Splitcoaststampers.com - the world's #1 papercrafting community
You're currently viewing Splitcoaststampers as a GUEST. We pride ourselves on being great hosts, but guests have limited access to some of our incredible artwork, our lively forums and other super cool features of the site! You can join our incredible papercrafting community at NO COST. So what are you waiting for?
I'd like to wish everyone celebrating Christmas today a wonderful day. And for those not celebrating, may it still be a good day for you all too. The TLC hostesses thank you all for your participation in the TLC challenge throughout this year!
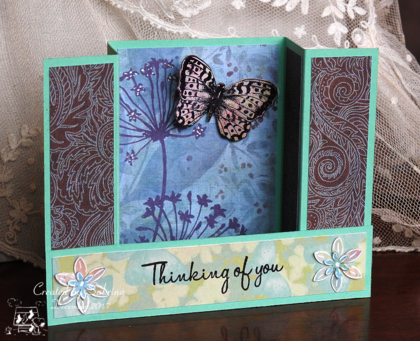
I have seen these cute little Bridge Cards popping up all over the place. Very quick to make - if you need any post-Christmas thank-yous, they will be perfect. And they're a great way of using up DP if you have some new pretty paper to play with, or want to use up some older patterns.
NOTE: in the video, she uses a shorter bridge, created from the offcut after trimming a 4 1/4" x 11" sheet down to 4 1/4" x 8. My examples both show a full bridge running across the entire width of the finished card. Which look you prefer is entirely your choice. Most cards I have seen use the latter, but this video version is more economical of your cardstock, letting you get two cards from one sheet.
Here are step by step photos with measurements in inches. Metric measurements are given below the photos, and there's also a pdf attached.
For metric measurements, cut your card base 10.5 cm high by 20cm wide.
Score at 2.5 cm, 5 cm, 15 cm and 17.5 cm.
Cut the long strip 3 cm high by 15 cm long.
Cut your matting layers accordingly.
As you can see from my sample below, it's perfectly possible to adjust the measurements to suit your project, but the above sizes fold to fit a standard US envelope for an A2 card, or a European C6 envelope.
Remember there's no deadline for uploading - play whenever you can. But comments are not guaranteed if you post in the New Year and don't leave a link here to say you've shared a card ;-).
I made mine a little bit deeper (the card is about 5 1/2" high, and folds to 7" flat, so it started out as 5 1/2" x 10", scored at 1 1/2", 3", 7" and 8 1/2". This made it deep enough to accommodate a tealight.
Remember to use the keyword TLC670 when you are uploading.
If you're not sure how to link your card on the thread here, here's how:
1. Open 2 windows or tabs: one window for your card and one for this thread. 2. In this thread, click on reply and type anything you want to show before the link. 3. Go to your card window. Highlight the address for your card. (It says www. splitcoaststampers.com/gallery/showphoto..... and so on) 4. Click EDIT. Click COPY 5. Go back to this thread. Click PASTE.
Late to the party, but I have just now re-established my craft area on the dining room table! It took forever to haul all of my stuff out of the spare room.
__________________ -----Liz "Make it your ambition to lead a quiet life, to mind your own business and to work with your hands, ..." ~~1 Thess. 4:11 (NIV)
I just can't stop making these Bridge Cards! :mrgreen: Here's one more for Valentine's Day!
__________________ -----Liz "Make it your ambition to lead a quiet life, to mind your own business and to work with your hands, ..." ~~1 Thess. 4:11 (NIV)