Splitcoaststampers.com - the world's #1 papercrafting community
You're currently viewing Splitcoaststampers as a GUEST. We pride ourselves on being great hosts, but guests have limited access to some of our incredible artwork, our lively forums and other super cool features of the site! You can join our incredible papercrafting community at NO COST. So what are you waiting for?
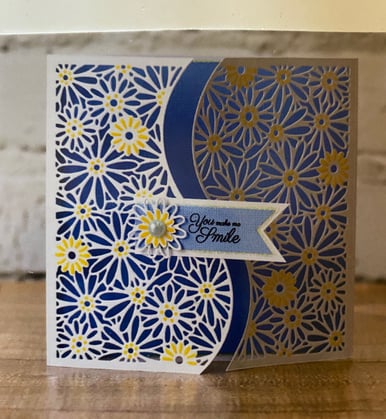
I have two dies that I'm not sure who made them so I can't look up instructions on them. The curved daisy one is really throwing me for a loop. I would love to make a card like the one in the picture with both sides die cut. Any help would be greatly appreciated
The Daisy one may very well be an older Tonic Studios one. I have something similar I got a couple years ago in one of their craft kits they sell. You might want to email them a photo.
__________________ "I have cats, but they don't smoke or associate with dogs...."
I don't know who makes the daisy one (Die'sire is a likely suspect), but the reason there are two pieces is so that you can use it without the curved line to cut the daisy pattern without cutting the edge. To cut the edge (like in the card you want to make), you would use the curved line so that it cuts the shape as well as the daisies. Since there are no "cut" edges on the other three sides, either, you can cut the panels for the card you want to make by cutting the base and one panel as one piece and the base and the other panel as one piece. They are identical, so you would just flip one over when you put them together, overlapping the base pieces. Clear as mud?
__________________ ~ Sue Happy for no reason...
Last edited by gregzgurl; 05-26-2020 at 06:20 PM..
Reason: typo
The Daisy one may very well be an older Tonic Studios one. I have something similar I got a couple years ago in one of their craft kits they sell. You might want to email them a photo.
Yes, I think those are both Crafter's Companion. I know the first one is. It's one of the Tesselating Dies. I find this one frustrating because the demo that Sara does in the HSN video doesn't work for all the dies in the set. You have to buy extra long cardstock, which I did. The cards do turn out beautifully, though.
I watched the video and you're correct it is the die I am talking about. Unfortunately, I couldn't tell how she put the two together to make them meet in the front middle. You mentioned you needed extra long card stock which I also purchased for this but can't for the life of me figure out exactly how to get the measurements right. Did you see it in another of her videos? where did you hear about the extra long CS? Thanks for all the responses though. If I don't figure it out the frustration will probably make me toss the die.:?
I watched the video and you're correct it is the die I am talking about. Unfortunately, I couldn't tell how she put the two together to make them meet in the front middle. You mentioned you needed extra long card stock which I also purchased for this but can't for the life of me figure out exactly how to get the measurements right. Did you see it in another of her videos? where did you hear about the extra long CS? Thanks for all the responses though. If I don't figure it out the frustration will probably make me toss the die.:?
Well, PJill, it went something like this. I got the dies and tried them out. The first one worked well. I measured the dies and figured out the correct measurements for the cardstock. When I tried to follow the same process for the other two, I couldn't get them to work. There was some very colorful language, some sweat and tears, and maybe a few deals with God. I ended up buying the long cardstock (legal size, 80 lb., 8 1/2 x 14) on Amazon.
I used my label maker to print out the correct sizes for the cardstock, and I stuck them on the magnet sheet where I store the dies. Here they are, so that you don't have to suffer the slings and arrows of outrageous fortune - but I digress:
Daisies (the one in your photo): 5.75 x 12 inches Butterflies: 5.75 x 14 Roses: 5.75 x 14
I hope these measurements work for you. I haven't used them in a while, but I think they all worked. Sorry if there are errors. It was an emotional roller-coaster ride.
Have fun! They really are beautiful when they work right.
Thank you!! I played last night until 2 AM and finally gave up with, like you said, lots of 'unusual' words. I did get the daisies to work--kind of. I had to run it through many times and finally used the small plates over the areas that just refused to cut. But then I had to poke out a number of tiny pieces that would put our national debt to shame!!! You should see my floor! Do you happen to remember if you scored the pieces before cutting or did you have to improvise when you tried folding them? Thank you for all your sweat and tears! You helped save me from the 'rubber room'.
Thank you!! I played last night until 2 AM and finally gave up with, like you said, lots of 'unusual' words. I did get the daisies to work--kind of. I had to run it through many times and finally used the small plates over the areas that just refused to cut. But then I had to poke out a number of tiny pieces that would put our national debt to shame!!! You should see my floor! Do you happen to remember if you scored the pieces before cutting or did you have to improvise when you tried folding them? Thank you for all your sweat and tears! You helped save me from the 'rubber room'.
I don't think I scored them before I cut. I believe I used a light pencil line to help with placement.
I don't know who makes the daisy one (Die'sire is a likely suspect), but the reason there are two pieces is so that you can use it without the curved line to cut the daisy pattern without cutting the edge. To cut the edge (like in the card you want to make), you would use the curved line so that it cuts the shape as well as the daisies. Since there are no "cut" edges on the other three sides, either, you can cut the panels for the card you want to make by cutting the base and one panel as one piece and the base and the other panel as one piece. They are identical, so you would just flip one over when you put them together, overlapping the base pieces. Clear as mud?
When I saw the die and the card that she wants to make, I also noticed that both sides are identical, but just flipped over. That's an interesting design and the flipping-over process wouldn't have been apparent to me before I watched a few videos that show these types of dies. Great way to get more use out of a shaped edge!
Karen