Splitcoaststampers.com - the world's #1 papercrafting community
You're currently viewing Splitcoaststampers as a GUEST. We pride ourselves on being great hosts, but guests have limited access to some of our incredible artwork, our lively forums and other super cool features of the site! You can join our incredible papercrafting community at NO COST. So what are you waiting for?
Update: So I think Angelnorths idea of Gilding Flake will give me the effect I am after. But gosh darn, that gold pen that AussieJenny posted also looks interesting.
I will probably also invest in the Spellbinder gilding tool in a few months, it's nice, it's less messy, and the foil is cheap.
So, I have been watching a ton of videos about adding metallic elements to cardstock and paper. But I am still not sure how I am going to go about this, or what I am going to use.
I want to be able to put shiny gold flourishes, borders, and frames on my boxes, but not using the embossing method.
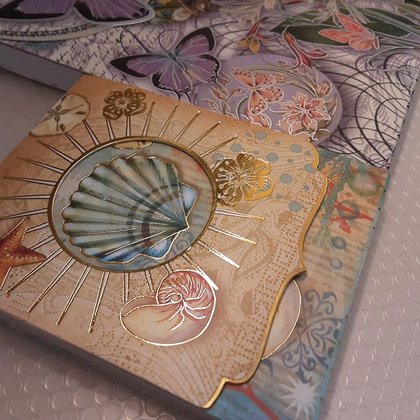
After something like this, which is hard to see in a photo, but I think it gets the point across. These are Punch Studio notepads, and the cardboard is heavily embellished with foil.
Got a laser writer printer, so I can in theory do foil that way, but that will not work because cutting such things would be nutz!
Have tried a gold ink pad, and am not super impressed - not very shiny, not great for super thin lines.
Curious to know what the rest of you are doing and would love suggestions. Thank you!
__________________ - Pandora
Really newbie 3d Crafter
Last edited by Indigo Blue; 04-26-2020 at 01:56 PM..
Metal flake (sometimes called gilding flake) might do the trick for you - I have Mega Flake by Indigo Blu and use their Flitter Glu with it. Their are other brands out there - Cosmic Shimmer is the only brandname popping in to my head right now, I’ll come back if my brain starts firing with others! You can also use something like a two way glue pen with it to draw freehand designs or make thin lines with a ruler, just let the glue go tacky and then add the flakes. The “scoochy foam” from Indigo Blu makes a big difference to the refinement of the finish, it really does scooch off even the tiniest of particles that aren’t directly stuck to the glue lines.
There are plenty of videos out there, this one from Joggles is probably a good intro, partly because she uses a stamp with fine outline so you can see how the process handles details.
Lots of the Indigo Blu tubs are variegated but Chariot of Fire is just gold and Sheffield Steel is just silver if you’re looking for mono options.
Metal flake (sometimes called gilding flake) might do the trick for you - I have Mega Flake by Indigo Blu and use their Flitter Glu with it. Their are other brands out there - Cosmic Shimmer is the only brandname popping in to my head right now, I’ll come back if my brain starts firing with others! You can also use something like a two way glue pen with it to draw freehand designs or make thin lines with a ruler, just let the glue go tacky and then add the flakes. The “scoochy foam” from Indigo Blu makes a big difference to the refinement of the finish, it really does scooch off even the tiniest of particles that aren’t directly stuck to the glue lines. There are plenty of videos out there, this one from Joggles is probably a good intro, partly because she uses a stamp with fine outline so you can see how the process handles details. Lots of the Indigo Blu tubs are variegated but Chariot of Fire is just gold and Sheffield Steel is just silver if you’re looking for mono options.
Thanks! I've watched some other gilding flake videos, and agree that this stuff is certainly a bit more "shiny"! Messy too, but no pain, no gain..heh.
Cosmic Shimmer is a spreadable liquid, right? Pretty sure I've seen videos about that stuff, and in fact, I have a jar, container, whatever, on order. Not for the same thing I posted this thread though.
In any case (btw my username and the product name made me giggle), I for sure will need to test a small jar of this stuff out and see how it does.
Question: What is a two-way glue pen? And, does Indigo Blu make one for using with gilding flake?
__________________ - Pandora
Really newbie 3d Crafter
Update: Apparently InigoBlu is a UK company, with a UK website. I'm in the US. I'd like to get the kit show in the video that @Angelnorth posted, but was not able to find one on any US sites (always out of stock). Since it was sold 3-4 years ago, it's possible I'll just have to make do with a DIY kit solution, no big.
Lots of US companies are doing gilding flakes, so I just got find a brand that has a true gold, or even maybe a "vintage gold". Very likely, this will be the foil solution I'll be using most often, though I am also looking at the Spellbinder Gilding device, just for giggles.
__________________ - Pandora
Really newbie 3d Crafter
Gilders Wax - there are several golds (and silvers). Fast forward to about 5:20 to see just the metallic application on cardstock. I stood at her booth at a Stamp and Scrapbook Expo for ages and returned the next day and to buy a bunch. Addictive and easy. A search turns up lots videos on line; this is who I learned from.
Thanks! I've watched some other gilding flake videos, and agree that this stuff is certainly a bit more "shiny"! Messy too, but no pain, no gain..heh.
Cosmic Shimmer is a spreadable liquid, right? Pretty sure I've seen videos about that stuff, and in fact, I have a jar, container, whatever, on order. Not for the same thing I posted this thread though.
In any case (btw my username and the product name made me giggle), I for sure will need to test a small jar of this stuff out and see how it does.
Question: What is a two-way glue pen? And, does Indigo Blu make one for using with gilding flake?
Yes, you certainly don’t want to sneeze when you have a jar of gilding flakes open!
Indigo Blu are indeed a UK company but there are stockists on your side of the Pond, Simon Says Stamp springs to mind but of course I don’t know what stock they have at the moment.
Cosmic Shimmer is a brand name, they do all sorts of products - everything from pearlised PVA glue to gilding wax and metal flakes.
Two way glue pen - something like Zig or Quickie would find it if you’re searching online. The glue comes out blue and when it’s wet it makes a permanent bond. When it dries it becomes clear and is like the adhesive on Post It notes. If you let it dry to that clear state though it works well with metal flake (it doesn’t rub off as you might think it would with a “temporary” adhesive). There are different sorts of nibs available in different pens.
Gilders Wax - there are several golds (and silvers). Fast forward to about 5:20 to see just the metallic application on cardstock. I stood at her booth at a Stamp and Scrapbook Expo for ages and returned the next day and to buy a bunch. Addictive and easy. A search turns up lots videos on line; this is who I learned from.
LOL. THAT is the video that has me all hot and bothered, and why I am slogging through that Spellbinders thread I posted. Dang it, I am going to bookmark that stupid thing right now.
Also, I can't believe you got see this in action. It's bloody amazing. Now this has actually got nothing to do with THIS thread (I think the gilding flake solution is the right one for the affect I am after, though that gold pen also looks interesting). But I have been trying to find that gild wax product and the video, so thanks!
__________________ - Pandora
Really newbie 3d Crafter
Last edited by Indigo Blue; 04-24-2020 at 07:55 AM..
Yes, you certainly don’t want to sneeze when you have a jar of gilding flakes open!
Indigo Blu are indeed a UK company but there are stockists on your side of the Pond, Simon Says Stamp springs to mind but of course I don’t know what stock they have at the moment.
Cosmic Shimmer is a brand name, they do all sorts of products - everything from pearlised PVA glue to gilding wax and metal flakes.
Two way glue pen - something like Zig or Quickie would find it if you’re searching online. The glue comes out blue and when it’s wet it makes a permanent bond. When it dries it becomes clear and is like the adhesive on Post It notes. If you let it dry to that clear state though it works well with metal flake (it doesn’t rub off as you might think it would with a “temporary” adhesive). There are different sorts of nibs available in different pens.
Those glue pens sound awesome! I've "smoochie" foam on order, and it looks like I will be ordering everything piecemeal. Next week I will have budget to place these other orders. Also, I've seen some Cosmic Shimmer videos. I watched a lot of "paint" videos a couple of weeks ago. It's a bit of a blur now.
I do hope this is what I'm looking for, because the only other option is the Spellbinder Gilding Add-on...which looks pretty cool, and the file is cheap..the dies though..as expensive as their normal ones.
__________________ - Pandora
Really newbie 3d Crafter
LOL. THAT is the video that has me all hot and bothered, and why I am slogging through that Spellbinders thread I posted. Dang it, I am going to bookmark that stupid thing right now. Also, I can't believe you got see this in action. It's bloody amazing. Now this has actually got nothing to do with THIS thread (I think the gilding flake solution is the right one for the affect I am after, though that gold pen also looks interesting). But I have been trying to find that gild wax product and the video, so thanks!
It’s very easy to use, not very messy - it’s not liquid and a little dab will do you. Just my fingertips want to be washed after using. The second day at the Expo I really didn’t look at anything else. Apologies for misinterpreting what you were looking for. I have gilding flakes and don’t like using them since barely breathing sends them flying - for me. YMMV. That means I’m full of hot air.
Gilders Wax - there are several golds (and silvers). Fast forward to about 5:20 to see just the metallic application on cardstock. I stood at her booth at a Stamp and Scrapbook Expo for ages and returned the next day and to buy a bunch. Addictive and easy. A search turns up lots videos on line; this is who I learned from.
Is there a difference between the Gilder's Polish (what was used first) and the Gilder's Paste? The moderator didn't show any of the Polish for sale in the video.
She was demoing gilders POLISH first with a blending sponge, and then gilders WAX over it lightly with her finger. Both were demo’ed.
For some reason which was which was confusing to me when I was there in person at an Expo! I was making it more complicated than it is. You apply the POLISH which dries super fast, then apply the WAX and then buff it a bit.
stamplistic.com has both in stock. I don’t know if they’re shipping now or not, but when I’ve needed help I’ve called and they were very nice - as they were at the show. But if you type “wax” in the search box the paste wax colors will load, and typing “polish” in the search box brings up the polish. Hope this helps.
Beth
Last edited by bjeans; 04-29-2020 at 12:28 PM..
Reason: Corrected the order of wax and polish!
She was demoing gilders wax first (also called paste wax) with a blending sponge, and then gilders polish over it lightly with her finger. Both were demo’ed.
For some reason which was which was confusing to me when I was there in person at an Expo! I was making it more complicated than it is. You apply the wax (paste), which dries super fast, then apply the polish and then buff it a bit.
stamplistic.com has both in stock. I don’t know if they’re shipping now or not, but when I’ve needed help I’ve called and they were very nice - as they were at the show. But if you type “wax” in the search box the paste wax colors will load, and typing “polish” in the search box brings up the polish. Hope this helps.
Beth
Wow! That seems just the opposite of what I got out of it. Seems like the polish was put on first and then the wax. I will go back and watch the video when I have the time. Thanks fr answering.
Wow! That seems just the opposite of what I got out of it. Seems like the polish was put on first and then the wax. I will go back and watch the video when I have the time. Thanks fr answering.
ditto! I got polish yesterday (on purpose, for something else). I still dont have a 3d embossing folder, but again, I'm buy supplies and trying to get all my ducks in a row.
__________________ - Pandora
Really newbie 3d Crafter
Wow! That seems just the opposite of what I got out of it. Seems like the polish was put on first and then the wax. I will go back and watch the video when I have the time. Thanks fr answering.
Jeanne, you’re absolutely right! I went back and corrected. I do that Every Single Time. In my weird brain, you polish after you wax - like for a car. But this is the opposite. Mea culpa for causing confusion. :shock: No hope for the doofusy (me).
Jeanne, you’re absolutely right! I went back and corrected. I do that Every Single Time. In my weird brain, you polish after you wax - like for a car. But this is the opposite. Mea culpa for causing confusion. :shock: No hope for the doofusy (me).
No worries. I do that kind of thing all the time, but I'm really old, so that's my excuse and I'm sticking to it! I agree with you about the names and process. Of course you wax first and then polish.
So, the polish and wax are two different products. Can anyone tell me what the difference is? Why do you need both to create the sample shown in the video?
Well it is a sales demonstration after all, so they show you all they've got! I thought the "polish" looked similar to a metallic alcohol ink, pretty liquid, it spread quickly and it dried up quickly as something that was solvent- or alcohol-based would. It would be interesting to know how it compares with the Ranger metallic ink. Sometimes craft companies like to give things special names to hide the fact that you can buy the same sort of thing from other companies...
I haven't seen this product but would expect gilder's wax to be a very thick creamy texture. Originally it was used to make wooden picture frames look gold and that sort of thing. It stays where it is put and doesn't flow, so you can use it to highlight specific areas of the item you are working on.
Last edited by AussieJenny; 04-30-2020 at 05:35 AM..
Reason: grammar
Well it is a sales demonstration after all, so they show you all they've got! I thought the "polish" looked similar to a metallic alcohol ink, pretty liquid, it spread quickly and it dried up quickly as something that was solvent- or alcohol-based would. It would be interesting to know how it compares with the Ranger metallic ink. Sometimes craft companies like to give things special names to hide the fact that you can buy the same sort of thing from other companies...
I haven't seen this product but would expect gilder's wax to be a very thick creamy texture. Originally it was used to make wooden picture frames look gold and that sort of thing. It stays where it is put and doesn't flow, so you can use it to highlight specific areas of the item you are working on.
OK, thank makes sense. Thanks so much. The glider's wax looks to be like a softer version of the metallic rub-ons from Craft-T Products that I've been using for years. They are not as smooth to apply, so I'm excited to try this new product as I'm running low on the colors I use a lot and they are difficult to apply.
Well it is a sales demonstration after all, so they show you all they've got! I thought the "polish" looked similar to a metallic alcohol ink, pretty liquid, it spread quickly and it dried up quickly as something that was solvent- or alcohol-based would. It would be interesting to know how it compares with the Ranger metallic ink. Sometimes craft companies like to give things special names to hide the fact that you can buy the same sort of thing from other companies...
I haven't seen this product but would expect gilder's wax to be a very thick creamy texture. Originally it was used to make wooden picture frames look gold and that sort of thing. It stays where it is put and doesn't flow, so you can use it to highlight specific areas of the item you are working on.
I have both products. A very small amount of the polish is used - in fact you scrape the applicator off back into the jar - and it dries almost instantly. It’s water based.
The wax is thick, as you say, and very rich. If it dries out because the lid is left off a couple drops of odorless mineral spirits revives it.
Using polish and wax gives a card - or anything - more depth. So does using multiple colors. (You can see the flatter look of cards done at the beginning of the video that only use one product.) It looks quite different than metallic alcohol ink to my eyes.
The name seems to be the same regardless of the industry or application - lots of videos out there. Stamplistic has the polish and wax in tons of colors. Besides the standard colors, the polish comes in an opal and a lustre. I only have standard colors since I like them more.
The pieces Kim made with colors any of us chose were stunning; the video doesn’t do the look justice.
Oh, you are such an enabler! Seems like playing with these would be a nice way to spend some isolation time. Thanks for the info. I didn't see the German Silver they used in the video on the site. I will have to look harder. I know Im going to have to make some hard decisions and not just say, "I want them all!"
Oh, you are such an enabler! Seems like playing with these would be a nice way to spend some isolation time. Thanks for the info. I didn't see the German Silver they used in the video on the site. I will have to look harder. I know Im going to have to make some hard decisions and not just say, "I want them all!"
Assuming they’re answering their phones or email, you could ask if they have any special deal if you buy X number, though that might have just been for the shows.
Assuming they’re answering their phones or email, you could ask if they have any special deal if you buy X number, though that might have just been for the shows.
You’re welcome/I’m sorry? I’ve lost my making mojo, but really have to make a card so your question has encouraged me to use these products, so thank you. I’ve never been able to get a decent photo that captures the depth and shine but will try again.
Well, being as frugal as I thought possible, I still ran up a $138.50 bill, so I must go back and rethink. I will watch more videos to see other ways to use the polish other than what they showed. Does it come with the applicator on the lid, or is that an add on? Looks like I might be able to paint with it. I know many things I can use the paste wax for. Good luck with your creating and glad I could help your mojo some!
Well, being as frugal as I thought possible, I still ran up a $138.50 bill, so I must go back and rethink. I will watch more videos to see other ways to use the polish other than what they showed. Does it come with the applicator on the lid, or is that an add on? Looks like I might be able to paint with it. I know many things I can use the paste wax for. Good luck with your creating and glad I could help your mojo some!
The polish has an applicator attached to it.
From Stamplistic’s website: “The pots have their own incorporated delivery system making them easy to apply to a variety of surfaces.�”
And here’s a video that shows the applicator really well. It’s from 2016 so there are lots more colors.
I played with Cosmic Shimmer Gilding Polish and gilders paste wax yesterday and think some of what I posted is confusing. To clarify, gilding polish or gilders wax can absolutely be used separately.
For example, gilders wax quickly, easily highlights raised embossing folder areas on cards and raised wood areas on frames, but also can cover metal or plastic objects completely, the plastic looking just like metal. Colors can be combined to give more depth or an aged or steampunk look.
For cards with raised areas, the pad (not tip) of the index finger with a tiny amount works well, or a foam applicator like goes on a Ranger blending tool, but used without the tool, folded so working only with a bit. (When I do that I inevitably get wax in unwanted places.)
Cosmic Shimmer Gilding Polish (in the glass jar with applicator) is made by a different company. It is creamier/gloppier and glides onto cardstock extremely easily and quickly. It can be used to color cardstock completely and can be mixed with other colors. It comes in opal (shifting between two colors!), lustre (sparkly) or regular.
What the video above showed was the two combined: gilding polish for the base and wax for highlighting. The wax on top of the polish gives tremendous depth. That is the difference.
Polish colors can be rich and bold - Kim showed me Christmas cards she made - or can make a card look aged.
There are many videos on line using one or the other. So far I’ve only seen the one by Stamplistic using them together, but haven’t looked for more.
Last edited by bjeans; 05-02-2020 at 05:49 AM..
Reason: Apostrophes turn into code!
Just to be an enabler, check out Craftasmic's website:
https://www.craftasmic.co.uk/
I don't know if they have what you want, but I can vouch for their service, speed in international shipping, and very, very reasonable shipping from the UK to the US. I have a nice big order coming from their latest sale, and shipping was 7.99 pounds, currently the exchange on that is $9.99. Get on their email list. I bought Pixie Powders in every color from them (like Color Bursts, but metallic!), also bought Opal Polishes from them. This is my favorite site for UK products. Try them sometime!!!<style></style>
I was going to look around on Craftasmic's website, but found your link is to Dover Publications..which, I think, is only one of the links you intended to share.
__________________ - Pandora
Really newbie 3d Crafter
I buy the Punch Studio Note Pads. I think the WRMK foil quill freestyle pen will give you similar look-
Some of the nail art girls are using hair glue to do their foil nail art-
If you are looking for a good source for flakes peek at the nail art ebay listings. If you don't want to do ebay several of the Nail Art YT girls have other resources. I buy a lot of my "craft" supplies in the nail art section. I can get the same amount for less price. Hope that helps.