Splitcoaststampers.com - the world's #1 papercrafting community
You're currently viewing Splitcoaststampers as a GUEST. We pride ourselves on being great hosts, but guests have limited access to some of our incredible artwork, our lively forums and other super cool features of the site! You can join our incredible papercrafting community at NO COST. So what are you waiting for?
It's my turn to feature a new (as in previously not featured in the TLC, not necessarily brand new!) technique this morning. I had something else lined up, written up and the initial backgrounds made, but then I thought that the last couple of challenges had called for supplies that maybe not all of us had, and I've subbed my original (don't worry, it will come around again some other time ;-)) idea with a VERY SIMPLE fold. Four scores and that's it...
Jacqueline featured it in the December 2016 VSN, and I cut out and scored the base, but that was as far as I ever got, it's always been at the back of my mind that I never finished it.
Here are her directions, and I'll add a couple of photos.
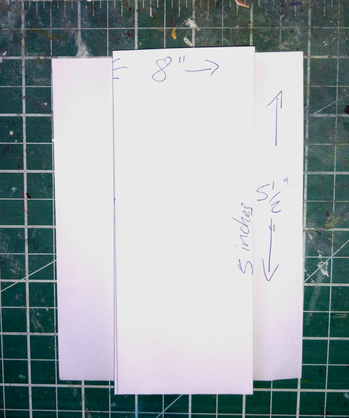
1: Start with an 8" x 5 1/2" piece of cardstock
2: Score on the long side at 2", 3", 5" and 6"
3: Mountain fold the 3" and the 5" lines and valley fold the 2" and 6" lines so the center panel pops outward.
As easy as one, two, three.
If using DSP to decorate cut the panels to: 1 3/4" x 5 1/4" each. If you mat the DSP panels, cut mat panels to: 1 7/8" x 5 3/8"
These measurements make a card which folds flat to measure 4" X 5 1/2, so it will fit in a regular A2 envelope.
I tried using a half sheet of cardstock, 8 1/2" x 51/2". I scored that at 2", 3", 5 1/2" and 6 1/2", and it folded flat to measure 4 1/2" x 5 1/2", so it was slightly larger than an A2 envelope, but if you make your own envelopes it's an option you could consider.
For metric measurements - cut a sheet of card in half to make two A6 pieces. Score at 5 and 7.5 cm from each end.
If you'd like some inspiration, check out the DEC16VSNP gallery, there are some great ideas.
Remember to use the keyword TLC793 when you are uploading. It's helpful if you come back and leave a link on this thread, especially in case you made a typo and people may not find your card.
If you're not sure how to link your card on the thread here, here's how:
1. Open 2 windows or tabs: one window for your card and one for this thread. 2. In this thread, click on reply and type anything you want to show before the link. 3. Go to your card window. Highlight the address for your card. (It says www. splitcoaststampers.com/gallery/showphoto..... and so on) 4. Click EDIT. Click COPY 5. Go back to this thread. Click PASTE.
such a nice challenge today for a very tired crafter. we just adopted a rescue kitty this weekend and she cried all night last night :( which guaranteed hubby and i did not sleep either. thx for the challenge!
I LOVE this technique! this is the 4th card I have made with this technique (cards 2 & 3 not uploaded). This was a special request from my mom to send to her aunt for her 104th birthday! Mom had specific requests - red roses, lacy or scalloped edges, and Happy Birthday on it! �. Took some work, but met all her requests!
Thanks for the cool technique and for looking at my card!
Hi, after a disastrous initial upload, the photo had a black line on it, which I had not seen, the re-load didn't work so had to delete and start over. Anyway, thank you for the challenge and here is my correct TLC793 - Live Love Laugh. And apologies for the upload approval crew that I didn't get to the photo before my initial submit. Thank you and thank you for looking.