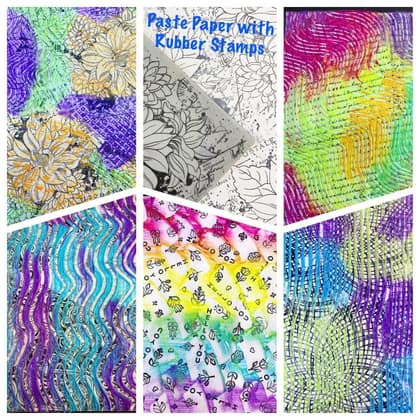
Title: Paste Not Waste
Host: Janelle S (a.k.a. dizzymommie)
Keyword: MIX332
For inspiration on this challenge see the MIX332
Gallery!
Hi, Mixers! This challenge was meant to be posted on June 7 and I had a mix-up on my calendar plus a lot of travelling that kept me from getting it up on time. On the positive side we have an extra challenge this week!
The challenge is to repurpose some partial or flawed stamping projects into beautiful background paper with the Paste Paper Technique. I'll share the paste and paper traditionally used later, first go for the technique with what you have on hand! Don't want to make the paste? If you have a gel plate, duplicate the pattern styles of paste papers with tools. If you have translucent water-based paint medium like Liquitex Gloss and Varnish Medium, add a few colors with just a 2-3 tablespoons of the medium. Create with what you have!
If you are familiar with bookbinding you may already know about paste paper. It's like glorified finger painting (cr: lilbookdinder) using a few rudimentary tools you probably already have around. It's simply starch paste mixed in with a liquid color medium.
Shiny to Matte finish depends on the starch used. On that scale you would use the following: corn starch, glycerine, methyl cellulose, rice starch paste, wheat starch paste, wall paper (credit: Lilibookbinder blog)
Make paste: Start with a slurry of 1:1 starch and water. Boil the rest of the water and then whisk together or use an electric blender. If it's too thick add more water a little at a time. If it's lumpy press through a fine sieve. (credit: Lilibookbinder blog)
Add colorant: The colorant can be food dye, fabric dye, acrylic paint, gouache, silk screen inks, calligraphy ink and block printing ink or powders (think of those old mica powders still sitting around!) (credit: Lilbookbinder blog, plus internet search)
Application and Design: Wet paper on both sides. It will curl so let it relax and flatten out before adding paste. Use a cheap flat paint brush to apply paste and then use combs, fingers, catalyst tools, etc., to create a design. Let dry and then use as you like.
Stamping on paste paper isn't recommended unless you want to experiment. The paper will be bumpy, warped and less porous than before so stamp ahead of time with waterproof ink and then continue with water-based mediums.
Here are some sample papers to spark ideas.
Have fun! When loading your projects to your gallery, add "
MIX332" as a keyword so we can see it in the gallery!


