Splitcoaststampers.com - the world's #1 papercrafting community
You're currently viewing Splitcoaststampers as a GUEST. We pride ourselves on being great hosts, but guests have limited access to some of our incredible artwork, our lively forums and other super cool features of the site! You can join our incredible papercrafting community at NO COST. So what are you waiting for?
I currently have a counter from homedepot with 3 file cabinets underneath that I have been satisified with. With the makeover of my scraproom, I was going with the jetmax cubes as it gives me more variations of storage. The problem is the counter won't sit on top of the cubes. The lip of the counter will prevent the top drawer from openning.
Has anybody used the inexpensive hollow core doors for desktops? I was thinking of those for several reasons:
1) no lip so don't have to worry about the top drawer being blocked.
2) squared edge so can but up against each other, even in an L shape.
3) no backsplash which is useless for me in a craft room.
I won't have anything real heavy on the top since I'll have so much storage under the doors with the Jetmax. Heaviest will probably be the Cricut and may my computer. I have a flatscreen iMac and they are very light.
I'm just not certain how sturdy it will end up being. But the cost is just so tempting.
__________________ Penny ~ Scrappin' Moments Blog Goals ~ Jan 2011 Double-Layouts 5/4 ~ Blog Posts 1/2 ~ Quilts 1/1 ~ 60/60 Shower Invites
I have lots of cubes. I purchased the white melanine (?) shelves from Lowe's for the counter top. They come 16 inches wide and up to 8 feet long and they will cut them to whatever size you want. I have my cubes out slightly from the wall so I can run cords behind them. It makes the 16 inch width perfect. There is no overhang. My "knee space" where I work is about 30 inches wide with no cubes underneath and the shelf is plenty sturdy for everything I do. Everywhere else there are cubes beneath. I have an electric bigshot and a tv among other things sitting on them and have never had a problem. On one section I have a couple of glass blocks supporting a narrower shelf for some extra storage. I've had the cubes for about 4 years now and they are quite sturdy.
I would think the door would be much wider than the cubes so you would either need to cut it narrower which probably wouldn't work or have the cubes set back pretty far from the edge.
I agree with the door comments Joy made...and would add that if it is a hollow core door, there is not much chance that it will always provide a level stamping surface. It would give too much.
You could always put legs on your counter to get it to the right height. My concern with placing a counter on the cubes is more the weight...I don't think the cubes would hold up to the weight of the counter anyway.
If you want to use the cubes for support, then I would go with Joy's idea of using 16 inch wide shelving from the lumber yard. You can get the white stuff...which will need to have the ends painted where they are cut. Or you can get unfinished ones and paint them to match...or go wild and have a contrast color!
I just got the counter planks that they sell at Michael's with the Cubes. I don't have them set up with the brackets that are supplied, just laid overtop of the cubes and it is working great for me. Here's a pic.
They are usually 29.99. I got the planks on sale for $14.99 there were two in the package.
I'm leaning towards the 16" shelving idea. My only concern is I am use to almost 30" depth between the counter and table I have.
But, the 16" would really free up a whole lot of space in my room (small 10x11 room). I mainly scrapbook and the page itself is 12x12. Anybody scrapbook with the setup with a narrow work area?
I'm hoping that with having most of the supplies under me in drawers/cubbies with the cubes, I won't need so much on top, therefore will not need the deeper space. Might just be something I need to get use to.
The next task will be to see if I can set up my computer on the new narrow space (I do on line video gaming
__________________ Penny ~ Scrappin' Moments Blog Goals ~ Jan 2011 Double-Layouts 5/4 ~ Blog Posts 1/2 ~ Quilts 1/1 ~ 60/60 Shower Invites
In my most recent re-org, I went from having a banquet table as my work surface, 8 feet long and 36 inches wide, to using one panel of a bi-fold door (about 7 feet long and 16 inches wide) set over two filing cabinets. I love the change. Instead of having tons of stuff stored under the back half of the table where I had to crawl under to get and rarely crawled back under to put away, I now have three bookcases behind me so I can just turn around and get what I need (and PUT IT AWAY!!). The narrower surface gives me plenty of place to work, even on a 12 X 12 scrapbook page, and the length of the space between the two filing cabinets is not wide enough that the door wants to bow in the center. We repurposed things that we already had in the house to make the worksurface (and luckily, the door was the same width as the filing cabinets) but cubes and a shelf would do the same thing.
I bought flat, backless white counter tops at Ikea. They are 24" deep like regular counters, they are the same thickness as regular counters (I can pound away on them with no worries), drawers open just fine, and they were cheap. $49 for an 8' run.
If you have an Ikea near you, you might want to check them out.
I use a door for my table and I LOVE it! We had a couple of undrilled birch veneer doors hanging around (our garage is known as "The Lowe's Auxillary Warehouse" ;) ), so I stained it and put 1,256 coats of polyurethane on it. OK, maybe just 5-6 coats...
It sits on two metal file cabinets. I may put a couple of pieces of wood between the tabletop and the cabinets to raise the height, though. Other than that, it is the best, most studiest work surface I've ever had. It sits in the middle of my 12x12 studio, so if I wanted to, I could have someone else over to play. I love having all that space to work on, too.
And my hubby laughed at me when I mentioned using a door as a table! ha! Turns out that we're going to be remodeling our kitchen so I'm going to use our current countertops and have him build shelves to set it on. Can't wait!
So far it seems the 16" x 8' shelving board will be the most cost effective. I'm in the process of buying the jetmax cubes. The cubes may be inexpensive, but when buying quanity it adds up.
I currently have 6 and will need at least 4 more to finsh off the one wall. I'm going to get the shelving soon (this weekend if weather premits) and hopefully that will work out great.
__________________ Penny ~ Scrappin' Moments Blog Goals ~ Jan 2011 Double-Layouts 5/4 ~ Blog Posts 1/2 ~ Quilts 1/1 ~ 60/60 Shower Invites
I bought a few pieces of 1X3 MDF (primed) and painted them white. my husband drilled some holes in the places where the pins from the Jetmax cubes go to stack them and we used the pins to secure the pieces of board in place on top of the cubes. This raises them enough to clear the lip of the countertop (I just moved my craft room a couple of weeks ago and got a new countertop and used the Jetmax cubes I already owned) You can't see the white pieces of MDF unless you get down to "eye level" with the countertop - they look fine though as they are white and we cut them to the same width as the cubes. NOTE: I actually have some painted birch plywood as the "legs" on my desk as well as braces on the wall behind the counter. I'm not relying on the cubes or the MDF strips as support for my countertop. I think the MDF cost me less than $4 CAD.
I'm adding a couple of pictures to show you that the 1X3 raises the coutertop enough for the jetmax cubes but is virtually invisible unless you kneel on the floor and look up under the countertop. (I'm hoping nobody actually does that!)
I used countertops with my jetmax as well. The home stores sell a build up kit of blocks that are used to put between the top of the cabinet and the underside of the counter to adjust for the lip when you have drawers. they worked great for the jetmax. My husband used 2x4 to create a ledger board along the wall attached to the studs, and the counters rest on this for support, and he attached the counter to that with brackets. the counter then rests on the cubes, which I have placed at the front edge of the counter - this leaves an approximate 10 inch gap from the wall to the back of the cubes, and my husband made a door to hide the gap where it showed in the room creating a little cubby hole hiding place for me to store larger items (and look more finished on the end). I am really happy with the way mine turned out!
I used countertops with my jetmax as well. The home stores sell a build up kit of blocks that are used to put between the top of the cabinet and the underside of the counter to adjust for the lip when you have drawers. they worked great for the jetmax. My husband used 2x4 to create a ledger board along the wall attached to the studs, and the counters rest on this for support, and he attached the counter to that with brackets. the counter then rests on the cubes, which I have placed at the front edge of the counter - this leaves an approximate 10 inch gap from the wall to the back of the cubes, and my husband made a door to hide the gap where it showed in the room creating a little cubby hole hiding place for me to store larger items (and look more finished on the end). I am really happy with the way mine turned out!
Hi Kristine~
Sounds like you've worked out a great solution! Is there any chance you could post a pic of how your DH did the door thing? I'm having a hard time visualizing that aspect. Thanks so much, in advance, if you can. I ♥ the more finished look you've described.
ETA: What "larger" things are you hidin' in there? ;)
I'd like to see the door too as I have 2 of the same hidey-hole behind my units! (one has electrical cords behind it but I'd still like to see the door...)
I am using the blocks as well and I didn't want to pay what a counter top would cost. The solution I came up with is taking a little work but I am happy with the results. At Home Depot they had a sheet of 4x8ft ply wood 3/4 inch thick for around $9 for the sheet. You can have them cut to the size that will fit your space.
I had them cut the top to the size I wanted by cutting 8 inch strips at a time. I will use the scrap to make shelves or a simple bookcase. The work is in the staining and I will put a couple coats of laquer when the weather is warmer.
I have 8 cubes under the table 2 on each side of my chair and 2 on the other side of table to stabilize. If I want I can have have 3 others over to crop with me. I love how it is working out. And I have cubes behind me, so I can reach everything except my stamps and my cricut. Really, they arn't that far away either. I have been collecting the blocks for about 4 years now and they are working well for me.
I'm in the process of doing something similar. Instead of Jetmax cubes, I'm using two of the 9-cube storage units (ClosetMaid possibly) for supports. I turned the cubes so that the openings face to the outsides of the desk area. These cubes are 36" deep put this way. So my DH got a 23.25" deep melamine shelf and a 11.25" deep shelf and glued/screwed them together. We then laid this on top of the cubes. Viola, a 6' by almost 3' desktop that is at counter-height so that I can stand or sit! I love handy men! ;)
__________________ Mindy
Full time working Mom to five-year old Tobias and two and-a-half-year old Amelia!
Sounds like you've worked out a great solution! Is there any chance you could post a pic of how your DH did the door thing? I'm having a hard time visualizing that aspect. Thanks so much, in advance, if you can. I ♥ the more finished look you've described.
ETA: What "larger" things are you hidin' in there? ;)
I will try to get some photos this weekend. I will post back here (hopefully tomorrow I will get a chance) to show you.
I hide my trash can behind one door, and on the other side it is a large cutting area so I have a big space and we improvised this really cool (to me) rolling embellishment cart so that I can hang my embellishments and thickers, bling, etc but keep them neatly tucked away until I need them. hard to explain, but having a door to slide (or roll) things out of the way is a great choice for me!
So far it seems the 16" x 8' shelving board will be the most cost effective. I'm in the process of buying the jetmax cubes. The cubes may be inexpensive, but when buying quanity it adds up.
I currently have 6 and will need at least 4 more to finsh off the one wall. I'm going to get the shelving soon (this weekend if weather premits) and hopefully that will work out great.
I don't think I'd spend anymore money if I didn't have to, but I'm kinda cheap. :rolleyes: I think I'd look around and find a couple 2x4s and lay them between the counter topr and the cabinets. Depending on the size of the 2x4s which way I would turn the 2x4s, if they are long I'd run them longways and if they're shorter I'd run them front to back. I always seem to have scraps of wood just lying around.
I will try to get some photos this weekend. I will post back here (hopefully tomorrow I will get a chance) to show you.
I hide my trash can behind one door, and on the other side it is a large cutting area so I have a big space and we improvised this really cool (to me) rolling embellishment cart so that I can hang my embellishments and thickers, bling, etc but keep them neatly tucked away until I need them. hard to explain, but having a door to slide (or roll) things out of the way is a great choice for me!
Thanks, Kristine!
I'm looking forward to seeing your set-up...it sounds cool & efficient.
Location: prolly in my 'rubber room'... in the mid-west
Posts: 11,531
Likes: 0
Received 0 Likes
on
0 Posts
i have a hollow core door as my desk top and am very happy with it!
i have another on top of a VERY LARGE shelving unit that i use for a work table for other large projects or for a couple friends when they come over to 'play'
i hope you find what will work best for you! happy stamping!
I use to use a door sitting on saw horses and loved it, when I had to make room for my husband (after we were married I had to share) I changed to a counter top. When we built my scrapbook room we got a nicer counter top and I now have an 12 foot run that is held up by two cabinets at the ends and 6 jetmax cubes in the middle. I just put a couple of boards on top of the cubes to make it the same height as the cabinets. I can open the top drawers and it has been that way for over a year and a half and there has not been a problem yet from the weight and I have a lot on top. HTH!
__________________ ___________________________________________
Scrapiegirl
I'm not messy, I'm creative!!!!
Mindy I would love to see a picture, as I have the closetmaid cubes.
Also where do you all by the jetmax drawers, and about how much are they? Do they sell them one drawer by itself or as a set?
I'm looking forward to seeing your set-up...it sounds cool & efficient.
I haven't forgotten about this...I had a crazy weekend and by the time I had time to try to take pics it was dark both days and I couldn't get a shot that was decent. hopefully I will get home in daylight one day soon so I can hurry things along...sorry!
I got the 16" wide shelving at Lowes. I bought an 8' and 3' piece and made it go wall to wall. I'm very happy with how it turned out. I still need to get two more jetmax cubes to fill the one spot on the left side.
Then I'm off to do the same with the other wall, about another 10' added with jetmax cubes.
In Michaels in the scrapbooking section is a very limited selection of different style cubes. My daughter-in-law was wondering around and found a very large selection opposite end of the store. I was like a kid on Christmas morning.
Love the drawer dividers!
The shelving is working very well, very sturdy! It's a little skinny from what I am use to, but once I have my room set with all the storage under the top it will work out fine.
__________________ Penny ~ Scrappin' Moments Blog Goals ~ Jan 2011 Double-Layouts 5/4 ~ Blog Posts 1/2 ~ Quilts 1/1 ~ 60/60 Shower Invites
Are the jetmax cubes the ones that are $29.99? I started to get some of those when they were on sale 50% off. I was going to get the desk top pieces too but they seemed too narrow. I would like to have something deeper to work on. It looks really good how you have yours put together. My craft room is probably a 12x12. I have a corner computer desk right now. It's great for storage, has plenty of shelves, but not much work space.
Are the jetmax cubes the ones that are $29.99? I started to get some of those when they were on sale 50% off. I was going to get the desk top pieces too but they seemed too narrow. I would like to have something deeper to work on. It looks really good how you have yours put together. My craft room is probably a 12x12. I have a corner computer desk right now. It's great for storage, has plenty of shelves, but not much work space.
The cubes are 29.99. You can use coupons on them and they often are on sale. But it seems better for them not to be on sale and use a coupon. I ended up paying 20.99 for most of mine (sale 30% off) and a few from Target at 23.99. The desk top they have is 3 foot long and 14.5 inches wide, comes in a pack of 2. So that is 29.99 for a total length of 6 feet. You have to 'mount' the desktop between two cubes.
I opted for going to Lowes and buying a 8 foot long shelving board, 16" wide for a cost of $20 (and some change). I then bought a 3 foot piece for $10 and cut off the excess. I ended up spending a total of $30 for a 10 foot long board that I just lay on top of the cubes, no mounting.
I like it this way because I can now rearrange the cubes to my liking at any time. If the desktop was mounted between two cubes, that would require unmounting desktop, rearranging cubes, remounting.
ScrappinMoments...thanks for the info and the link to the shelving board. I think that's what I'm going to go with. Dh bought me a couple of the short white bookshelves for Valentine's Day and told me that it was a start to my craft room. He wanted to get some other storage units but we don't have any craft stores around here. So anyway, I showed him the link to the shelving board and he said he'd pick that up for me this week when he goes to Lowe's to get material for our kitchen cabinets. Then when I can make it to one of the craft stores, I'm going to pick up some of the JetMax cubes/drawers. I like the idea of not mounting the desk top so that you can rearrange things if you want to.
I was going to use the kitchen table that I'll be taking out of my kitchen but it would take up too much room. Then I had thought about using the counter top that we'll be taking out but the biggest straight piece is only about 4 foot long. I can't wait to get started with organizing my room.
I'm heading out again today to Michaels (its about 45 minutes) to use some coupons. Going to pick up some more Jetmax cubes and the Making Memories wall organizer.
Will be going back again on Monday for more Jetmax cubes (with the new 50% off coupon).
Can't wait until I get my other wall done.
__________________ Penny ~ Scrappin' Moments Blog Goals ~ Jan 2011 Double-Layouts 5/4 ~ Blog Posts 1/2 ~ Quilts 1/1 ~ 60/60 Shower Invites
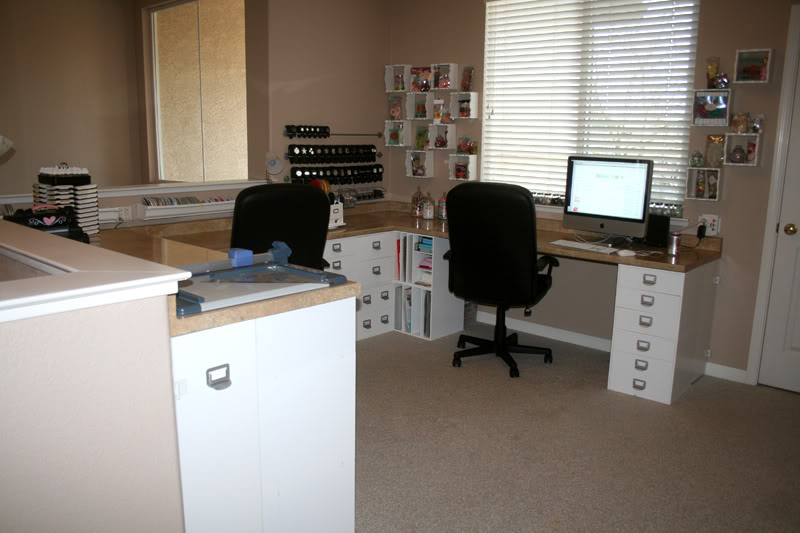
Okay, so it has only been a week since I said I would do it, but I finally took some pics of my new scrap space using jetmax cubes and countertops, and the way my DH made doors on the sides to "finish" the ends. It was an interesting effort since I scrap/ stamp in a loft, so designin a room with no walls was a challenge. I do have one wall, I have cubes on the wall, didn't photo that one yet, still need a few more cubes to finish it up...anyway...
This is the view of my scrap room -
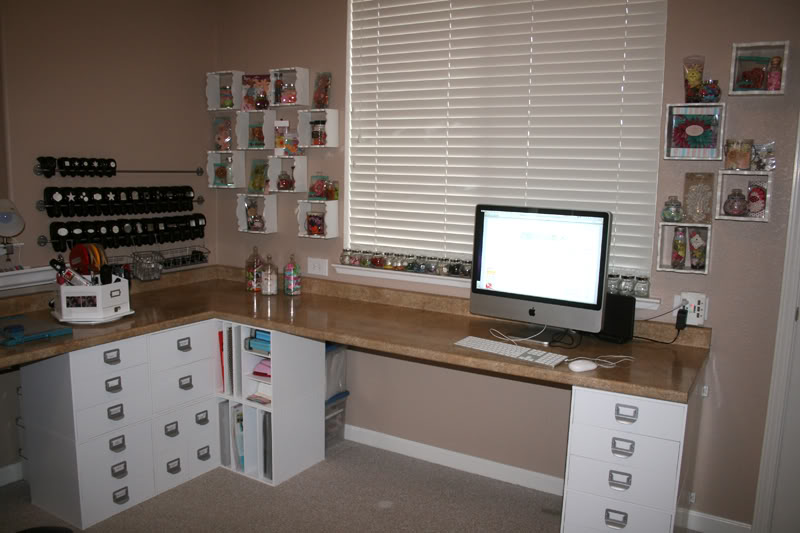
Here is a closer view of my computer area, workspace and some of my goodies (buttons, punches, primas etc.) As you can see the jetmax are the base of my desk space and I have the countertops (from home depot) in an L shaped work space. The boxes under the desk are temporary, still working on finding homes for everything!
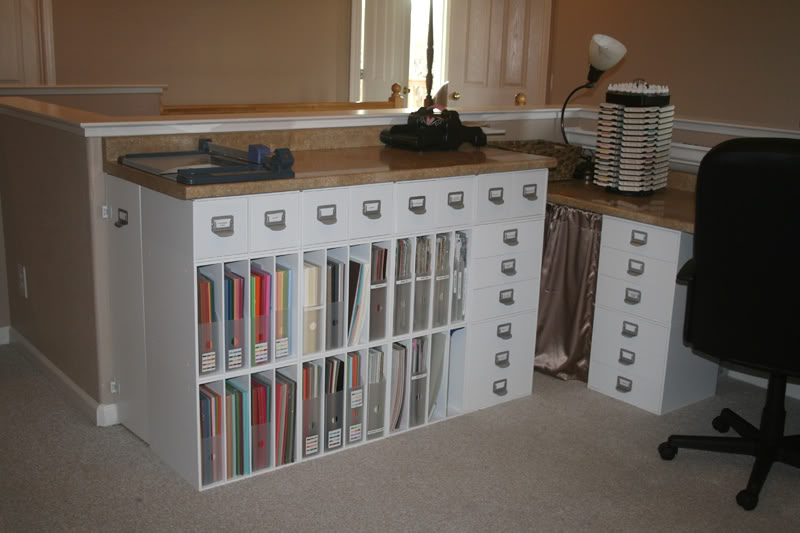
This area we raised up for a standing height work space for cutting. I LOVE IT! I have tons of storage for paper, die cuts etc. We did this by cutting 2 jetmax cubes in half for the extra 6 inches that we needed to raise the workspace under the counter top.
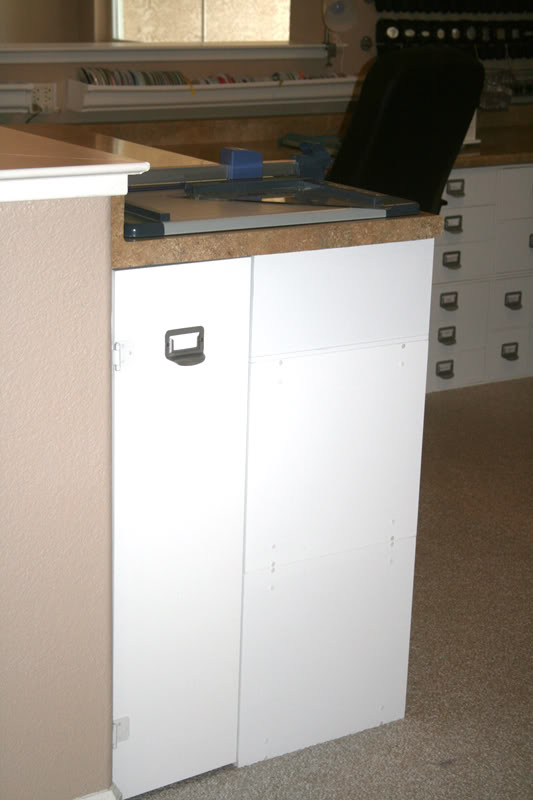
This is the close up of the "door" that my husband created on the side of the cubes between the cube and the wall. I added a handle to match the jetmax. It finishes the look, and is a great hiding place!
ANd this is what I have hiding in my hiding place. We made this embellishment cart that fits perfectly in my little space to tuck away all of my embellies so I can pull them out and sift through them easily when I want them, but they neatly tuck away out of sight. I love it. We used the base from a broken craft table that was on the way to goodwill, DH took it apart and used the table top for other projects, and we used the base on wheels, added curtain rods in the center and rings/ clips to attach embellies and wallah - rolling embellie cart! It aint pretty, but I love it!
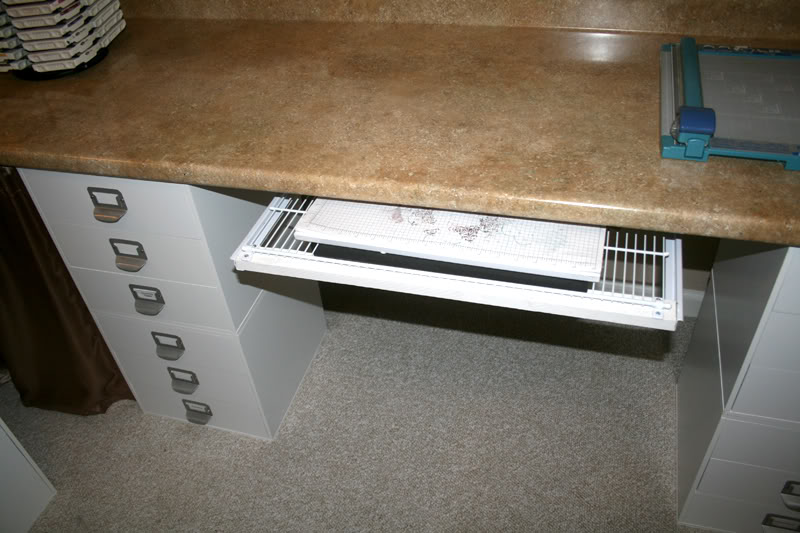
Then finally I thought I would share this idea for organization also. I like my room to stay tidy, mostly since it is a common area and I can't exactly close the door. I had DH add a sliding shelf under my workspace so when I am done working I can put it out of sight. We used undermount drawer and a 16 X 24 (had to cut it to this size) wire shelf. It slides all the way under the desk when not in use so you don't see it, I just pull it out to put my work in progress on it when I want to clear the work area (and pretend to be neat)
I used the melamine board that you can buy at Home Depot...it sits on top of two cubes on one side and a rolling plastic cart on the other side. Works perfect---has a ton of stuff on it, the only thing my DH did was shim the rolling cart with a piece of plywood---more to make it the same height as the cubes, but also helps a little with weight(at least that is what he said!) I have a mish mash of tables in my room, no wall space to sspeak of, mostly windows, so, none of my tables are the same height, but it works for me!
Wow, Kristine! Your space is fabulous! I love the door your dh made and the pull out embellishment cart. What an awesome idea! I like the little white shelves on the wall too. And what kind of jars do you have sitting in the window? So cool!
Wow, Kristine! Your space is fabulous! I love the door your dh made and the pull out embellishment cart. What an awesome idea! I like the little white shelves on the wall too. And what kind of jars do you have sitting in the window? So cool!
The jars are spice jars from Ikea - i still have 10 more to fill so I got some button shopping to do!