In the Forums

Register

Today's Posts

Search

Get the Weekly
Inkling
newsletter


Previous Issues

Splitcoaststampers's privacy policy

Get Social

Splitcoaststampers on InstagramLike Splitcoaststampers on FacebookFollow Splitcoaststampers on TwitterPit Splitcoaststampers on Pinterest

Sponsored Ads


Splitcoaststampers.com - the world's #1 papercrafting community
You're currently viewing Splitcoaststampers as a GUEST. We pride ourselves on being great hosts, but guests have limited access to some of our incredible artwork, our lively forums and other super cool features of the site! You can join our incredible papercrafting community at NO COST. So what are you waiting for?

Join the party at Splitcoaststampers today!

Reply
Thread Tools Search this Thread
Old 01-25-2017, 04:39 PM   #1  
Stazon Splitcoast
 
gregzgurl's Avatar
 
Join Date: Apr 2006
Location: Las Vegas, baby!
Posts: 14,931
Received 291 Likes on 115 Posts
Default Pegboard/Bygel hack and stamp storage overhaul

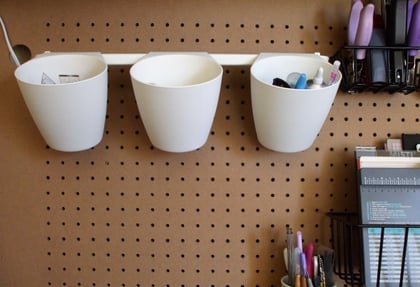
I've been at it - again! There was a request on another thread for me to post my "new" system when it was done, and I finally got a handle on that. I also needed to come up with a way to hang the cups that are designed for the Bygel rod without the rod. I bought them to go on my Raskog cart, but didn't like them there.

Here's what I did:

I'm sorry to drive traffic to my blog (that's SO not me!), but there's too much to say it all here, so if you want to see what's what, go HERE. Full low-down on the above is there for your viewing...

Edited to add: Yes, I am aware that there are slots on the cups that would allow them to be screwed directly to the pegboard without the rod. I prefer this way because a) I like that the cups are tilted out so that I can see - and grab - the things in them more easily, and b) I have other ideas for the rod, as well...

Photos of the stamp revamp:


More info and instructions to make the dividers on the same post on my blog that's linked above...
__________________
~ Sue
Happy for no reason...


Last edited by gregzgurl; 01-26-2017 at 07:26 AM.. Reason: add photos and a bit more info...
gregzgurl is online now  
Tweet this Post! Share on Facebook Reddit!! Pin on Pinterest! Share on Google+!
Reply With Quote Likes
Old 01-25-2017, 04:57 PM   #2  
Kookie Creator
 
bettyjoanes's Avatar
 
Join Date: Oct 2007
Location: Alberta
Posts: 418
Received 2 Likes on 2 Posts
Default

That looks totally workable to me! Thanks for the directions for the folders, i need a bunch of them!
bettyjoanes is offline  
Tweet this Post! Share on Facebook Reddit!! Pin on Pinterest! Share on Google+!
Reply With Quote Likes
Old 01-26-2017, 06:28 AM   #3  
Pearl-ExPert
 
Brenda71's Avatar
 
Join Date: Jan 2006
Location: SW Iowa
Posts: 2,697
Received 2 Likes on 2 Posts
Default

Looks great Sue!! TFS
__________________
Happy Stampin'!!
Brenda
My Blog
My Stampin' Up! site

Brenda71 is offline  
Tweet this Post! Share on Facebook Reddit!! Pin on Pinterest! Share on Google+!
Reply With Quote Likes
Old 01-30-2017, 10:49 AM   #4  
Splitcoast Dirty Dozen
Splitcoast Challenge Hostess
 
Covington Crafter's Avatar
 
Join Date: Mar 2011
Location: Covington, WA
Posts: 32,470
Received 32 Likes on 12 Posts
Default

Marvelous idea to use the curtain rods on pegboard. You've got me eyeing my room for a place to hang that pegboard!!
__________________
Carla ~ Proud Fan Club Member and Dirty Dozen Alumni.
Covington Crafter is offline  
Tweet this Post! Share on Facebook Reddit!! Pin on Pinterest! Share on Google+!
Reply With Quote Likes
Reply


Posting Rules
You may post new threads
You may post replies
You may post attachments
You may edit your posts

BB code is On
Smilies are On
[IMG] code is On
HTML code is On
Trackbacks are Off
Pingbacks are Off
Refbacks are Off