Splitcoaststampers.com - the world's #1 papercrafting community
You're currently viewing Splitcoaststampers as a GUEST. We pride ourselves on being great hosts, but guests have limited access to some of our incredible artwork, our lively forums and other super cool features of the site! You can join our incredible papercrafting community at NO COST. So what are you waiting for?
Got in a sampler pack of 9 Angelina Films, and tried it out for the first time on an embellishment.
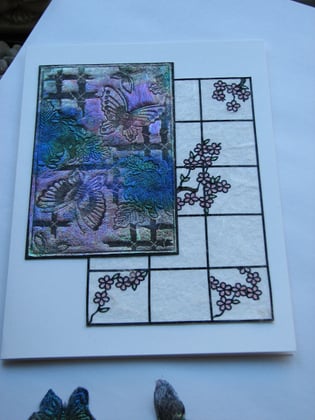
I'm going to try stamping a card with text and placing it behind the embellishment as I think the words will look nice behind the angelina. Thoughts? Open to other ideas still.
Also looking for mini-hinges to make this piece flip open to access the card and messages behind.
Here's how it's coming along so far:
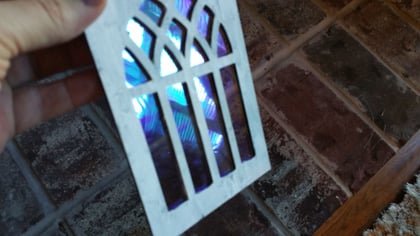
Painted with some crackle medium:
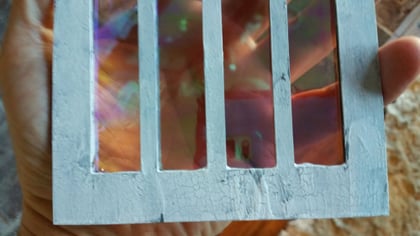
Before applying heat, here it's glued to the back of the chipboard:
After applying heat. The film pulled taut and looks like stained glass IMO
Do you know you can also use it with Rubber Stamps and Staz-on ink? Coat the stamp with the ink, lay film on top. Cover with baking parchment, then heat with an iron for about 15 seconds. Check the image, if it's not fused fully, reapply the iron. Peel off the image and trim. I've only ever done this with real rubber stamps, not sure how clear stamps would stand up to the heat.
You can also buy it as bags of fibres- very hair like- and use the same way.
That's pretty amazing! So if I'm hearing this right, then the film stays on the stamp while you iron it? Most of my stamps are clear, but I have a few rubber.
Do you know what setting you used? Would be open to trying it, but just want to make sure I don't melt these things! lol Thanks! Your panel looks great BTW!
Only use heat on rubber stamps, you can heat them with no problem. I've done embossed velvet and Angelina/Fantasy fiber/film techniques. There are lots of videos on You tube.
I was going to recommend the faux glass too, great fun
...Also I have in fact used the ironing technique, with care, on photopolymer stamps and had no problems. Quite a low setting is sufficient to fuse the layers of film.
You can also cut (or cut stamped designs) shapes out and give them a blast with a heatgun so that they wrinkle and distort. If you're careful not to burn yourself you can somewhat control the final shape. Check out the leaves, for example, on some of these cards: Fantasy film - Homemade Cards, Rubber Stamp Art, & Paper Crafts - Splitcoaststampers.com
Used about the middle setting on my iron, and had no problems. The ironing is only for a matter of seconds. Good to hear from Cook22 that it works on photopolymer stamps too. Guessing you just have to be sure they are photopolymer, which in my experience are harder, than the cheaper more squishy acrylic ones. Yes, the film is sat on the stamp, and you iron over the baking parchment. Make sure none of the film/fibres are sticking out beyond the parchment as it will stick to your iron. You can guess how I know that. I just bought a cheap iron I keep in my craft room, fortunately. Also, I have read that you can use basic wax crayons with an iron to do encaustic wax type work. Apparently, a cheap non steam travel iron works just as well for this as a 'proper' craft iron.
On the mini hinges, I think the ones Tim Holtz used to do are discontinued, but check eBay if you still have time to order, and something like this might work for you...Small Hinges | eBay.
If not, you could even just have two little strips of something pliable like grunge paper, and make like old-fashioned leather hinges, with brads for fastenings. You'd probably use brads in real hinges too. If you went with strips, you could even cut slits and thread them through the base, securing them firmly at the back. Then you'd just have two or three brads on the window frame.