In the Forums

Register

Today's Posts

Search

Get the Weekly
Inkling
newsletter


Previous Issues

Splitcoaststampers's privacy policy

Get Social

Splitcoaststampers on InstagramLike Splitcoaststampers on FacebookFollow Splitcoaststampers on TwitterPit Splitcoaststampers on Pinterest

Sponsored Ads


Splitcoaststampers.com - the world's #1 papercrafting community
You're currently viewing Splitcoaststampers as a GUEST. We pride ourselves on being great hosts, but guests have limited access to some of our incredible artwork, our lively forums and other super cool features of the site! You can join our incredible papercrafting community at NO COST. So what are you waiting for?

Join the party at Splitcoaststampers today!

Reply
Thread Tools Search this Thread
Old 07-14-2020, 12:15 PM   #1  
Rubber Obsessor
 
emck's Avatar
 
Join Date: Aug 2014
Location: Adelaide, Australia
Posts: 167
Likes: 0
Received 0 Likes on 0 Posts
Default Stair card with extra part

Hi i am trying to make a stair crd im using a spellbinders did it makes the stairs for you and i think its called happy days

So this isastair card where it looks like actual stairs i think itd be vertical

My question is ive seen some cards with a extra panel on the left giving a lot more room to decorate the card but its not part of the die and i have no idea how to add it on?

Being US sized i think the card ends up A2 sized so im assuming you would add a 4.25 x 5.5 inch rectangle perhaps adding half a inch make a flap score it and add it on and then put a layer over the top to hide the flap

Would that work?

I have no idea what its called ice just seen cards on a blog that say theyve use happydays buttheyve added a lanel - theyee very clever because even from the photos i cannot work out how they did it!

Its for a baby card for my niece i know i can just do it as its meant but i would love to know how to add the panel ithas a card front then the insude left the stair part and the die comes with layers ive got enough stuff to put on all of that i just need to know how to add the left panel i will measure card closed and work the size out that way

Greatful for your help

Oh and does anyone know if this type of card has a name other than stair step wutg a extra panel?

Thanks!
emck is offline  
Tweet this Post! Share on Facebook Reddit!! Pin on Pinterest! Share on Google+!
Reply With Quote Likes
Old 07-14-2020, 06:19 PM   #2  
Splitcoast Dirty Dozen
Splitcoast Challenge Hostess
 
Covington Crafter's Avatar
 
Join Date: Mar 2011
Location: Covington, WA
Posts: 32,470
Received 32 Likes on 12 Posts
Default

Here's a link to the Side Step Card Tutorial. It may be what you're looking for.
__________________
Carla ~ Proud Fan Club Member and Dirty Dozen Alumni.
Covington Crafter is offline  
Tweet this Post! Share on Facebook Reddit!! Pin on Pinterest! Share on Google+!
Reply With Quote Likes
Old 07-15-2020, 12:31 AM   #3  
Rubber Obsessor
 
emck's Avatar
 
Join Date: Aug 2014
Location: Adelaide, Australia
Posts: 167
Likes: 0
Received 0 Likes on 0 Posts
Default

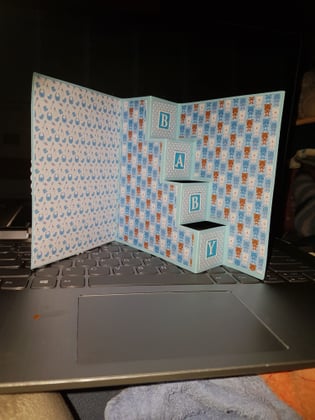
no actually this kind of card goes the other way around so the stairs look like actual stairs i think called vertical stair step card something like that.

this is the die and this is where i saw the card a picture of what i am meaning from someones blog
this is what the die does normally
https://images.app.goo.gl/Vd8YZRwyHLTxT82aA


and this is the same thing what i am trying to do is add a panel to the left of the card


i cannot find an exact link but the Second card down the first is what the die normally does the second card (think it may use a different die but there are other cards where the person has used the happy days die and added a panel


StampOwl's Studio: Search results for vertical stair step card

i cant think of another way to explain it! other than showing the picture.

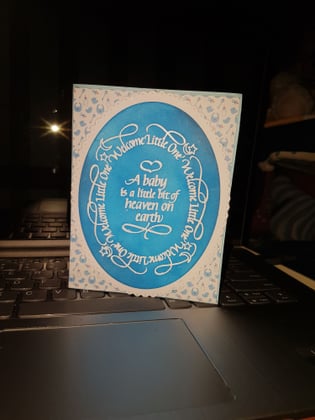
but basically this happy days die does what is shown in the first card and the one above as well but i wish to add a panel to the left which then creates a card "front" when you take it out the envelope it would look normal card but when you ppen it its not normal at all!

i do get vertical and horizontal mixed up but assuming vertical is going up the stairs and the side step card is horizontally....

i hope that makes sense?

I already have this happy days die i just want to alter it or what it eventually creates
emck is offline  
Tweet this Post! Share on Facebook Reddit!! Pin on Pinterest! Share on Google+!
Reply With Quote Likes
Old 07-15-2020, 12:53 AM   #4  
Splitcoast Dirty Dozen Alumni
SCS Gallery Moderator
Splitcoast Challenge Hostess
Teapot Tuesday TEAm
 
Cook22's Avatar
 
Join Date: Jul 2007
Location: Dublin, Ireland
Posts: 131,397
Received 1,055 Likes on 813 Posts
Default

The second card on France's blog uses a different die, which seems, from what I can find, to cut the entire piece with an extension which could be folded. But I'm not sure, it's hard to tell. It might be possible, with some very careful partial die-cutting, to cut the SB one into a sheet of card leaving a card-front sized margin on the left which you could score and fold over. But unless you have large cardstock, I think the easiest option would simply be to cut a piece the size of a card-front with a little margin along the edge for a tab, and stick it on, with the tab along the back of the card - well burnish the crease first. Or else create a card just ¼" wider and taller than the step element, and use the step as an insert.
__________________
Sabrina Monday is Technique Time: TLC challenge forum There's a TEA party every Tuesday Thursday is Ways To Use It: WT challenge forum SU Gallery Index project
Cook22 is offline  
Tweet this Post! Share on Facebook Reddit!! Pin on Pinterest! Share on Google+!
Reply With Quote Likes
Old 07-15-2020, 05:29 PM   #5  
Rubber Obsessor
 
emck's Avatar
 
Join Date: Aug 2014
Location: Adelaide, Australia
Posts: 167
Likes: 0
Received 0 Likes on 0 Posts
Default

Yeah i know this one is a diff die bur somewhere on her blog she uses the SB die i have to do that exact thing thats what i thought make a tab so make it 4.5 x 5.5 and use the 1/4 inch more to make the crease i didnt know if that would work! I think in the post with the other die she actually wrote so excired this actually has the extra part here already or something like that i just already have this die and i actually do have extra larte paper atm that would work bur partial die cutting not always the easiest thing to do! So i think i like the tab idea better!!

Divinitt designs same conoant wmake the die in the post they make a half shutter card and i never realise but it needs more than 12 x 12 inches to cur it i wish it said that on the packer bur it doesnt! My macgine is big but i dont have the long plates so we had to cut it in two goes!

So thats why i have these ginormous pieces of cardstock waa impressed cos only $2 a sheet and it was i think 220gsm (between 80 and 100 pound perfecr for cardbase)
I intend to get some more in different colours! I jusr got blue and pink for the baby cards i making

Thank you for the help i just could not work out if a tab would work nor how wide to make tab etc!
emck is offline  
Tweet this Post! Share on Facebook Reddit!! Pin on Pinterest! Share on Google+!
Reply With Quote Likes
Old 07-28-2020, 07:39 PM   #6  
Kookie Creator
 
Card Maker 01's Avatar
 
Join Date: Jul 2007
Location: L.A. area
Posts: 423
Likes: 0
Received 0 Likes on 0 Posts
Default Could you try

measuring the size of the card while closed. Make a card stock piece the same measurements with an extra 1/2 inch on the width side. Score the 1/2 inch on the left side of the card stock and bend it over so that you could attach it it at the back (of the front piece)? If you didn't want the seam to show, you could cut another piece of card stock to fit over it.

Does that make sense?
Card Maker 01 is offline  
Tweet this Post! Share on Facebook Reddit!! Pin on Pinterest! Share on Google+!
Reply With Quote Likes
Old 07-28-2020, 10:24 PM   #7  
Rubber Obsessor
 
emck's Avatar
 
Join Date: Aug 2014
Location: Adelaide, Australia
Posts: 167
Likes: 0
Received 0 Likes on 0 Posts
Default

I cut a panel 4.5 by 5.5 so it only had a 1/4 inch seam

I will take a photo and post it when its done! Its looks amazing already i love the additional panel it help card to stand up! Its for my niece in august will be finished soon prob by the weekend i hope but the die set comes with layers and ive got a die set with rect 1/8 inch apart i only have one set so far so its kinda 1/4 but was able use that for patterner paper on the panel
emck is offline  
Tweet this Post! Share on Facebook Reddit!! Pin on Pinterest! Share on Google+!
Reply With Quote Likes
Old 07-29-2020, 02:00 PM   #8  
Rubber Obsessor
 
August29's Avatar
 
Join Date: Sep 2013
Posts: 174
Likes: 0
Received 6 Likes on 4 Posts
Default

Is it this one? At the 2:09 minute mark she shows how to do a partial cut so the stair step part is extend and can be placed inside a card base. It looks like a normal card until it is opened. She uses the card turned top to bottom but it can be turned left to right.


Last edited by August29; 07-29-2020 at 02:01 PM.. Reason: Added info
August29 is offline  
Tweet this Post! Share on Facebook Reddit!! Pin on Pinterest! Share on Google+!
Reply With Quote Likes
Old 07-29-2020, 11:28 PM   #9  
Rubber Obsessor
 
emck's Avatar
 
Join Date: Aug 2014
Location: Adelaide, Australia
Posts: 167
Likes: 0
Received 0 Likes on 0 Posts
Default

Its the same die but shea done something different to what i did

Its not finished but ill try to attach a photo
emck is offline  
Tweet this Post! Share on Facebook Reddit!! Pin on Pinterest! Share on Google+!
Reply With Quote Likes
Old 07-29-2020, 11:34 PM   #10  
Rubber Obsessor
 
emck's Avatar
 
Join Date: Aug 2014
Location: Adelaide, Australia
Posts: 167
Likes: 0
Received 0 Likes on 0 Posts
Default

Heres some photos she seems to of turned it sideways to mine!

The part in 2nd photo with the bears pattern paper is what the die makes the part on left side with bibs that is what i created myself!


Its not finished but i thought id show u my progress!


emck is offline  
Tweet this Post! Share on Facebook Reddit!! Pin on Pinterest! Share on Google+!
Reply With Quote Likes
Reply


Posting Rules
You may post new threads
You may post replies
You may post attachments
You may edit your posts

BB code is On
Smilies are On
[IMG] code is On
HTML code is On
Trackbacks are Off
Pingbacks are Off
Refbacks are Off