Splitcoaststampers.com - the world's #1 papercrafting community
You're currently viewing Splitcoaststampers as a GUEST. We pride ourselves on being great hosts, but guests have limited access to some of our incredible artwork, our lively forums and other super cool features of the site! You can join our incredible papercrafting community at NO COST. So what are you waiting for?
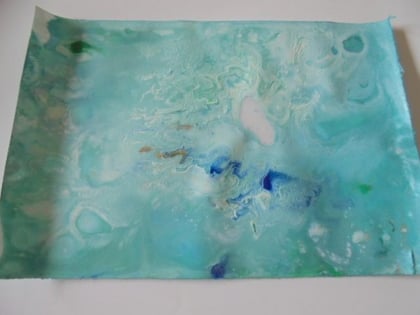
I've been playing with acrylic paint and pouring media and made some real fun backgrounds, I hope you'll enjoy to get dirty, this takes a bit of time so I know your cards won't be in the gallery very quickly but I hope you'll give it a try and show me what you've done, if you have questions, I'll do my best to answer as quickly as possible.
Here we go: First of all cover and protect your working place
You'll need acrylic paint, no matter the one you use, cheap one will do, if you've got pouring media that will be great if you don't, you can make it yourself with paint glue and water,you add a bit of this in each container with the paint.
I've used also acrylic pouring oil but that's not a must, maybe you want to try something else.
You can add glitter metallic paint and so on.
You can see how to work, you take some plastic or glass containers, the ones I've used are very old, we can't buy them anymore, but you can keep any containers, clean them and use them.
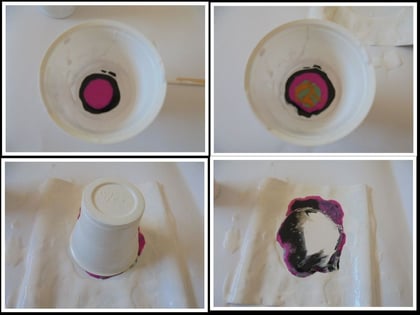
First I've put a bit of pouring media, then black acrylic paint, pink, green and finally I've added a bit of gold metallic.
The glossy photo paper or glossy card stock or backside from a block, is covered with white paint on the 4 edges just avoid a circle in the middle, that's where you'll empty your container.(picture 1)
You turn your container upside down but very quickly, and you move your paper to let the paint flow, it will go over the paper so I hope you've covered your working space, the paint which is falling will be used after.
So you've got one print which will take time to dry, and with other card stock you pick up the fallen paint mix.
You can make a Dutch pouring if you want to, there's no need for pouring media, just paint and water, I've made some , here's one:
I'll add a PDF in the thumbnails and some pictures, just mix and have fun
Remember to use the keyword TLC792 when you are uploading. It's helpful if you come back and leave a link on this thread, especially in case you made a typo and people may not find your card.
If you're not sure how to link your card on the thread here, here's how:
1. Open 2 windows or tabs: one window for your card and one for this thread.
2. In this thread, click on reply and type anything you want to show before the link.
3. Go to your card window. Highlight the address for your card. (It says www. splitcoaststampers.com/gallery/showphoto..... and so on)
I read and tore out a feature on mini-pours using disposable shot glasses late last year, and bought the shot glasses which sat on my desk all through the Christmas holidays. And until St Patrick's weekend when, having been further inspired by pidgesmom's blog post (http://papervernissage.blogspot.com/...t-pouring.html) and buying pouring medium on my last visit to my sister before lockdown, I finally had a go. And then I didn't know what to do with the pieces I made. After 5 weeks I finally turned two of them into cards this weekend, l'll be along shortly...A UK company sells two paper pads with acrylic pour designs, and I felt I'd have just as much trouble using those. Just not "my"type of background, I guess.
Yes this is a little messy, and the drying time (for me, I did them on Yupo and they took about two days, the mini canvases dried faster) felt like forever, but I'd strongly encourage you to give it a go. It's great fun, and don't we all have plenty of time right now?
The big canvases one sees are amazing, but I did two little ATC size ones and was delighted with them. I'd recommend shot glasses as being a great size for anything up to an 8" square, and my experience was that the paint and medium needed to be much thinner than my first try.
My pieces (you can see them in the raw on my blog here: My Miscellany: A Mixed Bag) all made me think of aerial views of the sea. One of them made me think of Italy, except it's facing the wrong direction. I tried my dolphin and seahorse edger dies with them, but it didn't come together. Not sure why, maybe I just didn't want to cover up that much of my pours! It's taken from St. Patrick's weekend till this one to finally start making them into finished pieces - but doing the pour was great fun.
I couldn't sleep last night so did my pour at 1:30 this morning so it was dry when I finally woke up a 7:30 AM. Here's my late night results: Acrylic Pour Thank You
__________________ Linda aka Bubbles
I'm not a Hoarder . . . I'm the Curator of an extensive collection of embellishments!!
Proud Fan Club Member Guest Designer Color Challenge July 2017 Favorites Notification Team
i did it and 4th time was the charm lol - now waiting for it to dry so i will post tomorrow. i'm really glad that this challenge came up as i've been wanting to do a liquid pour painting for awhile now and just needed to take the plunge.
__________________ If it was so, it might be; and if it were so, it would be; but as it isn't, it ain't. that's logic----Lewis Carroll
i did it and 4th time was the charm lol - now waiting for it to dry so i will post tomorrow. i'm really glad that this challenge came up as i've been wanting to do a liquid pour painting for awhile now and just needed to take the plunge.
And you'll see after drying it can be even different!! I'm glad you've gave it a try and can't wait to see it!!
Loved the fun, experimental challenge, Anita. I used an acrylic glaze and this took over a week to dry. The paper wasn't very porous either, so live and learn.
CT0520 Out Of The Bottle by Lori "Artzadoni"