|
|
| |
|
| Splitcoaststampers.com - the world's #1 papercrafting community |
 |
|
You're currently viewing Splitcoaststampers as a GUEST. We pride ourselves on being great hosts, but guests have limited access to some of our incredible artwork, our lively forums and other super cool features of the site! You can join our incredible papercrafting community at NO COST. So what are you waiting for?
Join the party at Splitcoaststampers today! |

|
 01-17-2020, 02:36 PM
|
#1
|
|
Stazon Splitcoast
Join Date: Apr 2006
Location: Las Vegas, baby!
|
 DIY Marker Storage
Since I quit my job this week, I had time to do a complete overhaul on my craft space and do another project I've had on my mind for a bit. I'll be posting photos of my space later, but I wanted to share my project first. This is a decided improvement over the cereal-box concoction I shared last time I did DIY marker storage...
I'll start by saying three things: 1) I am decidedly low-tech; 2) I am thrifty/frugal/cheap; 3) I'll go for function over aesthetics pretty much every time. Moving on, then...
I needed a better solution for my Bic MarkIt and Sharpie markers, my Sakura Stardust and white gel pens, and my Arteza Real Brush markers. I remembered reading somewhere that people were using those plastic grids that go over fluorescent lights to put inside of ArtBins and such to make dividers for their Copics, so I grabbed one of each marker that I needed to house and went to Lowes (Home Depot has the same thing, but my cousin and I had lunch across the street from Lowes, so I just went there). I got this: Louvered Ceiling Light Panel
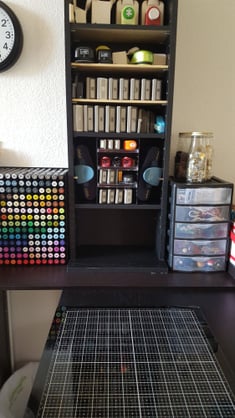
I wanted to insert the storage piece into the empty space at the bottom of this media storage unit:
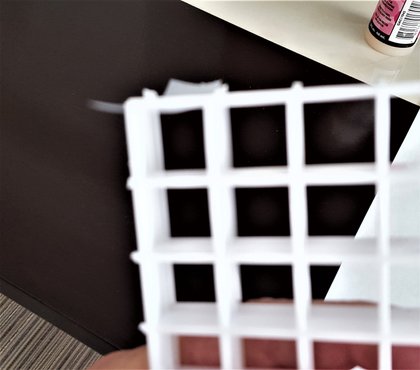
I measured the space and determined that I needed 17 squares across. I needed 9 squares high to accommodate the markers. I cut eight sections those dimensions from the panel. I also needed some deeper sections, so I cut another four sections that were 17 squares across but only four squares high. I couldn't find a saw and the razor blade wasn't working, but I found some pruning shears in the garage, so I just used those (like I said, low-tech). There were (of course) some pretty raggedy edges. If there was an obvious that's-gonna-leave-a-mark jagged piece I snapped it off with needlenose pliers, but didn't care much otherwise.
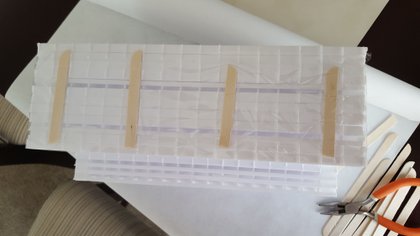
I was going to glue all of the panels together, but that wasn't working because the edges are extremely narrow and I couldn't find a glue that would work. Scotch tape to the rescue! (I know, seriously, right?) I taped the panels in pairs, taping through one corner, then the diagonally opposite one, then the other two, making sure that I kept the squares lined up properly:

After I had the pairs put together, I taped two of those to each other (a bit trickier, but still manageable). There was no way that I was going to be able to go through all of the squares to tape the final sections together, so I split some jumbo craft sticks in half and used them to stabilize eveything and stuck things together with packing tape:
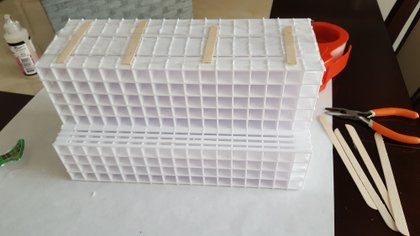
Here it is all finished:
Here it is slid into the media unit:
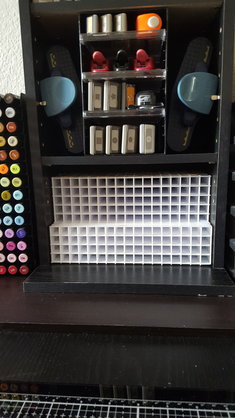
And here it is all filled up:
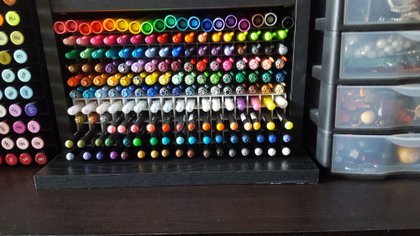
Added bonus: I had some Crayola jumbo markers that were homeless, and there was just enough room above this unit to let them slide in there. 
No too shabby for under $20, I'm thinking! Anyway, I might actually USE things now that I have easier access... __________________
~ Sue
Happy for no reason...
|

|


|
|
The following 3 users liked this post by gregzgurl:
|
|
|
01-17-2020, 03:03 PM
|
#2
|
|
Inking Addict
Join Date: Feb 2007
Posts: 87
Likes: 0
Received 0 Likes
on
0 Posts
|
Thank you for sharing this idea and the process. Eyeing my crafting area to see where I could put something like this (markers and pens currently in plastic baskets and mugs/cups).
|
|
|
|
|
01-18-2020, 05:09 AM
|
#3
|
|
Splitcoast Dirty Dozen
Creative Crew SU Design Team Alumni
Join Date: Jun 2005
Location: Fort Collins CO
|
Looks really nice, Sue!
I couldn't help noticing that all of your clips on the caps of the markers are facing the same direction.:lol:
__________________ Diane
On SCS since 2005...Fan Club since 2007
Quiltzi...High Plains Member of Punchkateerz I'll stand with arms high and heart abandoned,
in awe of the One who gave it all.
I'll stand, my soul, Lord, to You surrendered,
all I am is Yours. |

|
|
|
01-18-2020, 05:25 AM
|
#4
|
|
Splitcoast Dirty Dozen
Creative Crew SU Design Team Alumni
Join Date: Nov 2005
Location: Florida
|
This is great! Thanks for taking the time to take photos and document it all for us.  |
|
|
|
|
01-18-2020, 06:11 AM
|
#5
|
|
Stazon Splitcoast
Join Date: Apr 2006
Location: Las Vegas, baby!
|
Quote: Originally Posted by fionna51 Looks really nice, Sue!
I couldn't help noticing that all of your clips on the caps of the markers are facing the same direction.:lol: |
Ye, yes... we all have our idiosyncrasies, right? All of the Spectrums are fine tip pointing out, too, and I try to have the lettering right-side up (sometimes I mess up). I'm not super attentive to stuff like that once everything's in place, but I try to start out that way... __________________
~ Sue
Happy for no reason...
|
|
|
|
|
01-18-2020, 06:16 AM
|
#6
|
|
Stazon Splitcoast
Join Date: Apr 2006
Location: Las Vegas, baby!
|
Quote: Originally Posted by jasimonsThank you for sharing this idea and the process. Eyeing my crafting area to see where I could put something like this (markers and pens currently in plastic baskets and mugs/cups). |
Yeah, that was what I had going on, too, except the Artezas were still in their original package (NOT convenient at all!). I read that those and the gel pens should be stored horizontally, so I was more motivated to find a solution... __________________
~ Sue
Happy for no reason...
|
|
|
|
|
01-18-2020, 06:17 AM
|
#7
|
|
Stazon Splitcoast
Join Date: Apr 2006
Location: Las Vegas, baby!
|
Quote: Originally Posted by fl_beachbumThis is great! Thanks for taking the time to take photos and document it all for us. |
You're so welcome! I appreciate when others share, so I thought I'd do so, too. I have a blog but it's been inactive for quite a while, so it didn't make sense to resurrect it for one post. That's why I put the info here... __________________
~ Sue
Happy for no reason...
|
|
|
|
|
01-21-2020, 05:12 AM
|
#9
|
|
Splitcoast Dirty Dozen
Join Date: Mar 2008
Location: Hamburg, NY
|
This looks great!! Thanks for the detailed photos and instructions on how you did this.
|
|
|
|
|
01-22-2020, 03:14 AM
|
#10
|
|
Rubber Obsessor
|
Sue, this is beautiful, and your space is so neat and useable! I am ready to go through my shelves again and glean more to pass on. Much stuff is just too hard to get to to actually use. Sigh. I don’t often have the opportunity to work at my craft table. So my marker collection is in my old Snoopy lunch box that I carried to school in the ‘70s, and my pencils are in a Hello Kitty lunch box one of my girls was going to get rid of. I do need to at least rubber band them in color groups so sifting for the right color is faster and less noisy, though. I always enjoy your posts. |
|
|
|
|
01-22-2020, 05:33 AM
|
#11
|
|
Stampin' Fool
Join Date: Feb 2015
Location: Sacramento, CA
|
Nicely done! It looks really good and right at arms reach. I'm not that creative/patient. |
|
|
|
|
01-22-2020, 08:09 AM
|
#12
|
|
Hardware Hotshot
Join Date: Mar 2008
Location: Somewhere between the Shire & Mordor!
|
WOW!!! NICELY DONE!!!! LOVE what you've done!!! ;)<3
|
|
|
|
|
01-22-2020, 08:58 AM
|
#13
|
|
Proud Fan Club Member
Join Date: Nov 2013
Location: NYC
|
Good one Sue! I love this kind of thinking cuz really...when someone "designs one" it costs a ton of money for basically the same thing. And from the view now who knows what you are using? Does not even show. I will be interested to see the rest of the room. |
|
|
|
|
01-22-2020, 10:43 AM
|
#14
|
|
Rubber Obsessor
Join Date: Dec 2015
Location: Grand Rapids, Michigan
|
Great solution and who doesn't love how inexpensive..or thrifty it was. That makes it even more useful.
__________________
Have a creative day, every day.
Eloise
|
|
|
|
|
01-22-2020, 11:25 AM
|
#15
|
|
Splitcoast Dirty Dozen
Join Date: Sep 2005
Location: Minnesota
|
This is AWESOME! Thanks so much for sharing the idea!!! I have been wishing for something to make my own marker/pen collection easier to access, but I too am very frugal (hence the saving plastic packaging habit I have to use as acetate on cards, and the rubber leftovers from stamps I have to cut out to use for dimensionals and so on). I'll hold on to this idea and implement it in our future house... we're close enough to the moving game now that I would rather invest my time in making my version applicable to whatever I have to work with in that next house vs. now. THANKS again! Warmly, Chrissy __________________ Hugs & blessings,
~Chrissy Jeremiah 29:11
Splitcoast Dirty Dozen Alumni | Proud FanClub member since 2017
My Gallery | My Blog
"The wind of Heaven is that which blows between a horse's ears."
|
|
|
|
|
01-22-2020, 11:46 AM
|
#16
|
|
Stazon Splitcoast
Join Date: Apr 2006
Location: Las Vegas, baby!
|
Quote: Originally Posted by wavejumperGood one Sue! I love this kind of thinking cuz really...when someone "designs one" it costs a ton of money for basically the same thing. And from the view now who knows what you are using? Does not even show.
I will be interested to see the rest of the room. |
I posted two photos in the "Show us your room" thread in this forum, but there are a total of 30 new photos in the Stamp Room album in my gallery... __________________
~ Sue
Happy for no reason...
|
|
|
|
|
01-23-2020, 05:47 AM
|
#17
|
|
Splitcoast Dirty Dozen
Proud Fan Club Member
Join Date: Feb 2007
Location: teetering on the brink of everything
|
sue--you put hours and lots of thought into your stash housing.....I would like to know what the room dimensions are? I have a 9 by 12 windowless room with closet and can't seem to move without bumping into something. the closet holds paper and other crafty items that grandkids in school and 4-H depend on for last minute project emergencies all housed in a 3 cube -like 30 x 30- that stacks shoved into the left side of the closet and turned to open into the closet, a 3 shelf sturdy piece about 40 inches long that houses opened paper, dsp and really strong boxes of envelopes and other "stuff" on the bottom shelf. I have a DVD media cabinet that houses all my stamp sets(recently unmounted) in DVD cases from SU and the top holds more of the same brand of boxes each filled with one of my coloring tools(inks only). Then I have a raskog cart, a longish cabinet filled with scrapbooking materials on the just inside the door wall,but whose surface holds magazine file boxes(library supply store) full of stamp catalogs, bins of finished cards and things I haven't found a home for yet: an L shaped formica top where almost everything else resides on the pegboard above it or in the kitchen cabinets that hold the formica up--and one more two shelf unit that holds notebooks and on top is bins of dies and embossing folders and 6x6 and 8x8 paper pads--I also have a lab table(really from a school auction) that is raised on bed risers one with electric outlets where my big shot lives and piles accumulate. My whale tale punches live in a 3 drawer wire mesh card pushed under the L with ribbon bins on top, My locking punches have homes in the storage by Stamp and Store but with my last order I outgrew it (time to weed)---and under the knee hole where I work is a wayfair 8 drawer cart where my other needed items live--It is a crowded work space and I am not always neat about clearing up when I finish a project but it works....thanks for sharing your room. __________________
c-mouse-If you can't say nuttin nice--don't say nuttin at all. Thumper.
Pansy
Card Sketch Challenge 1-227 done only 396+ to go to be caught up!!!!!
-90 and sweating
|
|
|
|
|
01-23-2020, 08:18 AM
|
#18
|
|
Stazon Splitcoast
Join Date: Apr 2006
Location: Las Vegas, baby!
|
The room is roughly 10 feet by 14 feet. There is an alcove where the window is that makes the far wall 2 feet longer (so 16 feet), but the alcove is only 4 1/2 feet wide. My workbench extends into that space and I only stand at the bench, so there's enough room for that. The opposite wall is only 8 1/2 feet long (where the bookcases are), because the closet door cuts diagonally across the space from the alcove to the bookcase wall. It sounds like you may have a lot more "stuff" than I do - I'm purging pretty much constantly! The main thing that has saved space for me is that I never keep anything in its original packaging and consolidate what's left as much as possible (washi tape and ribbon are NOT on spools, for example). I also go vertical whenever possible. Everyone has to do what works for them, and what works for me is having things easily accessible but not in plain sight, for the most part. I'm okay looking at markers, but looking at ink pads makes me crazy. Weird, I know, but there it is...
__________________
~ Sue
Happy for no reason...
|
|
|
|
|
01-23-2020, 10:40 AM
|
#19
|
|
Insane Embellisher
|
Quote: Originally Posted by gregzgurl
I posted two photos in the "Show us your room" thread in this forum, but there are a total of 30 new photos in the Stamp Room album in my gallery... |
Sue, I went through all your room photos and left some comments. Very inspiring, thanks for sharing with us. Debra |
|
|
|
|
01-23-2020, 04:42 PM
|
#20
|
|
Stazon Splitcoast
Join Date: Apr 2006
Location: Las Vegas, baby!
|
Thanks, Debra! I saw your comments - so appreciated! Some of the photos are very old (you may have noticed) and I've switched up some of my storage ideas, but left the old ideas there in case they were useful to anyone...
__________________
~ Sue
Happy for no reason...
|
|
|
|
|
01-23-2020, 05:47 PM
|
#21
|
|
Stampin' Fool
Join Date: Feb 2015
Location: Sacramento, CA
|
Thank you for sharing views of your craft room. I really like what you've done and how organized you have it set up. Great job! However, something is missing... a TV to watch you work.  |
|
|
|
|
01-23-2020, 07:17 PM
|
#22
|
|
Pearl-ExPert
Join Date: Mar 2007
Location: northern California
|
Wow Sue, great ideas and I too am low-tech and thrifty. Spending $$$ on storage when I could be buying supplies just kills me. I've got my Spectrum Noir markers in the ugliest container ever (cardboard box turned on its size with the original 24 marker Spectrum Noir packaging stacked inside. I have my dye markers in various square plastic containers turned on their sides, and some of them in a shallow drawer. At least I have them all stored horizontally but it's all scattered.
When I first bought some alcohol markers, I didn't expect to use them often, but now they're my main go-to. Same with the dye markers (Tombow is my favorite). So I didn't have any storage for any of it.
My most-used ink pads are stored in an old wooden cassette holder that I found in the garage and mounted on the wall right above my craft table. Having my supplies right at hand are the most important thing for me, or else I won't use it. Love these DIY ideas. Karen
|
|
|
|
|
01-23-2020, 09:02 PM
|
#23
|
|
Stazon Splitcoast
Join Date: Apr 2006
Location: Las Vegas, baby!
|
Quote: Originally Posted by BohodivaThank you for sharing views of your craft room. I really like what you've done and how organized you have it set up. Great job! However, something is missing... a TV to watch you work. |
Ah, but I do! I just didn't take a picture of that wall. In the "view from the door" photo there is a bookcase on the far right that you can only see the profile of. That's where the TV lives - and it's a smart one, so I can do Netflix, YouTube, Disney, Amazon Prime and all the rest of it! I just have to make sure I'm sitting at the desk that faces it instead of the one with my back to it... __________________
~ Sue
Happy for no reason...
|
|
|
|
|
04-08-2022, 06:44 PM
|
#24
|
|
Cardstock Collector
Join Date: Apr 2022
Posts: 1
Likes: 0
Received 0 Likes
on
0 Posts
|
What tool did you use to cut the...
What tool did you use to cut the lighting panels?
|
|
|
|
|
| Thread Tools |
Search this Thread |
|
|
|
 Posting Rules
|
You may post new threads
You may post replies
You may post attachments
You may edit your posts
HTML code is On
|
|
|
|


