Splitcoaststampers.com - the world's #1 papercrafting community
You're currently viewing Splitcoaststampers as a GUEST. We pride ourselves on being great hosts, but guests have limited access to some of our incredible artwork, our lively forums and other super cool features of the site! You can join our incredible papercrafting community at NO COST. So what are you waiting for?
Sorry, nothing spooky or Halloweeny from me this last week in October!
I was really intrigued by the technique Anne used on THIS CARD for my recent rough and smooth WTUI challenge, and was keen to try it out.
Anne did say to me that the cheaper napkins worked well, and I didn't have much success with the ones I took from work (which I thought might work) or the really luxurious thick ones DH uses for napkin-folding (which I was pretty sure wouldn't). Sheesh, the problems I had finding cheap white napkins! Our local $ store equivalent didn't have any plain white. The next place I tried had about fifty different colours and styles but no white. Søstrene Grene was my next stop, and the pack I bought there worked well.
Here's the video from Dave of Memory Box, which Anne supplied the link to:
I would echo what he says about the colour bleeding - if you keep your brush quite dry it's easier to contain, but you don't get the same blended watercolour look.
I found it important to let it dry before moving it - the first time I moved it while still damp, and the layers separated a bit.
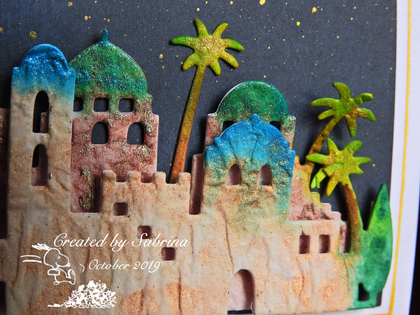
Think about the die you use - I found that fine detail worked well, but you get much more texture in larger areas - like the Bethlehem silhouettes, I've added a detail shot down below.
Technique synopsis:
1: take a thin paper napkin and fold into layers, large enough to lay your die on top - I used four layers.
2: add a layer of thin white card for stability.
3: place your die with the cutting edge on the napkins, and cut.
The pressure from the cutting will press the layers together (you've probably experienced this with regular thin paper if you've ever tried cutting more than one at a time).
4: colour your die-cut piece with watercolours, remembering the note above about how the wetter your brush, the more the colour will bleed. Since you need to leave it to dry, you might like to do your colouring on a mat that you can set aside till it's dry.
5: stamp/colour or not the card base as you desire, and add the coloured die-cut to finish your card.
I hope you'll be inspired to try this out and have fun with it.
:arrow: Remember to use the keyword TLC766 when you are uploading. It's helpful if you come back and leave a link on this thread , especially in case of typos.
If you're not sure how to link your card on the thread here, here's how:
1. Open 2 windows or tabs: one window for your card and one for this thread.
2. In this thread, click on reply and type anything you want to show before the link.
3. Go to your card window. Highlight the address for your card. (It says www. splitcoaststampers.com/gallery/showphoto..... and so on)
4. Click EDIT. Click COPY
5. Go back to this thread. Click PASTE.
This is so cool! Mine are drying now. Great Challenge, Sabrina!
__________________ My Blog- Trusting in the Lord for Everything Proverbs 3:5-6 Trust in the Lord with all your heart and lean not on your own understanding. In all your ways acknowledge Him and He will make your path straight. My Stampin' Up WebsiteMy Gallery, BRAK New Member Mentor. New Grandmother to Mia Lou. 1st Grandchild.
What a great technique- I love this- I have had this die for- oh 2 years maybe.... I wated to make an Autumn card for the challenge Your Stash (CYS) challenge here on SCS, so inked up the background, then tried this technique. Third time is a charm- the napkin layers are so very delicate!!!
Me too I was intrigued by Anne's card and this fun technique, I must admit I'v already tried it on an other project as soon as I'd seen Anne's.
Here's mine for today:
Fun challenge, Sabrina. Thanks. I used acrylic paint rather than watercolor since I wanted "black" and it didn't work out nearly as well. Lesson learned. I'll have to try this technique again with watercolors.
Well, Sabrina, I can say I tried this technique - and wasted WAY too much time trying to get something useable . . .but for me, as techniques go, I'd have to say it ranks right down there with my papercasting nightmare of 2016. But true to myself, I kept at it until I could finish a card ( and crossing my fingers that the layers won't keep peeling away before I can use it . . .)
All manner of napkins but not a white one in the house!
That was me too, Janine. I have white linen a-plenty, but all my paper ones (except for the super high-quality ones DH bought for napkin folding) are pretty patterned ones. He sacrificed one of his for me to try, but the die wouldn't even cut through two layers .
Ah Sabrina . . . My nature is not to quit and let a challenge defeat me . . . so with inspiration from Anita's birch trees I took a stab at one more bunch of die cut napkins - I am much happier with this one.
That was me too, Janine. I have white linen a-plenty, but all my paper ones (except for the super high-quality ones DH bought for napkin folding) are pretty patterned ones. He sacrificed one of his for me to try, but the die wouldn't even cut through two layers .
Tonight I grabbed some tissues and folded and die cut those. It separates from the card layer and colour spreads but the pieces might be useable. Will see what happens next day or so
__________________ Janine (aka Jay_Bee) Find a few favourites and share some love - check out theFavorites ForumDirty Dozen Alumni
Wow, this was such a fun technique, I'm going to try it again! I didn't have detailed dies, so I used my poinsettia die from Amuse. Here's my card.
__________________ My Blog- Trusting in the Lord for Everything Proverbs 3:5-6 Trust in the Lord with all your heart and lean not on your own understanding. In all your ways acknowledge Him and He will make your path straight. My Stampin' Up WebsiteMy Gallery, BRAK New Member Mentor. New Grandmother to Mia Lou. 1st Grandchild.
Tonight I grabbed some tissues and folded and die cut those. It separates from the card layer and colour spreads but the pieces might be useable. Will see what happens next day or so
When I was experimenting, I tried using a quick spray with spray mount on the card, to hold the first layer of napkin to it. It certainly helped with the less suitable napkins, but once I got better ones I found I didn't need that extra step. For me the most important thing was definitely letting it dry fully before moving it.
Tried the die cut tissue technique. It was a lot of fun. I used two trees from my die set. Instead of water colors, I used chalk pastels put on with a blender pen. The fluid in the pen was enough liquid to puff the napkin. There was a bit of separation of layers, cured by small dabs of glue when dry. This was an additional use of my Stampin pastels. I also rubbed black chalk on with sponges to make the dark sky ( moon was masked) and green to color the sentiment panel. Using up older supplies and stamps by stamping an Itty Bitty background with VersaMark and heat embossing with Irridecent Ice powder to look like stars. Die cut napkin trees by Vannie - at Splitcoaststampers