Splitcoaststampers.com - the world's #1 papercrafting community
You're currently viewing Splitcoaststampers as a GUEST. We pride ourselves on being great hosts, but guests have limited access to some of our incredible artwork, our lively forums and other super cool features of the site! You can join our incredible papercrafting community at NO COST. So what are you waiting for?
Does anyone have a C&9th turnabout stamp, where they followed the directions exactly and it just doesn't come out right? I vowed I would never buy one of these stamps but I fell for the wreath turnabout and while it comes close, it has never, after 10-15 attempts, ever come out exactly right in the center (I have white space). I contacted the company for tips and they initially got back to me but after I sent them pictures they disappeared.
I'm frustrated because I can cover that white space with a greeting or filler stamps etc. but I want a stamp to work correctly. I have watched multiple videos, read the directions online – I'm thinking the only thing missing from my efforts is a degree from MIT. I'm resisting purchasing that jig/alignment kit because with shipping it is almost the same cost as the stamp set! I feel the stamp set should work out of the box, as it were.
Does anyone have the same problem? Or have tips for me?
So if you're having alignment issues, it's either that that jig you're using isn't square, or the stamp wasn't exactly aligned with the image on the packaging. If you've bought it recently it would have come with a jig in the package - they all do now since they released that kit. I'll see if I have this one and stamp it to give you tips.
I played with one of my turnabout stamps for this first time last weekend, and here's what I did.
I cut out a piece of card stock to a 6 x 6 size, placed the stamp on the MISTI to cover this. Then, instead of turning the stamp every time, I just turned the card stock one quarter turn. I would ink, stamp, clean, turn card stock, and then repeat. After four turns, it was completely stamped, and it seemed to work out fine.
That's exactly what I did– and it didn't turn out fine :confused: That's what's so frustrating…
So if you're having alignment issues, it's either that that jig you're using isn't square, or the stamp wasn't exactly aligned with the image on the packaging. If you've bought it recently it would have come with a jig in the package - they all do now since they released that kit. I'll see if I have this one and stamp it to give you tips.
Yes, lined the stamp up multiple times on the acetate guide that came in the package, used a 6 x 6 piece of paper from a commercial paper pad (though I will double check the paper measurement again). Hence my frustration!
I have had no experience at all with these stamps but loved your comment about a degree from MIT..........I think we've all felt that way at times when struggling with something.........thanks for putting it into words and giving me my laugh this morning! Best of luck.
I have used the wreath turnabout successfully just fine. I have a few questions/comments.
One...It looks like the alignment lines you drew on the back of the stamp are just fine. It all looks just like mine look.
Two...You have a tan turntable with the lines drawn on it and that looks fine. You line up the lines on the stamp with the lines on the turntable.
Three...Your paper you are stamping on needs to be taped to the turntable. You didn't say whether you are doing that.
Four...What are you using to guarantee that your stamp comes down on the paper in exactly the same spot every time? Are you putting the stamp on a block so that you can line the block into the corner of your platform in the same place every time? Do not rotate your block!
It looks like you are using something to stamp the wreath that works something like a stamp-a-ma-jig. I'm going to call it "the alignment corner".
There are several things that you need to make sure would be "just right"
One...place your turntable snugly into that alignment corner. Tape it down or use the magnets.
Two...line up the stamp with the lines you drew on the turntable.
Three...select a large block that you can fit all the way into the corner where your turntable is positioned and lower it onto your stamp. It has to be all the way into the corner!
Four...Tape your paper to the turntable in the center. That turntable is then returned to your alignment corner, pushed tightly into the corner.
Five...ink your stamp and stamp the first impression. Make sure the block goes into the corner all the way. And make sure that you are putting the same corner of the block into the corner of the alignment corner as you did in step three.
Six...DO NOT ROTATE THE BLOCK! Rotate the turntable to reposition the paper. Then ink and stamp the second impression. Repeat with third and fourth inks.
These instructions would translate the MISTI instructions into stamp-a-ma-jig instructions. Hope that helps.
If you want to compare to a MISTI use, in this video:
The door of the MISTI is like the block that puts the inked stamp in the same place every time...directly over the center crossed lines of the turntable.
The set-up is exactly the same for everything else. Stamp aligned with the lines on the turntable that is in a fixed corner. Paper is taped to the turntable. Turntable with paper attached is turned 1/4 turn for each stamping.
Thank you for your help! I am doing all those things you listed, using a WRMK Advanced Precision Press stamp positioner. :confused: Haven't tried it on my Misti yet but it should work the same.
The company says even if it's "one 16th of an inch off" it won't turn out, which seems crazy to me, but I'm still not sure where I would be off... I'm going to measure the 6x6 paper from a commercial paper pad I'm using as a jig to see if it is off!
I also struggle with this very same stamp. I have a stamp positioning platform that I use and it's still not quite right. I bit the bullet and ordered the guide off Ebay - it arrived the other day but I haven't had a chance to pull it out and give it a try. Hopefully this weekend. If it makes a difference, I will post a pic.
__________________ "For the strength of the Pack is the Wolf, and the strength of the Wolf is the Pack" ~Rudyard Kipling my gallery
This tread was a confidence booster for me -- I thought I was the only one who did have have 100% success with turnabouts. When I got my first one, I filled the trash can then got one perfect card front. The tips posted here helped me a lot. TFS everyone!
Mary Beth
Poppy try it on the MISTI. Just for giggles. I would be interested to hear. I know the WMRK should work but what is and what should be are often not the same thing in life.
It should not matter if it is not centered on the CS...it would just come out whole to left or right of center imho if you keep stamping to the same spot.
I also struggle with this very same stamp. I have a stamp positioning platform that I use and it's still not quite right. I bit the bullet and ordered the guide off Ebay - it arrived the other day but I haven't had a chance to pull it out and give it a try. Hopefully this weekend. If it makes a difference, I will post a pic.
Ugh I know exactly how you feel! Please let us know if that jig works– I'm just so mad I might have to spend double the cost of the stamp set to get it to work :(
Poppy try it on the MISTI. Just for giggles. I would be interested to hear. I know the WMRK should work but what is and what should be are often not the same thing in life.
It should not matter if it is not centered on the CS...it would just come out whole to left or right of center imho if you keep stamping to the same spot.
You are so right! Jennifer Mcguire showed how you did not have to have centered or perfectly square card stock for it to work (for her --of course LOL) Wouldn't it be crazy if you had to have a Misti to get this stamp to work?!
I had tons of problems with a turnabout stamp; after 10 tries and a few tears, I was explaining to my husband that I couldn't get a perfect image and had him watch Jennifer McGuire's video. After he looked at my stamp and jig he told me that my Xs on both weren't perfect and he redrew the x on the stamp and made another jig. It worked perfectly! If your measurements are off only slightly, it will not work properly. I'm not a perfectionist but my retired surgeon husband sure is!
I had tons of problems with a turnabout stamp; after 10 tries and a few tears, I was explaining to my husband that I couldn't get a perfect image and had him watch Jennifer McGuire's video. After he looked at my stamp and jig he told me that my Xs on both weren't perfect and he redrew the x on the stamp and made another jig. It worked perfectly! If your measurements are off only slightly, it will not work properly. I'm not a perfectionist but my retired surgeon husband sure is!
Hmmm, so if normal eyeballs can't figure it out, maybe they should include a pop-up engineer from MIT with every stamp set ;)
Hmm, this thread tells me that I never want to purchase these type stamps, LOL! Way too much fussing for my temperament, lovely as they are!
I would think the ones with scattered images are much more forgiving.
I can understand if it was one of the geometrics that butt up to each other but this isn't that.
Let us know if the jig makes the difference.
I love that story about the surgeon. We need to hire him to evaluate our issues as an SCS consultant. It is so great to see the information come in for help requests. I always learn even when I think I know.
That's what I was thinking. Too much trouble and fiddling for me, but I hope those of you who have these stamps can find a way to make them work.
Too much trouble for me, too! I will never buy another one… Ditto for complicated 5-6 layer layering stamps. I have learned my lesson, and now I must resist the "quick and easy" mantra on videos on YT, because if they say that, you know it sure as heck isn't LOL
I would definitely check the measurements everywhere. The turntable measurements would be a problem if it was off...not whether it is exactly 6x6 but if it is square.
And while I looked at your lines that you drew to see if they are accurate according to the package lines, and they looked good...if they are off a little bit, then it won't work properly.
I do think you'd have better luck with the MISTI than with any other positioner. If you get the stamp properly positioned on the door, you won't have any variation from image to image.
Try this: Using your MISTI:
.....Mark the place where your gridlines on the door cross that are 3 inches in from the corner in each direction.
.....Put your turntable in the MISTI, close the door, and see if the marked dot is directly over the center point of the lines on the turntable. They should be. Check it at every position of the turntable.
.....Now line the lines up on your stamp with the turntable lines and adhere the stamp to the door. Look closely at the stamp through the closed door. The leaf closest to the center of the stamp should just touch that center point. If it doesn't then the lines are not drawn correctly on your stamp.
I took the lines off of my stamps (wipe them off with a q-tip dipped in alcohol, then wash the stamp with soap and water immediately). I now use the alignment aids instead of the lines. It's well worth being right every time...harder to compound small errors...and they are only $4.
If you want to have a plastic replacement for the turntable that will be perfect, then try the turnabout jig. You only need one, and it holds your paper in place (although I also use a little bit of tape for security ;) )
Ugh I know exactly how you feel! Please let us know if that jig works– I'm just so mad I might have to spend double the cost of the stamp set to get it to work :(
Thankfully, the extras aren't double the cost of the stamp...I put the links to the two items you would need in the post above. Total for the turnabout jig and alignment tools is only $12.25. The wreath stamp set is $18, although it is currently 20% off.
There's a kit that is a lot more, but you do not need to buy that kit. There's stuff you don't need in there. Unless, of course, you want the stamp set, which I did...:rolleyes:
I would definitely check the measurements everywhere. The turntable measurements would be a problem if it was off...not whether it is exactly 6x6 but if it is square.
And while I looked at your lines that you drew to see if they are accurate according to the package lines, and they looked good...if they are off a little bit, then it won't work properly.
I do think you'd have better luck with the MISTI than with any other positioner. If you get the stamp properly positioned on the door, you won't have any variation from image to image.
Try this: Using your MISTI:
.....Mark the place where your gridlines on the door cross that are 3 inches in from the corner in each direction.
.....Put your turntable in the MISTI, close the door, and see if the marked dot is directly over the center point of the lines on the turntable. They should be. Check it at every position of the turntable.
.....Now line the lines up on your stamp with the turntable lines and adhere the stamp to the door. Look closely at the stamp through the closed door. The leaf closest to the center of the stamp should just touch that center point. If it doesn't then the lines are not drawn correctly on your stamp.
I took the lines off of my stamps (wipe them off with a q-tip dipped in alcohol, then wash the stamp with soap and water immediately). I now use the alignment aids instead of the lines. It's well worth being right every time...harder to compound small errors...and they are only $4.
If you want to have a plastic replacement for the turntable that will be perfect, then try the turnabout jig. You only need one, and it holds your paper in place (although I also use a little bit of tape for security ;) )
Thank you – to be honest I didn't really understand what you said :p so I remeasured and created a new jig and used my Misti. Closer, but still not right. Found a C&9th jig on eBay (thank you to whoever above suggested that). When it gets here I'll test it out and if it doesn't work, I'll say bye-bye to this stamp set. Life is too short! Thank you to everyone who tried to help!
Well, I hate to see you totally give up on something that works when everything is just so! You read what DianeinSparks said in post #19 above...just a little bit off makes the biggest difference in the turnabouts. You've fixed your turntable (or jig, since that's what C&9 calls it now) and found that it was better, but not quite there.
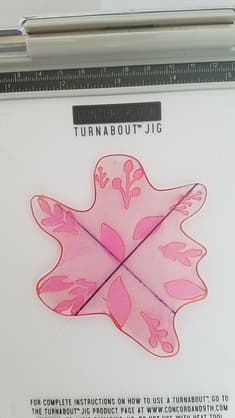
Now you need to fix your lines on your stamp. I've taken the picture you gave in your original post, straightened the view so I am looking straight down on the stamp over the lines, and am comparing the two photos, thanks to my photo software:
What I see in comparing these two images is that your lines need to be re-drawn. Compare where the lines are in relationship to the lower image.
The line that goes bottom left to top right (Line 1) is pretty close.
The other line that goes bottom right to top left (Line 2) is not.
Notice the large leaf in the right quadrant. There should be a space between it and line 2. Yours touches the line. Notice the large leaf that should almost touch the center point. Yours is a bit too far away to the left. Line 2 should just barely touch the little berry cluster at the top left end of the line. Yours goes thru the middle of that cluster. Your two lines aren't at right angles to each other.
I think your stamp likely moved as you were drawing your lines.
If you will remove both your ink lines (I mentioned how in a previous post--#25), be very careful in matching your stamp to the paper pattern, and tape your stamp in place to keep it from moving...then re-draw the lines with a fine-tip marker, while looking at all of it from directly above the stamp...I think you'll have much better results.
Don't give up! I want you to succeed...because this stamp is so beautiful!
(Well, so is the other one in the set... ;) )
Well, I hate to see you totally give up on something that works when everything is just so! You read what DianeinSparks said in post #19 above...just a little bit off makes the biggest difference in the turnabouts. You've fixed your turntable (or jig, since that's what C&9 calls it now) and found that it was better, but not quite there.
Now you need to fix your lines on your stamp. I've taken the picture you gave in your original post, straightened the view so I am looking straight down on the stamp over the lines, and am comparing the two photos, thanks to my photo software:
What I see in comparing these two images is that your lines need to be re-drawn. Compare where the lines are in relationship to the lower image.
The line that goes bottom left to top right (Line 1) is pretty close.
The other line that goes bottom right to top left (Line 2) is not.
Notice the large leaf in the right quadrant. There should be a space between it and line 2. Yours touches the line. Notice the large leaf that should almost touch the center point. Yours is a bit too far away to the left. Line 2 should just barely touch the little berry cluster at the top left end of the line. Yours goes thru the middle of that cluster. Your two lines aren't at right angles to each other.
I think your stamp likely moved as you were drawing your lines.
If you will remove both your ink lines (I mentioned how in a previous post--#25), be very careful in matching your stamp to the paper pattern, and tape your stamp in place to keep it from moving...then re-draw the lines with a fine-tip marker, while looking at all of it from directly above the stamp...I think you'll have much better results.
Don't give up! I want you to succeed...because this stamp is so beautiful!
(Well, so is the other one in the set... ;) )
Diane, you are amazing. That is all
I will try to be an obedient stamper and do everything you have said. Wish me luck!
Well, I hate to see you totally give up on something that works when everything is just so! You read what DianeinSparks said in post #19 above...just a little bit off makes the biggest difference in the turnabouts. You've fixed your turntable (or jig, since that's what C&9 calls it now) and found that it was better, but not quite there.
Now you need to fix your lines on your stamp. I've taken the picture you gave in your original post, straightened the view so I am looking straight down on the stamp over the lines, and am comparing the two photos, thanks to my photo software:
What I see in comparing these two images is that your lines need to be re-drawn. Compare where the lines are in relationship to the lower image.
The line that goes bottom left to top right (Line 1) is pretty close.
The other line that goes bottom right to top left (Line 2) is not.
Notice the large leaf in the right quadrant. There should be a space between it and line 2. Yours touches the line. Notice the large leaf that should almost touch the center point. Yours is a bit too far away to the left. Line 2 should just barely touch the little berry cluster at the top left end of the line. Yours goes thru the middle of that cluster. Your two lines aren't at right angles to each other.
I think your stamp likely moved as you were drawing your lines.
If you will remove both your ink lines (I mentioned how in a previous post--#25), be very careful in matching your stamp to the paper pattern, and tape your stamp in place to keep it from moving...then re-draw the lines with a fine-tip marker, while looking at all of it from directly above the stamp...I think you'll have much better results.
Don't give up! I want you to succeed...because this stamp is so beautiful!
(Well, so is the other one in the set... ;) )
Well, my gosh. I am looking at this and it makes me want to go home real quick and check mine out again!! I am in and out of my craft room these days - I am switching rooms with my husband and his "work" room so things are sort of all over the place. I, too, have to THANK YOU so much for all of this you have done to help!! I always seek out your posts when I have questions or when trying to deal with color matching/filing/sorting and I don't think I have ever formally thanked you for all you do! Big hugs to you from me!!
__________________ "For the strength of the Pack is the Wolf, and the strength of the Wolf is the Pack" ~Rudyard Kipling my gallery
The turnabouts I have aren’t as precise as the one shown but I’m super careful to line them up perfectly. But I’m like that with most things. It’s good but tiring! I sure hope redrawing the liens helps!
Thank you for all the tips in this post. I'm having the exact same problems as the OP. I actually found free stamping rather than using my MISTI worked better but still not great. I'm going to double check my lines as soon as I get home!
If drawing those lines on the stamp is such a critical step to achieving success when stamping with it, why doesn't the manufacturer print them on the back of the stamp? ... I have been looking askance at the "turnabout" stamps, and I'm glad I haven't sprung for them yet. I'll keep watching this thread to see if things improve. Many thanks to the OP poppydarling. Good luck to all!
If drawing those lines on the stamp is such a critical step to achieving success when stamping with it, why doesn't the manufacturer print them on the back of the stamp? ... I have been looking askance at the "turnabout" stamps, and I'm glad I haven't sprung for them yet. I'll keep watching this thread to see if things improve. Many thanks to the OP poppydarling. Good luck to all!
Exactly. I don't mind a bit of a challenge, and it's a beautiful stamp obviously, but if the effect is ruined if it's off by 1/16" that's not my type of stamp :eek: I just did not realize these were so hard to use… I would put many of the Altenew layering stamps, which are similarly beautiful and seductive, in the same category :(
Tah DAHHHHHH I didn't take any chances and cut my paper to the exact size of the jig and put them all in the platform s-l-o-w-l-y to be sure everything was lined up. At the first turn I thought it wasn't stamping in the right place but I heardFionna51 in my ear ...just keep going, don't give up now!...<just stamp="" it="" and="" don't="" worry=""> so I kept on going. I finally took a breath at the 3rd turn (HA!) and at that last turn I giggled just a little bit THANK YOU </just>
Lucky you! It's beautiful. And if you notice your line goes through that sprig in the upper right corner just where mine did, so that's obviously not the problem… I've emailed the company again but I'm not getting much help unfortunately...


 Tah DAHHHHHH I didn't take any chances and cut my paper to the exact size of the jig and put them all in the platform s-l-o-w-l-y to be sure everything was lined up. At the first turn I thought it wasn't stamping in the right place but I heardFionna51 in my ear ...just keep going, don't give up now!...<just stamp="" it="" and="" don't="" worry=""> so I kept on going. I finally took a breath at the 3rd turn (HA!) and at that last turn I giggled just a little bit

