Splitcoaststampers.com - the world's #1 papercrafting community
You're currently viewing Splitcoaststampers as a GUEST. We pride ourselves on being great hosts, but guests have limited access to some of our incredible artwork, our lively forums and other super cool features of the site! You can join our incredible papercrafting community at NO COST. So what are you waiting for?
I hope I'm allowed to do this. I recently bought the new stencil brushes from a stamp company. Yesterday, I saw similar brushes in a store called Five Below. So I thought I'd buy them to see how they compared. They're the exact same thing, down to the handle, except the ones I got at Five Below (at $5, $4, and $3) had a decal on the handle. Then I thought about the wreath builder that's so popular lately. I decided to make my own using Yupo paper (you could also use stencil plastic or any other kind of plastic or acetate you have). I made two different sizes (see picture). And I've also attached a picture of the card I made using the larger one. These are just a couple of money saving ideas if you can use them.
Thank you for sharing this! That is awesome! I didn't know how they used a wreath builder, but I'll have to look it up!
My dad is going to try to make me some long plates for my cuttlebug using a thick plastic cutting board and one with a piece of leftover laminate wood-like flooring. The laminate is hard as a brick, so I hope it works. He thought regular wood might be too soft. I cant' find them anywhere in a store, and I've heard rumors they've stopped making them. Online, the ones I've found would be over 40+ dollars. I can't afford that; especially when I only have five of the longer embossing folders. I'll have to let you know how they turn out. The cost of the stuff is free, and my Dad loves to work in his shop.
I used some eyeshadow to do some coloring on the embossing on a card, and used my stamp ink to color a die cut. I love repurposing and making the most of what I have. I don't see anything wrong with making homemade versions of things; it's not like you're trying to sell them.
Thanks so much for the tip about the brushes. I'll br going to that store soon and hope they have some.
I cut up my quilting cutting mat to make a plate for my Big Shot. there's a lot of info on the forum but I also tape a piece of magnetic vent cover on it. Now i have a "magnetic platform".
And your wreath builder card is lovely.
__________________ We can't all be stars but we can all twinkle.
Thank you barney for sharing that link! And especially for that idea! Awesome!
I sent Daddy one of my self healing mats to cut too; forgot about that! I'll have to try the vent cover tip. I'll have to remember to put it opposite of the side with the cutting edge; with the die facing the opposite direction.
I love to see people DIY. Looking forward to reading what others have come up with too!
If you are ok with shopping online (and possibly waiting a bit), look for this style makeup brush on Amazon and eBay. As shared in a separate thread, quite a few of us have tried inexpensive brands and only paid around $10-12 for the set. They work beautifully.
Thank you for sharing the wreath building tip! I never knew of this technique. I stamp with two women once a month and I design the cards we make. They love simple but beautiful and this technique will make them so happy!
A money saving thing I did was to make my own magnet cards for my dies. I have a Xyron machine with a magnet cartridge so I run leftover chipboard (from packaging, such as the sturdy backing for paper) through it to create magnet cards. This is a money saving tip if you already own a Xyron, which I did.
One of my favorite things (and I am revealing my nerdiness by owning this, but I am ok with that 😁) is to find ways to use what I have to solve a problem or get something done. Unless it is a major thing, like needing a new roof - I know when to say when lol!
Just saw this on YouTube. Whoo Hoo! I have one of these brushes!
Also found my inks. Just like I thought; I put them somewhere where I knew I would see them. *NOT!* DER!!!
Just saw this on YouTube. Whoo Hoo! I have one of these brushes!
Also found my inks. Just like I thought; I put them somewhere where I knew I would see them. *NOT!* DER!!!
Thanks so much for posting this video. I had the e.l.f. brush on my list and after watching this, I picked one up at CVS today. I have never had great luck with using daubers or distress inks, but with this brush the results are fabulous! I used distress and SU inks and they worked equally well. Off to find some large die cuts in my stash to finish a CASE of the card in the video!
Thanks for posting that it worked well, as I haven't found mine and tried it yet!
My dad finished making the boards for me to use with the cuttlebug. I will see him later this week. I'll let ya know how well they work.
I made my own sparkle glaze using this tutorial recently.
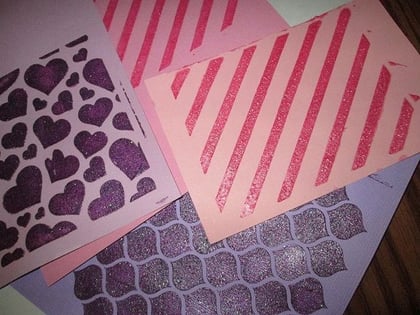
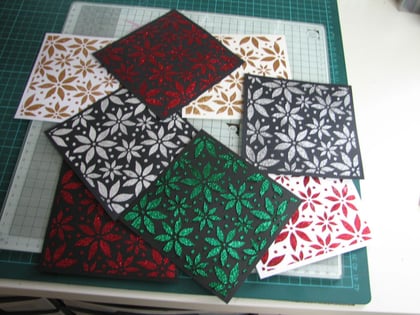
Here are some papers I used the glitter paste on recently. I am looking forward to cutting them out and using them on cards. I love that the glitter shines, but it doesn't rub off! I did use a heavier cardstock. Be warned though; it is messy! Although, I'm messy with all of it!
I did find one of those brushes like the one you all have mentioned that is at Walmart. They had one for two something at Big Lots, so I picked it up. I like how it and the Elf brush worked. I think all I need is one, as they can be washed and reused if necessary; although, the color seems to let you brush it off on scrap paper.
I had just a little bit left of the glimmer paste, so I stored it in some containers that you get for leftover sauces in resturants. The little cups with lids work well for it, and if it dries up before I use the rest of it, I won't have a mess to clean up.
Thanks for posting that it worked well, as I haven't found mine and tried it yet!
My dad finished making the boards for me to use with the cuttlebug. I will see him later this week. I'll let ya know how well they work.
I made my own sparkle glaze using this tutorial recently.
Thanks for sharing the video. How much of the eyeshadow powder did you use? She didn’t say in the video. I think this was the ratio of ingredients:
1 part tacky gel glue
2 parts sparkly “mod podge “
1 tablespoon extra fine glitter #1
1 tablespoon extra fine glitter # 2
? Eyeshadow powder
I just used enough to make it the color I wanted. For some colors, it did not take a lot. In fact, it took less than I thought it would, especially with t he purple and the gold.
I did try to substitute white glue for the mid podge too, and it did not work, as it was too wet and heavy for the paper, and I used a heavy cardstock. So it does need the Mid Podge. Thankfully our Dollar Tree stores have it in the small bottle for a buck.
Last edited by hoptownracer1; 03-07-2019 at 03:49 PM..
Depending on the size container your going to keep it in... but for the container I used the ingredients are 1 cup collage pauge ( or glossy modpodge ) 1/2 cup aleenes tacky glue ( or clear school glue ) 1 container of the eyeshadow pigment from dollar tree 3 tbsp extra fine glitter Your pigment and shadow should be the same or shade of what ever color your using . dollar tree has different shades of the pigment so you can match your glitter to what you find. You can also experiment and use different colors.
Thanks for sharing that video! This is something I didn't even know I needed, but now I do! I have a ton of stencils and this gives me another use for them.
__________________ Linda E
Caution: You are entering an artistic zone. This is not clutter - this is creating. These are not pajamas - it's my work uniform.
You can also make your own glitter paste using any of the Dreamweaver or Sweet Poppy stencil mediums. They are thicker than the recipe above using glue, so much easier to use. I've done it a lot, and it works great. You do need a reasonable amount of glitter to get a nice coverage. I usually just mix up enough on my worksheet for my project, rather than making a pot full. Any leftovers can be put into a small pot, will last a while. Also, if you are going to colour white/translucent paste, I really recommend using the darkest reinker you have in the colour you want, rather than the usual advice when adding colour to start with just a drop, and keep adding till you get the colour you want. The white paste will make it paler anyway, but obviously the more ink you add, the runnier you will make it. These pieces were all done with home made glitter paste.
Those are GORGEOUS!!! Thank you so much for the tip and to the previous poster for posting the recipe. I cut the recipe amounts way down, as there is no way I was going to use that much. So glad for the one who started this thread! She has inspired me!
I have a tip for getting your stencils to stay down and work better. Use Scotch restickable glue stick on the back of the stencil to keep it in place. It doesn't leave anything on the paper, and lifts up easy. You just have to wipe it off your stencil afterwards. Makes it so much easier!
For my own curiosity, I did a comparison of different blending mediums for Prismacolor pencils. I was happy to see that the ones that did the best and easiest were also the cheapest. My favorites in order were Goo Gone, Baby Oil and Vaseline with blending stumps. Here is a pic I took.