Splitcoaststampers.com - the world's #1 papercrafting community
You're currently viewing Splitcoaststampers as a GUEST. We pride ourselves on being great hosts, but guests have limited access to some of our incredible artwork, our lively forums and other super cool features of the site! You can join our incredible papercrafting community at NO COST. So what are you waiting for?
I have a ton of brass stencils mostly from Dreamweaver. But they don't always lay flat and I can't figure out how to make them do that so the pasted doesn't seep under the stencil. I love using metal ones but can't find anyone that sells them anymore. Anyone know how to do it or where to find metal ones?
Stampendous bought Dreamwaver. I found some at Tuesday Morning last week. You can also find them on Amazon. I press my stencil down as I'm spreading the paste. Here's a link to their tip sheet Metal Stenciling Techniques. Some interesting techniques on the tip sheet.
Welcome to the Tessler Crafts Co. online store! "You are viewing the largest brass stencil collection from leading manufacturers across the world. Be sure to surf all the areas and find your favorite items to fulfill your scrapbook & paper craft needs."
Be sure to see if they will be at a convention near you. I've visited their booth at several ecpis over the years. I chose to not see their booth recently in Columbia SC because I was out of money, energy and time (not to mention space to put stuff)
I always thought the metal ones were for dry embossing, with a stylus. I remember doing that by hand BEFORE embossing machines, like Cuttlebug & big Shot came out. My very first card in my gallery was done that way:
Stampendous bought Dreamwaver. I found some at Tuesday Morning last week. You can also find them on Amazon. I press my stencil down as I'm spreading the paste. Here's a link to their tip sheet Metal Stenciling Techniques. Some interesting techniques on the tip sheet.
Who knew there were so many ways to use the metal stencils? I still have a box of them that haven't been used in a long time. Thanks to you and TeeGeeDee for the links! New ways to use old supplies.
Quote:
I have a ton of brass stencils mostly from Dreamweaver. But they don't always lay flat and I can't figure out how to make them do that so the pasted doesn't seep under the stencil. I love using metal ones but can't find anyone that sells them anymore. Anyone know how to do it or where to find metal ones?
Awhile back I saw some metal stencils at Hobby Lobby, although not the Dreamweaver ones. Frantic Stamper sells Dreamweaver stencils. Dreamweaver Stencils The links suggested in previous posts talk about taping the stencil down with removable tape on a flat solid surface. You might have already tried that. My old metal stencils (mostly Lasting Impressions) are fairly thick. The Dreamweaver ones that I have are thinner, so could see how they would be more of a challenge to stay flat when using paste.
There is a UK company making the most amazing metal stencils, called Sweet Poppy ( The Craft Station). Link to their website HERE. HERE is a link to their shipping policy page. They do International shipping, and what seems a reasonable rate to me. Maximum £10, which I guess is around $13.
Link to their You Tube videos HERE.
Lucy, the owner, has a video showing tips for stencilling with paste without getting it under the stencil. Biggest tip is use a magnetic sheet under your cardstock- that pulls the stencil down flatter. Then stencil tape around the outside.
Also pay attention the direction 'join lines' go in your stencil, and try and work with them rather than against. But go have a look at her 'How To' videos. I saw her at a demo, and learnt at least 3 things I was doing wrong in the first 10 minutes! She is so good at explaining, and showing, the best way to work with them.
Lucy is amazing! Whenever I see someone plastering the embossing paste all over the stencil and saying 'It's just like icing a cake' I want to shout 'No. Its not. Lucy says one pull of the scraper is usually all you need'. :-)
Lucy is amazing! Whenever I see someone plastering the embossing paste all over the stencil and saying 'It's just like icing a cake' I want to shout 'No. Its not. Lucy says one pull of the scraper is usually all you need'. :-)
Lolling at this! I do exactly that when I see some people giving that advice in videos.
Also, Sweet Poppy do a paste spreader, similar to the Dreamweaver one, but I find much easier to use. The Dreamweaver one is sort of semi circular, but the Sweet Poppy one is more oblong, with rounded corners at the top. I find that much easier to get the right pressure.
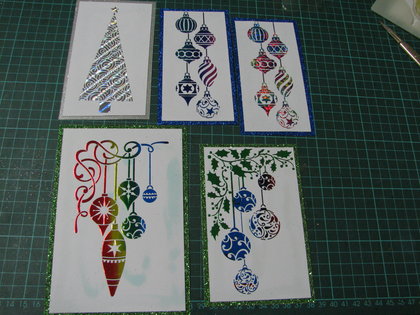
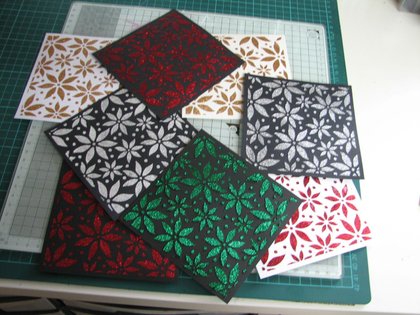
Watched Lucy's videos. Didn't even know there was an "official" paste spreader. Magnetic sheet under the stencil- genius. I'm learning all kinds of things from this thread. [Shaz, the ending sayings on your blog posts... LOL. So true.] Also, thanks for sharing your cards on this thread. Easier for me when there are visual examples. Appreciate those of you who share your knowledge with us!!!
Question- on the smaller metal stencils, do you think a metal palette knife would work for a paste spreader? Other ideas? Not even going to try to use the larger Dreamweaver stencil with paste until I have a paste spreader.
I **love** metal stencils! Some of my first card lessons was inking, clear paste and clear glitter...sigh. I miss that. I loved to watch the Dreamweaver DVDs....
I was always told once a metal stencil bends, usually it is not savable...I think I would do the same thing and hold it down.
And yes! I did dry embossing with them on a light box w a stylus!
I cant believe I am at the point where I can say "back when". Seems like just yesterday I started...
Marymint, I think a palette knife would work just fine. I'm guessing anything wider than the design would work great. Happy you are amused by my funnies.
Also,Love Carlas idea of a gift card, reckon that would be perfect.
I went to see Lucy demoing at a local craft store. Within a few minutes, found out why I wasn't having much success. First off, I was dumping paste into the 'open' areas of the stencil.
I wasn't using enough stencil tape.
And, I guess like most, I was automatically putting the stencil right way up on my cardstock. Lucy said to look at it, and if there are thin lines through it, or 'loose' pieces of stencil- I have one with a cat on a wall, and the divider between the cats body & haunches is like that- then to work with the stencil so that you are going with that, rather than dragging against it.
Went home, followed the tips, and had perfect prints first time.
I totally agree, the magnetic sheet beneath is a total gamechanger.
The hot foil idea was something I picked up from one of her DT's.
I think one of the best things about crafting is the fact that we are creative enough to take something designed to use one way and use it another way. I have a few of the metal stencils and I use them however I can come up with a way to use. So try to let the imagination run free and use them any way you can think of. Because if you can use it a certain way, it's not wrong. If the next person uses it a different way, it's not wrong.
My solution is to press down as much as you can. I think there is no other option.
------------------------------------------------------------------------------------------- It takes a long time to grow young. – Pablo Picasso
Thanks Carla and Shaz. I thought about the gift card, but then read not to use plastic. ???? But saw where others were, so guessing as long as it works... why not. Many of the Lasting Impressions metal stencils aren't very big, so the palette knife or even better the gift card should would well.
Shaz, thanks for sharing the tips from Lucy. What a great resource.
Lolling at this! I do exactly that when I see some people giving that advice in videos.
Also, Sweet Poppy do a paste spreader, similar to the Dreamweaver one, but I find much easier to use. The Dreamweaver one is sort of semi circular, but the Sweet Poppy one is more oblong, with rounded corners at the top. I find that much easier to get the right pressure.
I have Lucy's spreader. It is indeed easy to use. Her method reminds me of screen printing. :-)
Don't use plastic? That's weird. I have palette knives that are plastic..and using a CC goes way when...maybe they are worried the new ones the color would come off?
Another idea-use a small offset metal spatula from baking if you like how it sits in your hand. Whatever works that is comfortable for you. Dough cutters are another choice esp if you work with bigger stencils.
I don't agree with Lucy about only one direction pulls though. Especially for fine detail..I go in more than one...but I end in one direction. Kind of like painting a wall. You can go side to side and then up and down for last strokes. But hey I can try her way too....I like the vids.
Hi - late to the party on this one, but I wanted to recommend Brassworks Embossing (http://www.brassworksembossing.com) as a great supplier of the brass embossing templates as well as embossing paste and other related products. I have been using these templates for longer than I care to admit. Dry embossing was one of the very first things I tried in my early paper days and I still love the look. I have used the embossing paste and once I got the hang of it, I was able to turn out some impressive results. Sharalyn at Brassworks is great, and they represent many of the manufacturers. Give them a try!