Splitcoaststampers.com - the world's #1 papercrafting community
You're currently viewing Splitcoaststampers as a GUEST. We pride ourselves on being great hosts, but guests have limited access to some of our incredible artwork, our lively forums and other super cool features of the site! You can join our incredible papercrafting community at NO COST. So what are you waiting for?
Back in December, I showed a super easy way to create background on my blog using a piece of acetate and water-based inks.
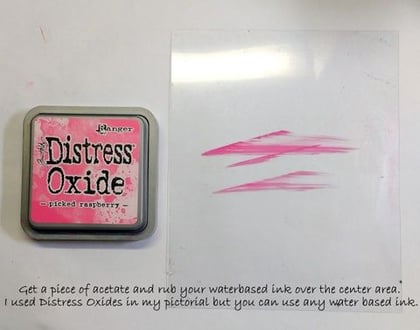
For my cards, I used regular Distress inks and Distress Oxides but any water based ink would work.
I use a piece of heavier weight acetate but any backing from one of you stamp sets would work just fine.
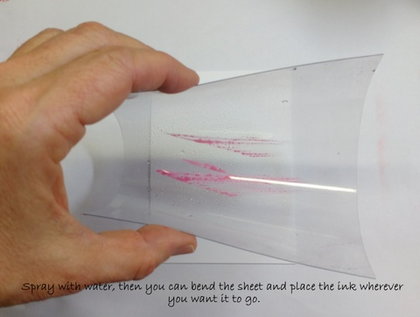
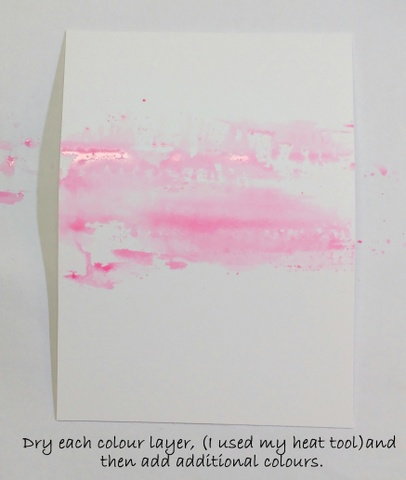
I used a heavy weight cardstock as I like the way the ink sits on the surface and pools and I am able to dry it with my heat tool but if you prefer, try it out on a piece of watercolour paper.
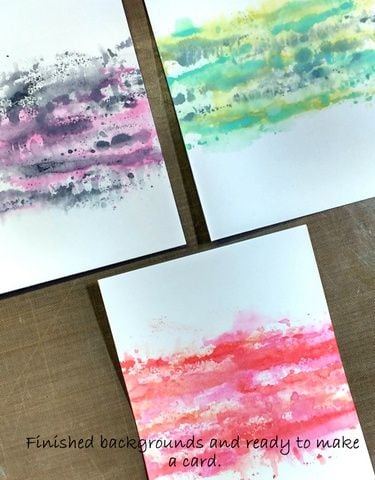
Here is the process that I use.
*please note- the pics are taken from my blog and I used different colours for today's card sample*
Be sure to add the keyword to you card so it will be added to the gallery.
Karen- awesome technique, thanks! I went with a bread wrapper in place of acetate as that's what I had handy, swiped with ink pads, misted, folded and applied to card stock and dried. Propped up the bed full of hearts with a dimensional square, adding a large sparkly heart for pizazz. Dedicated to my DS who turns 25 in February. Here's Birthday Wish
__________________ "You can't use up creativity. The more you use the more you have." -- Maya Angelou
Karen- did a second card as I really enjoyed this technique- adding a dry embossed pine branch to my stamped image, complete with embellishments from my stamping friend Dr. Sonja. This card is dedicated to my dear dad who I just visited- who has a wonderful garden and lots of birds Here's Red Cardinal
__________________ "You can't use up creativity. The more you use the more you have." -- Maya Angelou
Had great fun doing this Karen and may do another one, loved how easy it was. I used some acetate packing that an embossing folder had come in. Here it is Glossy Greetings
Such a quick and easy...Fun Acetate Inking technique, Karen. I loved the artsy design for my background. TFS and hosting this weeks TLC my friend. Hugs
Karen, I love how you have all the white space around your inked backgrounds. ( all of mine so far have no white space lol) but, I had fun with this. thanks for sharing this, TLC675 Ink Fed by JBgreendawn - at Splitcoaststampers
Here is another one from me, this time you can only see a portion of the background which looks a little like grey clouds and sets the image off perfectly here it is; My Sunshine
This is really a fun technique, so I used it again on a card. One thing I did, however, is dipped my card onto the inked acetate, rather than pressing the acetate onto my card. I think that gives me more control on where I put the color. Here's my card: the card that morphed.
Finally had a minute to upload my card for this fun technique challenge!
__________________ -----Liz "Make it your ambition to lead a quiet life, to mind your own business and to work with your hands, ..." ~~1 Thess. 4:11 (NIV)
I had another go today, combining it with the mix challenge. By putting a lot less ink onto the acetate I was able to get a look closer to what you shared with us, Karen (inspired by the card on my mantel, too!). And I got a good workout going up and down the ladder to my attic, as my heat gun is too hot for drying, so I had to go and use DH's hairdryer.