Splitcoaststampers.com - the world's #1 papercrafting community
You're currently viewing Splitcoaststampers as a GUEST. We pride ourselves on being great hosts, but guests have limited access to some of our incredible artwork, our lively forums and other super cool features of the site! You can join our incredible papercrafting community at NO COST. So what are you waiting for?
This is a super creative group so I have been searching for a fun technique for you.
I hope you like it!
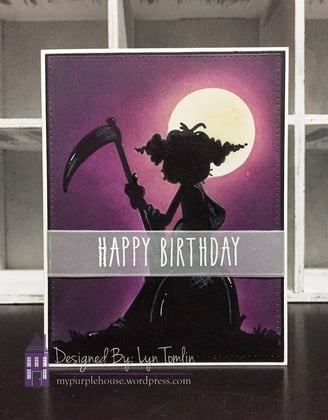
Silhouette stamps are becoming more and more popular and while I have silhouette stamps that I love to create with, today we are thinking outside of the box (or inside the lines LOL) and we are going to stretch the outline stamps we have in our stash.This technique will work for rubber stamps or digital stamps so look at all the images you have…
This was so fun and really easy!
Step one – create a background. This can include a night sky, a sunrise, a blended background, a“smooshed” distress ink background, and so many more – you choose. I first decided what background I wanted then found a stamp that would coordinate with it. I sometimes work backwards so do this your own way .
Step two – the image. Think flowers, leaves, people, so many things would work. Either it is already printed (a digi – see note below) or you need to ink it up and stamp it (in black ink) onto your background.
-Note: when using digital stamps, you can actually print out the image first and create a background over it without worrying too much about masking (easy right?)
Step three – the secret weapon. Using a black Sharpie, color inside the lines of the image until you have filled it in fully. If the artist has drawn outside of the main image (wisps of hair for example), leave them as they are – they add to the authenticity.
It is now a silhouette!
To show you how versatile your stamps are, and how awesome this technique is, I created two cards. I recreated the same background and added my outline stamp to both. I colored one up with color pencils then the other with my Sharpie. They both make me smile and are both effective… but how different right?
Here is the Colored Version:
Here is the Silhouette Version:
Here is a link to one of my inspirations for this technique -
__________________ We as people are raindrops of colorful ink , falling down Crisp and Clear, each a different shade more vibrant then the last, but once we realize at the bottom of an endless abyss we all fall into the same inkpot forming one color, only then can we come together as one My son.
What a great, innovative technique! I am so happy to be back after MIA from SCS due to an unexpected major surgery. So glad stamping doesn't require too much heavy lifting
__________________ Jan 'Being confident of this very thing, that he which hath begun a good work in you will perform it until the day of Jesus Christ'. Philippians 1:6
Would love to try this technique and have a birthday card I need to make. Thanks for the challenge. Happy day
__________________ The Difference Between Try and Triumph Is Just A Little Ump Wednesday: Alpha Challenge
Thursday: Ways To Use It Challenge
Monthly: MMJ Challenge….get inky and have fun
This was such a cool challenge and gave me a way to use a stamp I found too “cutesy” and had never used! Great new way to expand the versatility of our collections!
Fantastic! I have a card finished and ready for it's photo shoot... now just need to figure out how to upload it into the right gallery. (0.o)
Barbara, just make sure to put the challenge key words TLC673 in the keyword section of the upload and it will automatically be in this challenge gallery.
Here's my card using this technique. Thank you for the challenge. ;)
TFL Happy day
__________________ The Difference Between Try and Triumph Is Just A Little Ump Wednesday: Alpha Challenge
Thursday: Ways To Use It Challenge
Monthly: MMJ Challenge….get inky and have fun
I love this! Lydia Fielder made a cute one with the critters and I made one with a dragon and a wizard. Thanks so much for the tutorial. Challenge TLC673