|
|
| |
|
| Splitcoaststampers.com - the world's #1 papercrafting community |
 |
|
You're currently viewing Splitcoaststampers as a GUEST. We pride ourselves on being great hosts, but guests have limited access to some of our incredible artwork, our lively forums and other super cool features of the site! You can join our incredible papercrafting community at NO COST. So what are you waiting for?
Join the party at Splitcoaststampers today! |

|
|
 09-26-2017, 02:51 PM
|
#1
|
|
Stazon Splitcoast
Join Date: Apr 2006
Location: Las Vegas, baby!
|
 Conceding defeat and asking for help
So... I've been searching for and testing various adhesives to replace the no-longer-the same-formula-and-no-longer-works AdTech tape runner that I was using on the back of all of my unmounted rubber stamps, with ZERO success.
I have determined that I will have to bite the bullet and go the Tack It Over and Over route. I plan to add a dauber top to the bottle to turn it into a big "marker" so it's easier to apply. My questions are these: Does it work best used full strength or diluted? If diluted, what ratio of water to glue? Full coverage on the back of the stamp (edge to edge) or just "some"?
Any/all hints or tips or tricks or other advice or suggestions MORE than welcome! Thanks in advance... (and I'm still so sad...  ) __________________
~ Sue
Happy for no reason...
|

|


|
|
09-26-2017, 03:02 PM
|
#2
|
|
Stazon Splitcoast
Join Date: Feb 2005
Location: WI
|
Oh Sue! I'm so sad for your frustrating moment. You were the one who gave me the courage to go nekkid in the first place! Not sure you'll like my solution, but if it can help, then I'll be mighty honored.
I gave up on trying to have anything sticky on the rubber itself. I store my nekkid rubber loose (in a pocket with a stamped sheet so I know what pieces are in the set and how many belong in that pocket.). I have a strip or two or three of tape runner on one side of my clear blocks, depending on the size of the block, that do just fine to grab the stamps. When it gets too gross and unsticky, I rub it off and start fresh, but it works just fine for a pretty long time. With my MISTI, the vinyl cling sheet seems to do a fine job grabbing the rubber, but once in a while, I need to remove it and put down a dab or two of two sided tape on the MISTI lid. My way may not work at all for you, but if a bit of it helps, then yay!  __________________
If you don't want your tax dollars to help the poor, then stop saying you want a country based on Christian values, because you don't. ~ Jimmy Carter
Last edited by jeaniebean55; 09-26-2017 at 03:09 PM..
|

|
|
|
09-26-2017, 03:06 PM
|
#3
|
|
Hardware Hotshot
Join Date: Sep 2007
Location: Brampton, Ontario
|
I am a nekkid stamper, I am either to tight or too lazy but I just rub a bit of cheap mono or such like glue on the back of them slap them on the mount, MISTI or Tim Holtz platform, stamp, remove, wipe with a wet whip and move on __________________
Encourage, Empower and Embrace
|
|
|
|
|
09-26-2017, 04:26 PM
|
#4
|
|
Splitcoast Dirty Dozen
|
I just use Mono removable adhesive runner on the rubber stamp: https://tombowusa.com/school-office/...removable.html
I find that it has just enough stick to hold the stamp to the block, but it's super easy to peel off after I'm done stamping. When I'm done stamping, I just rub off the adhesive. It rubs off easily from the block and from the stamp, so I don't have to worry about anything getting tacky or dusty.
Hope that helps. |
|
|
|
|
09-26-2017, 04:50 PM
|
#5
|
|
Stazon Splitcoast
Join Date: Apr 2006
Location: Las Vegas, baby!
|
I typed up a whole response and thought that I hit the "post" button, but since it's NOT here, I guess I didn't...
Storage is where I get hung up on the idea of not having anything sticky on the backs of the stamps. I have SO MANY stamps! If I put them in pockets, they all fall to the bottom and create too much bulk to store in any kind of reasonable footprint. I tried trading card pages in binders but, when it became clear that I would need an entire wall of bookcases for all of the binders, I nixed that idea. What other options are there and how well do they work?
Thanks for the input so far. Even though I can't see my way to adopting what you're doing, I appreciate that you're offering suggestions and getting my wheels turning, truly...
__________________
~ Sue
Happy for no reason...
|
|
|
|
|
09-26-2017, 05:31 PM
|
#7
|
|
Rubber Obsessor
Join Date: Nov 2006
Location: Tha Bronx
Posts: 145
Likes: 0
Received 0 Likes
on
0 Posts
|
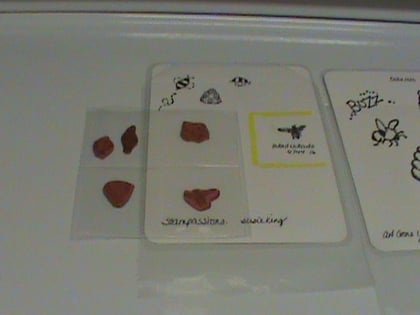
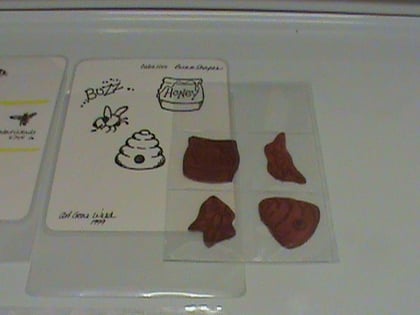
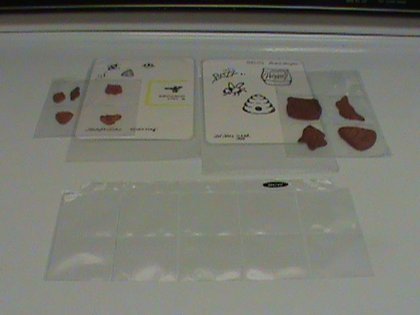
Hello, I made these cards about 4 years ago because I have way too many stamps to store any other way. I tried the cd's, the baggies, the binders and it all just took up too much room. This has contained my collection in one small bookcase. I got the tape at local dollar stores. It is still available currently. I see it all the time. The tape has just enough tack to keep the stamps attached but they come off easily. It does yellow some but that doesn't bother me. 4 years and the tape hasn't lost the tack or permanently fused to the stamps.
Ugh, sorry the pics loaded up sideways.
|
|
|
|
|
09-26-2017, 06:04 PM
|
#8
|
|
Stazon Splitcoast
Join Date: Apr 2006
Location: Las Vegas, baby!
|
I did something similar with poster tape, but the tape sometimes stuck to the storage panel, and sometimes stuck to the stamp. I found it too futzy to be happy about it, and that's when I tripped over the AdTech. Why, oh why did they have to change their formula? Going further back, why did Sailor quit making their wide chisel-tip glue marker? You get so happy with something, then they switch it up on you... >:-/
__________________
~ Sue
Happy for no reason...
|
|
|
|
|
09-26-2017, 06:14 PM
|
#9
|
|
Rubber Obsessor
Join Date: Nov 2006
Location: Tha Bronx
Posts: 145
Likes: 0
Received 0 Likes
on
0 Posts
|
Yup, that's why I used this tape. It stays stuck on the panel and the stamps come right off. Poster tape is too tacky, I've had it rip my posters...go figure.
|
|
|
|
|
09-26-2017, 06:22 PM
|
#10
|
|
Pearl-ExPert
Join Date: Jan 2005
Location: Santa Rosa Beach, FL
|
Sue, have you tried Tack N Peel. I have had a few blocks covered in it for several years and it works great for me.
Tack 'n Peel Reusable 4X6.5 Cling Sheets | JOANN |
|
|
|
|
09-26-2017, 07:17 PM
|
#11
|
|
Matboard Maniac
Join Date: Jun 2004
Posts: 206
Likes: 0
Received 0 Likes
on
0 Posts
|
Quote: Originally Posted by gregzgurl So... I've been searching for and testing various adhesives to replace the no-longer-the same-formula-and-no-longer-works AdTech tape runner that I was using on the back of all of my unmounted rubber stamps, with ZERO success.
I have determined that I will have to bite the bullet and go the Tack It Over and Over route. I plan to add a dauber top to the bottle to turn it into a big "marker" so it's easier to apply. My questions are these: Does it work best used full strength or diluted? If diluted, what ratio of water to glue? Full coverage on the back of the stamp (edge to edge) or just "some"?
Any/all hints or tips or tricks or other advice or suggestions MORE than welcome! Thanks in advance... (and I'm still so sad... ) |
I started to use TIOO because I was having a problem with EZ mount. I had a whole bunch of stamps that were sliding off the EZ mount. I would reposition them and they would slide off again. I changed the EZ mount and the same problem.
I didn't dilute the TIOO when I used it. I used a foam applicator and painted the back of the bare rubber with a very thin coat and let it dry for a couple of hours. It's messy and it worked fine and I store them in the SU DVD style cases.
I don't use it anymore and now use the Tack & Peel. It's less mess and virtually no prep time - once you adhere Tack & Peel to a clear block, you're done. I have a couple of different size blocks covered with Tack & Peel. I like it because you have a little bit of cushion. Bare rubber is still stored in the DVD cases with a stamp index.
erin |
|
|
|
|
09-26-2017, 08:44 PM
|
#12
|
|
Compulsive Stamper
Join Date: Sep 2016
Posts: 37
Likes: 0
Received 0 Likes
on
0 Posts
|
Sue, I am hearing that you are wanting more of a storage solution rather than a stamping solution. Based on that angle, I want to share something I came up with and hope it will work for you.
The JM 2 x 2 ink sample (coin pages) can be trimmed to fit the pockets. And of course, in a combination of one, two, four or whatever the set requires.
I will try to attach pics to give you an idea and the best part is:
1 NO STICKY
2 YOU ELIMINATE THE "COVER" SHEET IN THE POCKET
3 EASY TO REARRANGE
4 THE STAMPS STAY UP INSIDE THE POCKETS JUST FINE!
The best part is you can customize any set of pockets with the fuse tool as well.
If the top edge of the pocket is a bit stubborn, just trim a bit and no problem.
Hope this is a solution for you! Have Fun!
SORRY ABOUT THE PICS, AT FIRST I HAD NONE THEN THERE WERE MORE! STILL GETTING USE TO POSTING!
 |
|
|
|
|
09-27-2017, 01:02 AM
|
#13
|
|
Splitcoast Dirty Dozen Alumni
SCS Gallery Moderator
Splitcoast Challenge Hostess
Teapot Tuesday TEAm
Join Date: Jul 2007
Location: Dublin, Ireland
|
Since my solution is TIOO I'll address your question relating to that specifically, Sue. And part of the reason I use it is the same as yours: storage.Personally I don't dilute it. Full strength, thin coat all over, dry overnight. After drying, press on my jeans or back of my hand a couple of times before sticking to storage. This seems to noticeably reduce any residue sticking to the blocks after stamping.
I imagine that if the coat was thin enough, simply a few days in strategic areas would work perfectly well. After all, we don't put tape all over, just a couple of strips ;-). But I spread mine by putting a little squeeze on the stamps, then putting on a latex glove and using my finger to spread it evenly. Doing that, it's easiest to just spread all over. Your dabber sounds as if it would be fine for applying in just a few spots.
For my Art Neko stamps, I am managing to fit a LOT in the big SU wood-mount cases, sticking them to the case and I think I have 3 pieces of report cover cut to size with stamps on both sides. Very economical of space.
|
|
|
|
|
09-27-2017, 05:06 AM
|
#14
|
|
Compulsive Stamper
Join Date: Jul 2014
Posts: 41
Likes: 0
Received 0 Likes
on
0 Posts
|
Have you tried the Zig 2 way glue pens for this? I used the really large one or the medium one, and just apply it lightly and let it dry. I've been doing that with my SU stamp sets for about five years, and even the ones from my first order still stick well.
|
|
|
|
|
09-27-2017, 05:36 AM
|
#15
|
|
Glitter Guru
Join Date: Nov 2006
Location: The City That Never Sleeps
|
I still use TIO&O in a dauber bottle. I don't dilute it, and I make sure that I apply the thinnest coat possible. I then wait until it is completely dry before I store or use the stamp. Some of my stamps have gotten "gunky," but those are my older stamps (about 10 years old). On those, I remove the old TIO&O with UnDu, and I apply a fresh coat.
|
|
|
|
|
09-27-2017, 06:37 AM
|
#16
|
|
Stazon Splitcoast
Join Date: Feb 2005
Location: WI
|
Jana, love your coin pocket system! Did a little internet poking around and prices don't seem bad at all. Have a few local coin shops and may have a look at them IRL.
__________________
If you don't want your tax dollars to help the poor, then stop saying you want a country based on Christian values, because you don't. ~ Jimmy Carter
|
|
|
|
|
09-27-2017, 08:10 AM
|
#17
|
|
Stazon Splitcoast
Join Date: Apr 2006
Location: Las Vegas, baby!
|
Quote: Originally Posted by Jana 25
Sue, I am hearing that you are wanting more of a storage solution rather than a stamping solution. Based on that angle, I want to share something I came up with and hope it will work for you.
The JM 2 x 2 ink sample (coin pages) can be trimmed to fit the pockets. And of course, in a combination of one, two, four or whatever the set requires.
I will try to attach pics to give you an idea and the best part is:
1 NO STICKY
2 YOU ELIMINATE THE "COVER" SHEET IN THE POCKET
3 EASY TO REARRANGE
4 THE STAMPS STAY UP INSIDE THE POCKETS JUST FINE!
The best part is you can customize any set of pockets with the fuse tool as well.
If the top edge of the pocket is a bit stubborn, just trim a bit and no problem.
Hope this is a solution for you! Have Fun!
SORRY ABOUT THE PICS, AT FIRST I HAD NONE THEN THERE WERE MORE! STILL GETTING USE TO POSTING!
|
I started to do this with coin pages, trading card pages, coupon pages and photo pages so they could all co-exist happily in binders, but I was ending up with waaaaay too many pages and had barely made a dent in the stash. Thanks for another idea - in pockets would be more space-saving and portable than the binders, for sure! Maybe I'll look at that again, but I'm thinking I'll probably go the TIO&O route, after all... __________________
~ Sue
Happy for no reason...
|
|
|
|
|
09-27-2017, 08:13 AM
|
#18
|
|
Stazon Splitcoast
Join Date: Apr 2006
Location: Las Vegas, baby!
|
Quote: Originally Posted by hilsmomHave you tried the Zig 2 way glue pens for this? I used the really large one or the medium one, and just apply it lightly and let it dry. I've been doing that with my SU stamp sets for about five years, and even the ones from my first order still stick well. |
I did use the Zig on some and it may have worked well, but it was a while back and I can't tell now if those are the ones that seem okay, or if those are the ones that are peeling. I've tried literally every adhesive I've ever even heard of, with varying success. I still have a large Zig glue pen, so maybe I'll do a side-by-side comparison with the TIO&O. Thanks for the input! __________________
~ Sue
Happy for no reason...
|
|
|
|
|
09-27-2017, 08:19 AM
|
#19
|
|
Stazon Splitcoast
Join Date: Apr 2006
Location: Las Vegas, baby!
|
Thanks, everyone! I really appreciate the time and input from one and all! I put some TIO&O in my dauber bottle last night and did a test run on one stamp set. I did dilute it slightly with distilled water, just so it would flow a bit better through the dauber. The stamps seem to be sticking well to both the MISTI and the storage panel, so maybe I'm good to go. The dauber makes it easy to spread a thin coating all over the back of the stamp, so it's not as messy as my previous encounters with TIO&O. I have some stamps that are falling off of their storage panels because of the AdTech formula change, so I have to rescue those before I lose something... Thanks again!
__________________
~ Sue
Happy for no reason...
|
|
|
|
|
09-27-2017, 10:48 AM
|
#20
|
|
Pearl-ExPert
Join Date: Jan 2006
Location: SW Iowa
|
where do you find a dauber bottle? I think I know what you are talking about, but I didn't know they came empty also?
|
|
|
|
|
09-27-2017, 11:29 AM
|
#21
|
|
Stazon Splitcoast
Join Date: Apr 2006
Location: Las Vegas, baby!
|
__________________
~ Sue
Happy for no reason...
|
|
|
|
|
09-27-2017, 05:29 PM
|
#22
|
|
Matboard Maniac
Join Date: Sep 2010
Location: Texas
Posts: 292
Likes: 0
Received 0 Likes
on
0 Posts
|
Quote: Originally Posted by Jana 25
Sue, I am hearing that you are wanting more of a storage solution rather than a stamping solution. Based on that angle, I want to share something I came up with and hope it will work for you.
The JM 2 x 2 ink sample (coin pages) can be trimmed to fit the pockets. And of course, in a combination of one, two, four or whatever the set requires.
I will try to attach pics to give you an idea and the best part is:
1 NO STICKY
2 YOU ELIMINATE THE "COVER" SHEET IN THE POCKET
3 EASY TO REARRANGE
4 THE STAMPS STAY UP INSIDE THE POCKETS JUST FINE!
The best part is you can customize any set of pockets with the fuse tool as well.
If the top edge of the pocket is a bit stubborn, just trim a bit and no problem.
Hope this is a solution for you! Have Fun!
SORRY ABOUT THE PICS, AT FIRST I HAD NONE THEN THERE WERE MORE! STILL GETTING USE TO POSTING!
|
I love this suggestion! Thank you! |
|
|
|
|
09-27-2017, 07:58 PM
|
#23
|
|
Compulsive Stamper
Join Date: Sep 2016
Posts: 37
Likes: 0
Received 0 Likes
on
0 Posts
|
Thanks for the likes! I received so much help from SCS family and saved all my stamp collection and now a proud owner of a laminating machine and refrigerator bins! But we always up for fine tuning our stash!
Sue, I totally agree binders are not the way to go. Been there and had so much trouble! Even after awhile the rubber started to curled from the weight of falling over in the binders.
By the way, not to highjack a thread, but can any tell me how I managed such a large pic in that post and two to boot! I used the insert option then oops! OR redirect!
Thanks again.
Last edited by Jana 25; 09-27-2017 at 08:01 PM..
|
|
|
|
|
09-27-2017, 10:22 PM
|
#24
|
|
Splitcoast Dirty Dozen Alumni
SCS Gallery Moderator
Splitcoast Challenge Hostess
Teapot Tuesday TEAm
Join Date: Jul 2007
Location: Dublin, Ireland
|
When you use that insert photo option, the larger your original image the larger the insert will be. I usually scale my images down if I'm adding them that way. The "smaller" alternative is to add them as attachments. Then if you want them in the body of the post and not just underneath, click on the little downward arrow beside the paperclip, and click "insert all". Then they show in the body of the post as small thumbs but are clickable to enlarge. How you got two I don't know, but that deals with the size issue.
|
|
|
|
|
09-28-2017, 09:59 PM
|
#25
|
|
Proud Fan Club Member
Join Date: Mar 2011
Location: Langley, B.C. Canada
|
subbing
Shirl
|
|
|
|
|
09-30-2017, 06:27 AM
|
#26
|
|
Stazon Splitcoast
Join Date: Apr 2006
Location: Las Vegas, baby!
|
Thought I'd pop back with an update... The dauber bottle wasn't exactly a "fail", but it wasn't the brilliant success I was hoping for, either. Maybe I got a faulty one, but I didn't get enough TIO&O flowing through it to adequately do the job, so I switched to the "all-purpose tool" (aka: my finger) method instead. Let them dry overnight, just to be safe, and I'm happy with the results. I have too many stamps to do all of them that need it at once, so I'm just doing them as I encounter issues...
__________________
~ Sue
Happy for no reason...
|
|
|
|
|
09-30-2017, 06:35 AM
|
#27
|
|
Polyshrink Goddess
Join Date: Nov 2009
Location: Spencerville, Indiana
|
I had to laugh at the "all purpose tool" aka: my finger method" comment. When all else fails.......
|
|
|
|
|
10-01-2017, 09:22 PM
|
#28
|
|
Compulsive Stamper
Join Date: Mar 2016
Posts: 44
Likes: 0
Received 0 Likes
on
0 Posts
|
Not sure if this will help
but I bought a bottle of Zig Two Way glue with a wide (1/2") applicator tip to re-stick my cutting mats. When it ran out I refilled it with a slightly watered down TIOO and it works fine. I haven't used it on stamps yet as I'm still using the AdTech, but I'll give it a try if that starts to fail.
|
|
|
|
|
10-02-2017, 07:23 AM
|
#29
|
|
Stazon Splitcoast
Join Date: Apr 2006
Location: Las Vegas, baby!
|
Thanks, Teresa! I have one of those - maybe I'll give it a try...
__________________
~ Sue
Happy for no reason...
|
|
|
|
|
10-04-2017, 12:59 AM
|
#30
|
|
Proud Fan Club Member
Join Date: Jun 2006
Location: texas gulf coast
|
Sue, what I do is I bought a bunch of Tack-it-over sheets on sale at Joann.com, then I bought a separate set of acrylic blocks and added the Tack-It to those. That way, I can keep adhesive off my rubber-only stamps and store them easier and in less space. I love it in practice, too. And I suppose you could use your regular blocks and just know one side has the Tack It applied, but I splurged. :-)
|
|
|
|
|
10-04-2017, 03:29 AM
|
#31
|
|
Matboard Maniac
Join Date: Aug 2005
Posts: 200
Likes: 0
Received 0 Likes
on
0 Posts
|
Sue, just wanted to let you know my experience. I didn't have success with the TIO&O or the AdTech. The TIO&O was too sticky and that and the AdTech left residue on my blocks. I put a small blob of Tombow Multi glue on a silicone mat then used a quarter of a sponge with a binder clip attached to apply a thin coating of glue to the back of my stamps. Let them dry thoroughly. I store them on laminated pouches (no paper inside). Hope you find your solution. Debbie
|
|
|
|
|
10-04-2017, 05:41 AM
|
#32
|
|
Stazon Splitcoast
Join Date: Apr 2006
Location: Las Vegas, baby!
|
Quote: Originally Posted by 123scrapSue, what I do is I bought a bunch of Tack-it-over sheets on sale at Joann.com, then I bought a separate set of acrylic blocks and added the Tack-It to those. That way, I can keep adhesive off my rubber-only stamps and store them easier and in less space. I love it in practice, too. And I suppose you could use your regular blocks and just know one side has the Tack It applied, but I splurged. :-) |
Multiple people have suggested leaving the rubber bare and adding sticky to the blocks/MISTI/whatever - and I tried that myself - but STORAGE becomes the issue with that! I've tried multiple methods (coin/trading card pages, baggies, drawers, photo cases, poster tape on laminated panels) and NONE of them worked for me in the long-term (some failed almost immediately). How do you store yours "easier and in less space", please and thank you? __________________
~ Sue
Happy for no reason...
|
|
|
|
|
10-04-2017, 06:26 AM
|
#33
|
|
Stazon Splitcoast
Join Date: Feb 2005
Location: WI
|
not really answering your question, Sue, more of a 'look what you've started' comment ... lol!
So here's my plan (why did I ever peak into this thread?!?! My system was OK ... just now I think Jana-thanks-to-Sue's-question has started me on a better one. lol!) I went to my local coin shop and picked up a sheet of each: the 4 x 5 grid, 2 inchies and the paper money 4 pocket sheets, to see what the plastic is like, to see how easy it is to get things in and out, to see how adaptable they are to suit my container options, and this is what I've discovered and where I think I'm headed: The paper money sheets are divided into four sections and can be easily cut apart. They are sturdy plastic, but measure just under 3 x 7 inches, easy to get into and out of, sturdy enough so stamps don't slide over and under each other, so I can put a good amount in a pocket (I like to keep sets together). I already have several Iris project containers*, and the pockets will fit perfectly and the lid closes easily. That way I can arrange and rearrange as desired. The Iris project containers are very stackable.
an aside: Tim Holtz has thin acrylic blocks for a fraction of the cost of the regular kind. They have an etched grid on them and take up way less space. I wasn't sure I'd like them, but I've been using them with my cling stamps and they work great. (not sure I'll use them with nekkid rubber as there's not much space between the CS and the block, but who knows?!) anyway ... I find I'm using them more and more with my cling stamps and my other blocks with tape runner for nekkid rubber.
* approx 10 x 14 x 4 inches
__________________
If you don't want your tax dollars to help the poor, then stop saying you want a country based on Christian values, because you don't. ~ Jimmy Carter
|
|
|
|
|
10-04-2017, 08:32 AM
|
#34
|
|
Splitcoast Dirty Dozen
You know I love RED
Join Date: Aug 2007
Location: Wayland MA
|
Sue, thanks for getting this started. I didn't know that Ad Tech had changed their formula. Maybe that explains why things don't stay stuck! I went to Tombow for attaching paper to paper, and Zots for anything bulky. I tried the TI00 as well, and though it works, I found it so messy I stopped. My stamps are nekkid, and in CD cases like the ones from SU. I put down strips of double sided tape on the plastic, and stuck the stamps down to that. Really works well.
One other things......clear stamps I stick to clear sheets that come with the stamps, on both sides, and put one in each case. That works.
Keep us up to date on how things are going. Binders didn't work for me either!
__________________
Anne Harmon FS154, QFTD58, PROUD FAN CLUB MEMBER
|
|
|
|
|
10-04-2017, 12:17 PM
|
#36
|
|
Crimping Master
Join Date: Mar 2008
Location: Bedford, NH
|
Hey Sue -- I use a quick swipe of my ATG on the back of the naked stamp itself to keep it in place on the piece of acetate that I use for storage. I haven't had any issues with them sticking permanently and the swipe stays sticky enough to keep the stamp on the block, too. It's a very low tech approach but it's working for me.
|
|
|
|
|
10-04-2017, 01:21 PM
|
#37
|
|
Stazon Splitcoast
Join Date: Apr 2006
Location: Las Vegas, baby!
|
I swiped my ATG on the back of a few, as well, before moving on to the TIO&O. I'm so frustrated with having to re-gear from what was working so well - you have NO idea! Why, oh why do the crafty suppliers have to switch things up or discontinue them?!? Sailor glue in the wide chisel-tip marker was THE BOMB!!! The stamps I have with Sailor on them are still PERFECT after at least a decade! Every single other adhesive I've tried (Tombow and ATG included) has had mixed results, at best, or epic fails, at worst. I'm packing to move across town next week, so I'm sort of ignoring the mess everything is currently in until I get at least semi-situated again. Thanks again for all of the discussion, everyone!
__________________
~ Sue
Happy for no reason...
|
|
|
|
|
10-04-2017, 01:24 PM
|
#38
|
|
Proud Fan Club Member
Join Date: Mar 2011
Location: Langley, B.C. Canada
|
Sue, I am glad you started this thread. And I do feel your pain, when you are perfectly happy and then it gets changed. I have not heard of Sailor glue though.
Happy moving. (I know it is a chore!)
Shirl
|
|
|
|
|
10-05-2017, 02:15 AM
|
#39
|
|
Proud Fan Club Member
Join Date: Jun 2006
Location: texas gulf coast
|
Quote: Originally Posted by gregzgurlMultiple people have suggested leaving the rubber bare and adding sticky to the blocks/MISTI/whatever - and I tried that myself - but STORAGE becomes the issue with that! I've tried multiple methods (coin/trading card pages, baggies, drawers, photo cases, poster tape on laminated panels) and NONE of them worked for me in the long-term (some failed almost immediately). How do you store yours "easier and in less space", please and thank you? |
OKAY, Sue, I'm so sorry, I did not explain myself right the first time. I do not use any kind of glue on my blocks. I use those TACK N PEEL clear sheets. I have a dedicated bunch of acrylic blocks that have those on there, so I can keep my rubber clean. Most of them are Stamp Smith-type photo stamps and not very recognizable, so I use a sharpie and write what each stamp is on the back of the stamp. Then I can store a bunch of them in these old VHS cases I have (or any similar box or case). I just use those to recycle. I also keep a file on my computer with a picture of each stamped image in each case, number the cases, so I can literally use my computer as a card catalog system. Find the stamp I want on my computer, then go to that case. I also keep stamps in cd cases and do the same thing. Hope this clears it up and corrects me - Tack n Peel is what I put on my blocks. |
|
|
|
|
10-05-2017, 07:20 AM
|
#40
|
|
Stazon Splitcoast
Join Date: Apr 2006
Location: Las Vegas, baby!
|
Hello again, Aimeslee! I knew that you meant Tack 'n Peel, so no worries there, lol. So you just have the rubber "in a pile" in the cases? I could do that with the larger ones (Unity's Angie Girls, for example), but I have a bazillion (no exaggeration) small sentiment stamps and there is NO WAY I could dig through a pile to find the one I wanted! I tried the coin pages for those, and it was still too much wasted space for me to be happy. I'm all about consolidation in as many ways as possible...
__________________
~ Sue
Happy for no reason...
Last edited by gregzgurl; 10-05-2017 at 12:15 PM..
|
|
|
|
|
|
| Thread Tools |
Search this Thread |
|
|
|
 Posting Rules
|
You may post new threads
You may post replies
You may post attachments
You may edit your posts
HTML code is On
|
|
|
|


