Splitcoaststampers.com - the world's #1 papercrafting community
You're currently viewing Splitcoaststampers as a GUEST. We pride ourselves on being great hosts, but guests have limited access to some of our incredible artwork, our lively forums and other super cool features of the site! You can join our incredible papercrafting community at NO COST. So what are you waiting for?
OK I am failing rubber stamping. I can't seem to get ink evenly on the stamp. I've tried several types of ink, rubber and clear cling stamps. I have pressed the stamp to the pad, tapped the stamp with the ink pad, and tried makers (Holtz distressed markers mostly) and my stamps still come out with blank spots.
What am I doing wrong, or do I need to know?
:confused:
Is it possible that the table you're using has a dip in it or just too much flex? Try adding something firm (like a magazine) under your card stock and see if that helps.
Sometimes, too, new stamps need to be "conditioned" with an eraser or a fine emery board. One of my favorite bloggers, Susan Raihala (aka LateBlossom) had a very good post on this here: Simplicity: Conditioning Clear Stamps
Rubber stamp wood mount or cling mount??? Might need a stamping foam pad to stamp on.
__________________ The quickest way for a parent to get a child's attention is to sit down and look comfortable. Practice safe eating always use condiments
Linda, I feel your pain. Doing anything for the first time can be frustrating, especially if you don't know if you're doing something wrong.
I will tell you that I have the best luck using pigment inks, rather than dye inks. My favorite all around black ink for basic stamping is Versafine Onyx. It works wonderfully well on both rubber and clear stamps. It works very well for detailed stamps.
Next, it is important to have a level surface to stamp on. I have a table which looks perfectly flat, but if I just put my paper down on the table and stamp, I can get uneven stamping. I usually put a magazine down, then the paper, then stamp. Some people have stamping mats, but magazines are easy and free.
Also, when you place the stamp on the paper, try to let it "rest" a minute. Don't just stick it down and pick up quickly. Sometimes that can cause blank spots. The ink needs a little time to sink into/adhere to your paper.
Just keep practicing and don't give up. You will get it!
__________________ Bugga in OK
"Be kind whenever possible. It is always possible." Dalai Lama
Dont worry! You'll get it! Even some of the biggest names in the business will tell you they are not good stampers.
I too love a foam mat, but a computer mouse pad will work fine too.
For years I did what a teacher told me-Take about 20 sheets of computer paper and use that. Some stamps really do have an unever surface, and these ways of having flex under you helps to compensate. A magazine or two also works.
What's nice about pigment inks is they dry slower for transfer. (but you have to leave it alone longer to dry unless you use a heat gun) Also "huffing" your stamp before pressing can help. (pant/breathe on it a couple times strongly) I was taught to do that.
Also true about the surface of the stamps, esp the clear re-the eraser trick. Sometimes there is mfg stuff still on it. I have seen it most with solid images.
Let us know how it goes. We'll get you there!
Just want to say - can't speak for all pigment inks, but my everyday go-to, Versafine Onyx really dries quickly. I use it on nearly all of my cards, cause I don't like colored inks. Would rather color images in myself.
__________________ Bugga in OK
"Be kind whenever possible. It is always possible." Dalai Lama
There's already some great advice here. I'm mostly curious what particular problems you are having with the rubber stamps. Those are normally fail proof for me. Cheap Acrylic Clear stamps can definitely be troublesome and require some finessing. I've had to do the sanding or eraser trick before on those. Pigment inks will be your BFF. I love the Dew Drop Inks by Memento and the Cat Eye ones from Colorbox. The foam mat will definitely help too. Here's some other suggestions, The Craft Review : Best Tools for Getting a Perfect Stamped Image
Bugga I love Versafine too, esp as I tend to use a lot of very detailed stamps. It rocks!
I am thinking more like.. colorbox, encore for metallics, brilliance..etc. Encore I actually have to fight with to get to dry. Even heat drying it might still rub off but I am in love with the metals. I know ranger and avery elle both make but I havent used those.
It isnt that pigments take forever to dry, just a bit longer.
Linda, when you say "blank spots" do you mean breaks in a stamp that is basically an outline of some kind, or blank spots in solid areas on a stamp?
If you mean blank spots in a solid area, then welcome to the club. Inking solid areas are the hardest thing to do. That's why so many of us have a MISTI - it allows you to re-ink and re-stamp directly over an "imperfect" image. I'm not telling you to buy one, just pointing out that getting a reasonable image from a solid stamp - especially a photopolymer stamp - is something that takes lots of practice and experimentation.
And notice I use the word "reasonable". Are you really getting blank spots that are so obvious as to render the image useless? It's very easy to get into the whole perfection thing and become intolerant of the smallest blips. The longer you stamp, and the more you look really closely at the work of your favorite stampers, the more you will see those little imperfections and the more you'll become comfortable with them in your own work. So be sure you're not being too hard on yourself. These are handmade cards, after all!
And of course I'm not talking about cards that are done in design-team tutorial demos - many of those folks redo and redo until things really ARE pretty much perfect because they have to and so throwing away lots of less-than-perfect work is part of the game for them.
__________________ I have come to the conclusion that buying craft supplies and actually using them are two separate hobbies. RachelRose Designs by Robin... GALLERY
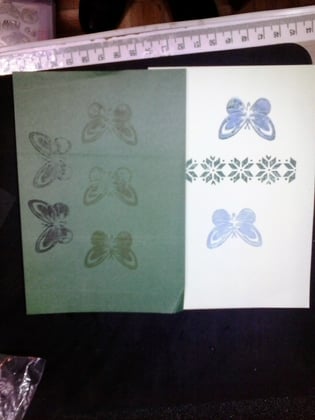
Thank you everyone. I think I've solved some of my problems. I now have a foam mat from Sizzix that helped, as did conditioning the stamp.
The card on the left shows my original attempts, before I posted. I had actually tried conditioning the stamp which you can see on the far left bottom worked, sort of. The right shows the most recent attempt using the mat, which helped. (The top butterfly is a double image.) The bottom one was done with a dye ink. All the others were with Tim Holtz Distress inks. The quilted stamp is a rubber stamp, and I think the spots and faded places are just part of using the Distress ink.
The mat definitely helped, though. As did the conditioning on the cheap butterfly stamp. However, I need to do some checking on a couple of the more complex rubber stamps and see if the mat helps with those.
Location: in a parallel universe, where i get to stamp all day!
Posts: 2,008
Likes: 0
Received 0 Likes
on
0 Posts
Linda
one of the key things that has helped me - regardless of ink or stamp type - is the MISTI. I've been stamping since 2009 and STILL have blank spots with solid images. I really resisted the MISTI thinking that I didn't need it. But, after throwing away so many cards that I had been making because of the "spotty stamping" problem, I decided to invest in one. Now, it saves me almost every time. I did try using a Stamp-a-ma-Jig - or "eyeing" it when using clear stamps... but nothing works like the MISTI does. (btw... I am definitely not being paid for this :grin:
Jaydee
Quote:
Originally Posted by LindafromIndiana
Thank you everyone. I think I've solved some of my problems. I now have a foam mat from Sizzix that helped, as did conditioning the stamp.
The card on the left shows my original attempts, before I posted. I had actually tried conditioning the stamp which you can see on the far left bottom worked, sort of. The right shows the most recent attempt using the mat, which helped. (The top butterfly is a double image.) The bottom one was done with a dye ink. All the others were with Tim Holtz Distress inks. The quilted stamp is a rubber stamp, and I think the spots and faded places are just part of using the Distress ink.
The mat definitely helped, though. As did the conditioning on the cheap butterfly stamp. However, I need to do some checking on a couple of the more complex rubber stamps and see if the mat helps with those.
Had to share this with everyone who's been so wonderful here. I am in the SCA--Society for Creative Anachronism, a Medieval and Renaissance recreation group. Our 50th year celebration is going on this week near where I live, with lots of classes and demonstrations. One series of classes is on fabric printing, which we know was done in period, and it was fascinating. I could not get to all of any one class because of other commitments, but I did watch part of the class on hands on stamping, and was really boggled to hear much of the information I've gotten here from the teacher. From using a pad to explaining that new stamps, whether you make them yourself or buy them don't always work well at first.
Meanwhile I'm going to look up the web page in the program book and really start researching this...
Getting a "solid" image to be covered evenly with ink and stamp well is a common problem among all stampers. All the tips you've been given are the things we all do to get our finished images to come out to our satisfaction. Sometimes just one will work, other times it takes all the major ones; condition the stamp, get the right ink, stamp on a better surface etc.
I did get a Misti and it is amazing to be able to re-stamp in the exact same spot if you end up with blank spots despite all your best efforts.
Once you get the hang of conditioning the stamps and have a surface to stamp on that is working for you, you might want to branch out past the Distress inks. I LOVE Distress inks but they are not the best for clear, crisp images when you stamp. If you get online and find Tim Holtz's videos you will see some great backgrounds and blending techniques with these inks.
I just thought I would add that I started to use my mouse pad which is usually sitting near by at my laptop. I put that under the paper I am stamping on to get a good solid image. Especially for silhouette images.
Just going to echo cobby's comment- don't expect a good crisp image from Distress Inks, That's not their function. For a good crisp image go to Versafine or Memento, or Archival.
Well for me the only clear stamps I have trouble with are SU! Sentiments are great as are rubber, but anything with a solid design not so much without going through all of the above and then not much improvement. The kicker is, I have yet to buy a cheap dollar clear stamp that does not give the perfect image.
After this happening with three sets and help from demos without resolve, I think I will stick to their rubber stamps, and will only buy clear from brands I can consistantly get a good image right from the start.
Love the helpful tips shared above, and just as cobby stated, sometimes just one tip/trick works, while sometimes it can be a couple of things together that seem to 'do the trick'.
I don't think it was mentioned that on solid stamps, care must be given to applying equal pressure across the full stamp ... don't skimp pressure in the middle. ;) Sometimes I notice peeps in classes holding the stamp block by the edges or by the corners while stamping. And that's fine for smaller stamps and smaller sentiments. But when the middle areas are weak, it might be that you need to gingerly move your pressure across to include those weak-looking areas.
Next item to check can be the cardstock. Various cardstocks simply respond differently to the ink you're using. Some are inky-sucker-uppers, some are not. Likewise, there's a lot of response-variety amongst the many ink pads out there, so it's nice to become familiar with your faves on clear and on rubber and on your different cardstock choices at your table.
You gave me my laugh for the day with this term!
__________________ Bugga in OK
"Be kind whenever possible. It is always possible." Dalai Lama
Sometimes no matter what you do, using all of the above tips its just comes down to the stamp. Sometimes you just get one of a batch that missed quality control lol. Thank goodness this is rare.
I love the stampers secret weapon from Sizzix and the Stamps of Life. It is a thick pad and you can turn it over to use the back with your piercing tool.
Excellent for stamping and very cheap. Cut in half, you end up with two 8.5X11 mats.
I have bought four of these. I also use them (cut in half) when I have partly finished projects and want to put them aside. I put the pieces for each project on a mat and stack them.
__________________ I have come to the conclusion that buying craft supplies and actually using them are two separate hobbies. RachelRose Designs by Robin... GALLERY
Excellent for stamping and very cheap. Cut in half, you end up with two 8.5X11 mats.
I have bought four of these. I also use them (cut in half) when I have partly finished projects and want to put them aside. I put the pieces for each project on a mat and stack them.
I like the idea of stacking works-in-progress on half-sisters of this mat! What worked well to do the cutting (or what was inefficient?). TIA and ...
Happy Crafting!
Tina aka TeeGeeDee
ETA:. All the previously given advice includes anything I might have said. Isn't SCS a helpful place!
I think I used a box cutter for a clean edge. They cut really easily.
Yes, the stacking is a great thing for me. I always have several projects going at once.
But they are also great stamping mats. Which is why I bought my first one.
__________________ I have come to the conclusion that buying craft supplies and actually using them are two separate hobbies. RachelRose Designs by Robin... GALLERY
I've been using a Sizzix stamping sheet, and probably will continue to use it until ai switch all my rubber stamps from wooden block to cling...After that the mat in the Misti does most of that job. I was able to get a really complex celtic cross stamp to print after three tries after I took it off its mount and used it in the Misiti. Tomorrow i've to do a sympathy card for my sister, because her husband just passed away. I'm trying to gather my ideas. And figure out what, that I've currently got will work.