Happy Monday, everybody. Judy and I have swapped again this month, so I'm here this week.
I'm sure that those who have been playing along in DTGD are pretty stamped-out, so don't worry, I've gone with an easy challenge this week ;-).
I can't find that we've done this before, excuse me if we have. I'm also not 100% sure what these are called - I have always known them as "floating cards" but when I did a quick look on the 'net, many people seem to call them "gap cards".
You have two options - with and without acetate.
Unless you have heavy, cardstock-weight acetate, go for the "without" option ;-). I remember making one with light acetate many years ago and it was too flimsy, even though my gap was vertical and not horizontal.
1: Take your card base in your chosen size. Make sure that the fold-line is parallel to your gap; Horizontal gap, you need your card folded at the top in tent-fashion. Vertical gap, have your card folded at the side.
2: Cut off a strip from the bottom of the front of the card (front only, don't cut the back); no exact measurements, it's up to you. It needs to be at least 2", really, since you will be taking some more off it to create the "gap". It can be either straight, free-handed in a curve or if you have a curvy die, you can use that. If your gap is vertical, trim your strip from the right edge of the front
:arrow: If you are using stamping or DP on the front of the card - do it now!!! Embellishments will be added later.
3: I find it easiest to position the gap and then trim the bottom strip to the same depth as the back of the card when it has been attached.
3A ( A for Acetate): Cut a strip of acetate the same width as your card, and the depth of your desired gap + about half an inch or more.
Run a strip of tape across the new bottom edge of the front ON THE INSIDE.
Stick the acetate strip to it and close the card over so that the front now faces you.
Run a strip of tape along the bottom edge of the acetate (front of the card is now facing upwards) and re-attach the strip you trimmed off. If you want to cover it with DP or otherwise decorate it, it's easiest to do that first.
So looking at the card front, you have the main front, a strip of acetate, and the re-attached bottom. The acetate is attached on the back of the front.
Trim the front so that it measures the same as the back.
3B - if you are not using acetate, you need to use something like die-cuts (including words) which will re-attach the bottom strip to the card front and provide stability.
Arrange them along the bottom edge of the front, and when you are happy with the arrangement, adhere them to it. If your gap is vertical, make sure the lowest die-cut doesn't overhang the bottom edge of the card.
Position your bottom strip so that the bottom edges of the die-cut pieces will overlap it slightly, and adhere them in place. Three anchor points are sufficient for stability, you can also add smaller die-cuts for decorative purpose.
Trim the bottom (or side) edge of the card so that it is the same size as the back.
4: Decorate the rest of the card front.
Decorate the inside back!! Some of this will show through the gap.
For the acetate version you can also pretty up where you have stuck the acetate on by lining the back with DP - look at the photos I have attached to see what I mean (but don't look too closely!! - I didn't realise that there was part of a sentiment on the back of one of my little birds :oops

.
It's actually pretty easy, but I have attached some pictures which may be helpful. They include the tip that when you are sticking die-cuts to the card front, a little scratch paper is a good idea to protect the card back from accidents ;-).
Click on them and they will enlarge...


.


.

:arrow: Here's a link to our
TLC546 Mind The Gap gallery
Here are my samples:
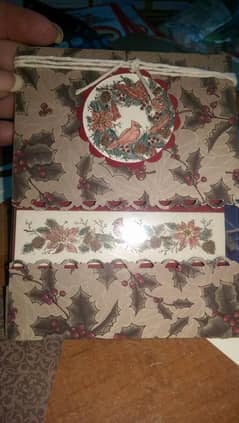
TLC546 Birdie Birthday - acetate version
TLC546 No Magic, Just Mushrooms
TLC546 Rainbow of Hope
:arrow: Remember to use the keyword
TLC546 when you are uploading. It's helpful (to the hostesses for sure!) if you come back and leave a link on this thread .
If you're not sure how to link your card on the thread here, here's how:
1. Open 2 windows or tabs: one window for your card and one for this thread.
2. In this thread, click on reply and type anything you want to show before the link.
3. Go to your card window. Highlight the address for your card. (It says www. splitcoaststampers.com/gallery/showphoto..... and so on)
4. Click EDIT. Click COPY
5. Go back to this thread. Click PASTE.