Triple Tier Slider Card
by Heather Summers
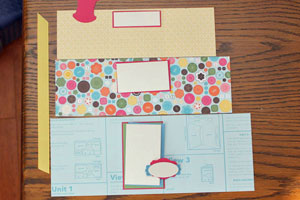
Pull on the top tab and watch hidden layers slide out from the bottom layer.
Supplies
- One 11 5/8" x 4 1/2" piece of patterned paper
- One 10 3/4" x 3 3/8" piece of patterned paper
- One 9 3/8" x 3" piece of patterned paper
- Two 1/2" x 2 7/8" strips of cardstock (slider tabs)
- Cardstock to layer images and punch out tabs
- One 7/8" x 2 3/4" piece of watercolor paper, or neutral cardstock (for top image)
- One 1 3/4" x 3" piece of watercolor paper, or neutral cardstock (for middle image
- One 2" x 3 1/2" piece of watercolor paper, or neutral cardstock (for bottom image
- Paper Cutter with scoring tool
- Ribbon
- Tab punch
- Adhesive
- Stamps and ink
Step-by-Step
-
Step 1
Score the 11 5/8" x 4 1/2" piece of patterned paper at 3 7/8" and 7 3/4".
On the end shown, cut two slots that are 2 1/2" long. They will be 1" in from the score line on the left, 1" from the right edge and 1/2" from the top.
-
Step 2
Score the 10 3/4" x 3 3/8" piece of patterned paper at 3 3/8" and 6 7/8".
On the end shown, cut two slots - 1" from the score line and 1" from the edge. Each slot will be 2 1/4" long and start 1/4" from the top.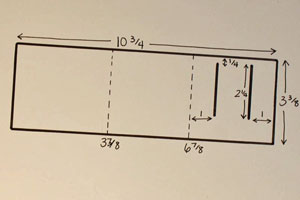
-
Step 3
Score the 9 3/8" x 3" piece of patterned paper at 3 1/8" and 6 3/8".

-
Step 4
Stamp all the images on watercolor paper.
Adhere layers to slightly bigger pieces of cardstock if you would like a mat for your images.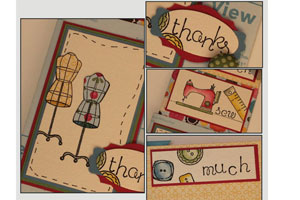
-
Step 5
Attach the top image to the middle panel of the smallest piece of patterned paper.
Punch a tab out of cardstock and adhere it so the RIGHT side is facing down (this seems wrong, but it will face the front in the end.) This is the top tier of your card.
-
Step 6
Place the second layer of patterned paper so the "right" side is facing down, and the slots are on the right side.
Weave the 1/2" strip of card stock through the slots - the ends will be on the bottom of the patterned paper.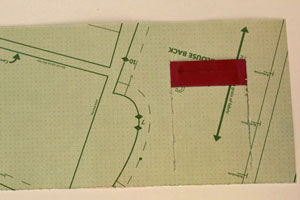
-
Step 7
Flip the Patterned Paper over and fold the ends gently around the it. This creates the sliding mechanism for the tier.
Flip the paper over so the ends and the "right" side of the paper faces down.
Attach Sticky Strip™ to the tab of card stock and push the tab to the bottom of the track. With the "right" side of tier one facing down, place tier one onto tier two so the panel is centered and the top edges of the Patterned Paper are aligned.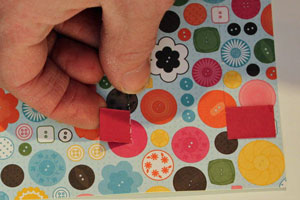
-
Step 8
Attach a line of Sticky Strip™ on the end of the first tier and fold shut.

-
Repeat with the second tier. Now pull on the tab (gently) and see how the tier slides up.

-
Step 9
Repeat the steps of attaching tier two to the third piece of patterned paper.
Lay the patterned paper with the "right" side facing down. Place the card stock tab in the slots. Flip the patterned paper over and fold down the ends.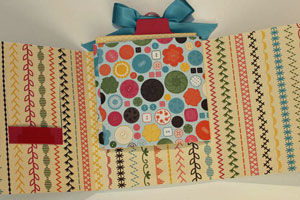
-
Flip the page back over, attach Sticky Strip™ and attach the second tier to the third piece of Patterned Paper.
Attach a piece of Sticky Strip™ along the end and fold shut to close the bottom layer.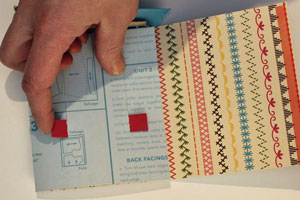
-
Step 10
The card is now finished - this is how it looks when it's closed.

-
Here is the card fully opened.
A few tricks or tips:
I suggest using Patterned Paper for this card as the thinner paper is easier to slide.
I wouldn't recommend too many layers on the middle layers (two max) and no embellishments. If it is too thick it's hard to slide out.
You can place a gift card in the top tier slot if you'd like another surprise.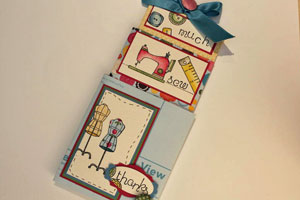
Video!
Your Turn
You've seen the tutorial, now you try it! We've got a section of the gallery set aside for Triple Tier Slider Card. Try this technique, then upload your artwork to the gallery. Show us your creations!
***Please note - Internet Explorer/Edge is not a supported browser, and will not allow you to see the videos. Please use Chrome, Firefox or Safari to view our tutorial videos.

Questions and Comments
We'd love to get your feedback or questions. Leave your comment below.
So excited to see you on SCS!!
I'm very excited to see you share your talents on Splitcoaststampers!
I've been hoarding my Sew Suite paper. Gotta break down and finally use it for this project.
LOVE IT!
Thanks for sharing and thanks for the video. I am a visual person and while I 'get' the written instructions and can see the pictures - the video puts it all together for me.
Thanks, again
Page 1 of 2 pages 1 2 >