Triangular Diorama Card

by Bibiana Martinez-Ziegler

Create a unique diorama card.

Supplies

  • One 8 1/2" x 11" piece of cardstock

  • Paper trimmer

  • Scoring board

  • Bone folder

  • Scissors

  • Strong double sided adhesive tape

  • Die cutting machine

  • Stamps

  • Dies

  • Inks, Kaleidacolor, Versamark Dazzle Frost used here

  • Brayer

  • Embellishments

Step-by-Step

  1. Step 1

    Cut your 8 1/2" x 11" piece of cardstock at 5 1/2" . You will have 2 panels measuring 5 1/2" x 8 1/2",

  2. Step 2

    Score one of the panels (5 1/2" x 8 1/2") at 4 1/4" – A2 card

  3. Step 3

    Cut second panel (5 1/2" x 8 1/2") at 4 3/4" x 5 1/2". It will be your window panel. Score on each end at 1/8".

  4. Step 4

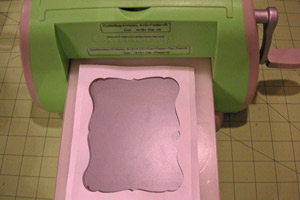
    Die cut the window frame on the single panel.

  5. Step 5

    You will have one A2 card fold for the base and one piece of cardstock for the window. Decorate as desired.

  6. Step 6

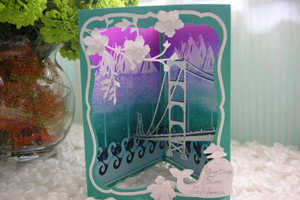
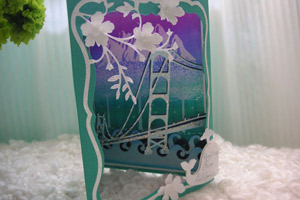
    Adhere window panel to the card base to finish the card.

Video!

Your Turn

You've seen the tutorial, now you try it! We've got a section of the gallery set aside for Triangular Diorama Card. Try this technique, then upload your artwork to the gallery. Show us your creations!

***Please note - Internet Explorer/Edge is not a supported browser, and will not allow you to see the videos. Please use Chrome, Firefox or Safari to view our tutorial videos.

Questions and Comments

We'd love to get your feedback or questions. Leave your comment below.

wow that is so cool smile
Lucy  |  Wed Jul 24, 2013 at 4:00 AM
You are so creative. Thank you very much for sharing!
Vicki  |  Wed Jul 24, 2013 at 4:33 AM
This is absolutely gorgeous. I love the colors and all the details. Thanks for sharing this!
Katherine Rock  |  Wed Jul 24, 2013 at 5:05 AM
Wow! I'm speechless - this has really taken my breath away with its beauty.
Bridget Keenor  |  Wed Jul 24, 2013 at 5:42 AM
How do you get in in an envelope?
Ann  |  Wed Jul 24, 2013 at 6:15 AM
An amazing card! Just got the bridge die, so this tutorial is perfect, & steps given so clearly! Thanks for sharing! Have trouble with brayer at times, so appreciated seeing you use it, too! Pat
Patricia Stoneking  |  Wed Jul 24, 2013 at 6:21 AM
I love that you "show" without "telling". Thank you!
Susan Myrick  |  Wed Jul 24, 2013 at 6:31 AM
This is awesome! How can you mail it though?? It doesn't look like it folds flat....???
Jeannie Kupsh  |  Wed Jul 24, 2013 at 6:57 AM
Beautiful Work
Anna Forsman  |  Wed Jul 24, 2013 at 7:39 AM
that was excellent TFS
susan mcmillan  |  Wed Jul 24, 2013 at 8:53 AM
I love all the gorgeous detail in your cards - be they in a class in person or on an SCS tutorial.
kab  |  Wed Jul 24, 2013 at 8:56 AM
Good grief, this is outstanding! I've never seen any card like this before. This is a fabulous wow!
Judith Hall  |  Wed Jul 24, 2013 at 11:24 AM
what a wonderful card. Instructions were nice and clear. Thank you for sharing this with us.
Julia Forsyth  |  Wed Jul 24, 2013 at 5:45 PM
Merci Bibiana pour cette magnifique cr�ation et pour le tutoriel!!!!!!!!
J'adore.
Chantal MEZIAT-BELOUZE  |  Wed Jul 24, 2013 at 10:44 PM
I was wondering that to......how do you get it in an envelope?
Linda  |  Thu Jul 25, 2013 at 3:45 AM
Where is the bridge die from? What a cool card!!
Connie Watson  |  Thu Jul 25, 2013 at 6:28 AM
Is this able to go into an envelope to mail? It is truly a piece of art but I have to mail most of my cards. Any ideas?
chaun  |  Thu Jul 25, 2013 at 8:57 AM
I love the colors. Are the Kaleidacolor pads you sued Blue Breeze and Caribbean Sea? I ordered the bridge die!
Astrid
Astrid Pryor  |  Sat Jul 27, 2013 at 2:33 AM
Absolutely gorgeous! To be hand-delivered only??
T C  |  Sat Jul 27, 2013 at 8:51 PM
wow. just wow. thanks for telling us who makes those fabulous dies. amazing what those diecut companies can make.
Jean Kanack  |  Sun Jul 28, 2013 at 6:13 AM

Page 1 of 2 pages  1 2 >

You need to be logged in to comment

GET OUR NEWSLETTER


Splitcoaststampers's privacy policy