Screen Divider Card
by Dawn Olchefske
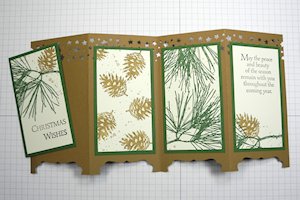
Use punches to create a paneled card or keepsake that looks like a decorative room divider screen.
Supplies
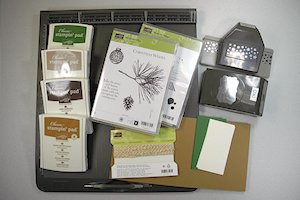
- Cardstock
- Base cut to 5 1/2" x 11" (Baked Brown Sugar Cardstock used here)
- four panels cut to 2 1/8 x 4 (Very Vanilla Card Stock used here)
- four layering panels cut to 2 3/8" x 4 1/4" (Garden Green Card Stock used here)
- Scoring board
- Border punch (Stampin’ Up Confetti Stars Punch used here)
- Decorative Label Punch or similar label die with decorative edge
- Adhesive
- Other supplies as needed to complete the card (Stampin' Up! products used here: Ornamental Pine and Gorgeous Grunge Stamp Sets; Garden Green, Baked Brown Sugar, Early Espresso and Crumb Cake Classic Stampin' Pads, Stamp positioner, Gold Baker's Twine (16"))
Step-by-Step
-
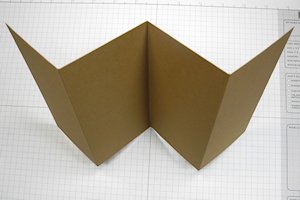
Step 1
Score 5 1/2" x 11" cardstock at 2 3/4", 5 1/2", and 8-1/4" along the long side.

-
Step 2
To create the Screen Divider fold, fold in half at scored line then fold each side back in the opposite direction at the scored lines.
-
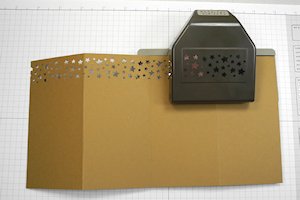
Step 3
Unfold card and lay flat. Using a border punch, create a punched border along the top edge of the card.
-
Step 4
To create "legs" at the bottom work with half of the card at a time. Keeping the two left panels folded, slide the bottom of those two panels into the Decorative Label punch (only 2 layers at a time will work). Position the cardstock about one-third of the way into the punch and center side to side, then punch.

-
Repeat with the right two panels.

-
Step 5
Use stamps & ink to create four decorative panels measuring 2 1/8" x 4".
NOTE:
Be sure to leave room for the greeting and your signature on the 4th panel.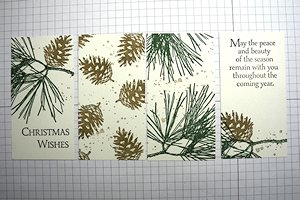
-
Step 6
Layer stamped panels on to cardstock measuring 2-3/8" x 4-1/4". Adhere completed panels to the screen divider card base.
-
Step 7
Embellish and complete the card, tying closed for mailing if desired.

-
Finished card will fit in an A2 envelope.

Video!
Your Turn
You've seen the tutorial, now you try it! We've got a section of the gallery set aside for Screen Divider Card. Try this technique, then upload your artwork to the gallery. Show us your creations!
***Please note - Internet Explorer/Edge is not a supported browser, and will not allow you to see the videos. Please use Chrome, Firefox or Safari to view our tutorial videos.

Questions and Comments
We'd love to get your feedback or questions. Leave your comment below.
Page 1 of 1 pages