Easter Basket

by Makeesha Byl

Create a sweet little basket to hold Easter eggs or other small treats.

Supplies

  • One 4 3/4" x 7 3/4" piece of cardstock for basket base
  • One 1" x 11" piece of cardstock for basket handle
  • One 1 1/2" x 15" piece of patterned paper to decorate basket base
  • One 7/8" x 11" piece of patterned paper to decorate basket handle
  • Scoring Tool
  • Scissors
  • Crop-a-dile
  • Two large brads
  • Adhesive
  • Stamps, Ink and additional cardstock to decorate the basket
  • Tissue Paper
  • Easter Eggs

Step-by-Step

  1. Step 1

    Adhere the patterned paper strip on the center of your cardstock strip.

  2. Step 2

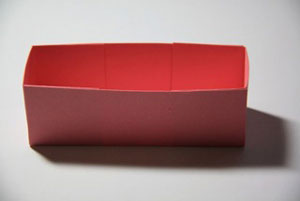
    Score your 4 3/4" x 7 3/4" piece of cardstock at 1 1/2" on each side.

  3. Step 3

    Cut the cardstock at the two scored lines on either side of the long length of cardstock.

  4. Step 4

    Add adhesive to the outside four corners of cardstock.

  5. Step 5

    Prefold your score lines, remove the adhesive backing and assemble your basket.

  6. Step 6

    Decorate the outside of your box.

  7. Step 7

    Punch a large hole with your Crop-a-Dile and also an inch up from either end of your handle, making sure to line everything up.

    Use a large brad to attach the handle to both ends of the basket.

  8. Step 8

    Place tissue paper into the box base and then add Easter eggs.

Video!

Your Turn

You've seen the tutorial, now you try it! We've got a section of the gallery set aside for Easter Basket. Try this technique, then upload your artwork to the gallery. Show us your creations!

***Please note - Internet Explorer/Edge is not a supported browser, and will not allow you to see the videos. Please use Chrome, Firefox or Safari to view our tutorial videos.

Questions and Comments

We'd love to get your feedback or questions. Leave your comment below.

Thanks. I have several people in my family who love cadbury eggs and this will be perfect for them.
Lisa  |  Wed Mar 3, 2010 at 8:48 AM
That is so adorable.....I will have to make some of these for the grandchildren.....
Gloria Westerman  |  Wed Mar 3, 2010 at 8:55 AM
Hello.....Is anyone else not able to view the video for this project? I see the space where the video should be, but the block is blank.

Patti
Patti  |  Wed Mar 3, 2010 at 8:58 AM
I am going to make this with my Assisted Living Residents! looks like something they will really enjoy for Easte. Thank you for all the great ideas!
Karen  |  Wed Mar 3, 2010 at 9:01 AM
oops... I mean Easter!
Karen  |  Wed Mar 3, 2010 at 9:03 AM
Patti,
Try updating your flash player. Hopefully that will help.
beate  |  Wed Mar 3, 2010 at 9:04 AM
Makeesha - this is great - fun, an "out of the box" size. I love it. Thanks for sharing with us. Definitely on my list of "I'm gonna make these"!!!
Cindy  |  Wed Mar 3, 2010 at 9:22 AM
Thanks so much for this wonderful tutorial!
I will definitely be making some of these for friends and family.
Robin (robth)  |  Wed Mar 3, 2010 at 10:10 AM
I love the size of this box. This is perfect for baskets for my coworkers. Great timing!
Dorlene  |  Wed Mar 3, 2010 at 10:25 AM
Wow.............I really loved this project. It looks fun and easy. I am planning on making this little easter basket with my 7 year old. Thanks for sharing.
Deedee G  |  Wed Mar 3, 2010 at 11:10 AM
Made one of these in a flash - great fun and looks good - just need some chocolate eggs to go in it. Bet I end up buying twice as many as I need so that hubby can "try them out"! Thanks.
Margie D  |  Wed Mar 3, 2010 at 12:11 PM
This is an adorable idea! Think I'll add it to my seniors class as an additional project for Easter! Thanks so much for sharing!
Janice  |  Wed Mar 3, 2010 at 12:17 PM
I also can not view the video . Any suggestions
Phil  |  Wed Mar 3, 2010 at 1:07 PM
If you have social networking things blocked on your computer, you tube will not show up. You'll have to go through the administrator password and temporarily unblock it.
Cindy R  |  Wed Mar 3, 2010 at 1:45 PM
You did such a nice job with the tutorial, Beate. It's a wonderful little project.
Judy  |  Wed Mar 3, 2010 at 2:34 PM
I can't wait to make one for each of my grandchildren. It's awesome!
cindy coven  |  Wed Mar 3, 2010 at 5:10 PM
Thanks Everybody.....I needed to update the Flash Player. Somehow it stopped working all of a sudden! Works fine now.

Patti
Patti  |  Wed Mar 3, 2010 at 6:26 PM
I really enjoyed making several of these for my Grandkids. I added one of those tiny little yellow chicks that I remembered in my Easter basket as a child. Thank you once again for such a sweet idea.
mary elizondo  |  Wed Mar 3, 2010 at 8:35 PM
What a wonderful tutorial. This is the sweetest little basket! I will have to give this a try!
Karen Maldonado  |  Wed Mar 3, 2010 at 10:15 PM
You mention in your written directions to use one 1 1/2" x 12" piece of patterned paper to decorate basket base, but in your video you mention 14 to 15 inches. Just a suggestion to change the written instructions so that everyone knows. I watched your video, but then followed the written instructions, and made my strip of paper too short. Thanks!
Valentina  |  Thu Mar 4, 2010 at 9:14 AM

Page 1 of 2 pages  1 2 >

You need to be logged in to comment

GET OUR NEWSLETTER


Splitcoaststampers's privacy policy