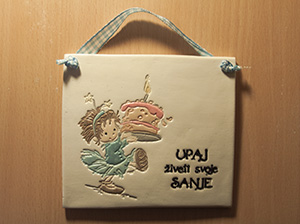
Clay Hanger

by Mojca Perdih

Stamp and color clay to create tile decor.

Supplies

  • Air Drying Clay

  • Clay Tools

  • Image Stamp

  • Straw

  • Watercolor Paints

Step-by-Step

  1. Step 1

    Roll out the clay till it's really smooth (you have to be careful that it is not too thin (around 1/4" or 1/2 - 1 cm)

  2. Step 2

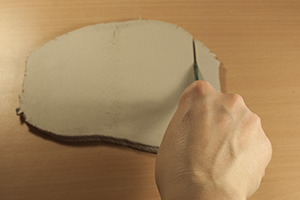
    Cut out the shape with your clay tools.

  3. Step 3

    Press stamp uninked into the clay.

    Hint:
    Be careful not to press to hard or too soft, but just something between. If you get any traces on the clay that you don’t want just gently rub them with you finger and some water ...but be gentle, any strong pressure will show on the surface.
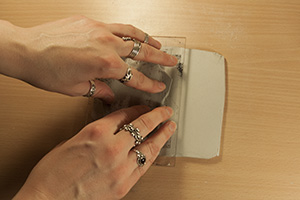
  4. Step 4

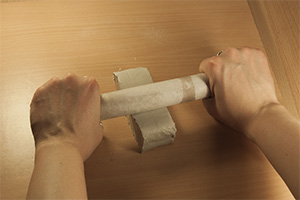
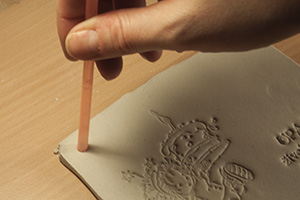
    Use a straw to make holes for the ribbon. Let it dry (at least 5 to 7 days but it depends on the temperature in the room).

  5. Step 5

    When it is completely dry color the picture and add ribbon. Watercolor paints were used here to color the image.

Variations

  1. Try working with clay on a smaller scale:
    Silk Clay Embellishments
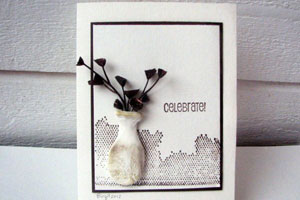
Your Turn

You've seen the tutorial, now you try it! We've got a section of the gallery set aside for Clay Hanger. Try this technique, then upload your artwork to the gallery. Show us your creations!

***Please note - Internet Explorer/Edge is not a supported browser, and will not allow you to see the videos. Please use Chrome, Firefox or Safari to view our tutorial videos.

Questions and Comments

We'd love to get your feedback or questions. Leave your comment below.

Hello Mojca, love the idea you came up with to make this adorable hanger from this cool clay. Now I can't wait to give this a try. TFS
Kris  |  Wed Mar 20, 2013 at 5:02 AM
Mojca, this is fabulous... what fun!! The directions are so clear and simple, cannot wait to try it!
Thanks for sharing your technique!
Sharon Field  |  Wed Mar 20, 2013 at 5:03 AM
Hi. I really like the little girl on the stamp you used. What company makes this stamp?
Rosemary Purdy  |  Wed Mar 20, 2013 at 5:26 AM
Mojca--great, easy to follow directions! @ Rosemary--that stamp is from Lily of the Valley, UK company!
Susanne Gleason  |  Wed Mar 20, 2013 at 6:05 AM
Mojca, love this clay idea. Could you tell me the company that makes the watercolor paint in your picture? I have some of those paints and love them, but there is no name on the container. THANKS!
Dolores Murphy  |  Wed Mar 20, 2013 at 6:27 AM
Where can I get that stamp? It's terrific!
Carol Henderson  |  Wed Mar 20, 2013 at 6:59 AM
Hi everyone
the stamp used with the lovely clay hanger is from
liliofthevally.co.uk

just check all of their wonderful stamps for every occasion. I just love them all
JANET HINTON  |  Wed Mar 20, 2013 at 7:08 AM
Love this idea and will have to have a go as I think my little granddaughters would love one of these plaques for their bedroom.
Monica Young  |  Wed Mar 20, 2013 at 7:17 AM
I'll bet a set of chimes could be made with this concept!!! Now to experiment!!!!
Kim Lambdin  |  Wed Mar 20, 2013 at 8:58 AM
I have access to the clay pictured, but I'm wondering if anyone has experimented with other brands? Crayola Model Magic is air dry, would that work?
Colleen Hapchuck  |  Wed Mar 20, 2013 at 1:25 PM
hi,

I love this project! I saw a tip for keeping crusts even when rolling them out. I thought it might work for rolling clay. cut 2 lengths of 1/4" wood 6-12 inches long and use that as a guide for your roller. when your roller runs along the wood your clay is 1/4 inch thick.
kathy senn  |  Wed Mar 20, 2013 at 3:12 PM
Oh I am so glad that you love the tutorial ... Thank you so much for all the kind words.

Dolores Murphy ... the watercolour paints are Pearlescent Watercolors
(http://www.memories.si/modules/trgovina/product.php?product_id=3839)

Colleen Hapchuck ... I haven't tried to use any other clay ... but I think that it would work with all air drying clays al well.

Hugs!

Mojca
Mojca  |  Wed Mar 20, 2013 at 5:45 PM
LOVE THIS! I want to try this with the chime idea for a birthday card. I also have wooden square dowels from another project that I will use for the 1/4" guide; great TIP for the OCD ! Thanks....
Mary  |  Wed Mar 20, 2013 at 6:24 PM
Could you use Copics to color this? Also would it be necessary to seal the surface with anything?
Adelle Priess  |  Wed Mar 20, 2013 at 7:16 PM
I've never tried working with clay like this, as an adult and it looks like great fun! Is there anything special needed for the stamps that are used? This tutorial is so well done!! Thanks!
SallyDee  |  Wed Mar 20, 2013 at 8:56 PM
SallyDee ... no you don't need nothing special for the stams. you just wash them after you don stamping. hugs!
Mojca
Mojca  |  Thu Mar 21, 2013 at 2:16 AM
I would love to try this - I am assuming that watercolor pencils would work as well? I don't have watercolors pots, just the pencils.
Kim Licata  |  Sat Mar 23, 2013 at 1:09 PM
Kim Licata ... hm, I dont know it you'll be able to colour with watercolor pencils .... haven't tried that jet ... but I think that would be really hard to do, because the clay is really different than paper ...

Hugs!

Mojca
Mojca  |  Sun Mar 24, 2013 at 12:26 PM
LOOOOOOOOOVE this idea!!!!!!!!!! This would make a SUPER LITTLE GIFT!!!!!!!! smile THANK YOU!!!!!!! smile
Becky Green  |  Wed Mar 27, 2013 at 7:03 AM
Is there any reason that a clay that needs to be baked (such as Femo) wouldn't work. I might just be willing to be the guinea pig on this! wink
Barbara  |  Fri Mar 29, 2013 at 7:55 PM

Page 1 of 2 pages  1 2 >

You need to be logged in to comment

GET OUR NEWSLETTER


Splitcoaststampers's privacy policy