Carousel Book
by Bibiana Martinez-Ziegler
Create a carousel-shaped book that can be customized with diecut scenes.
Supplies
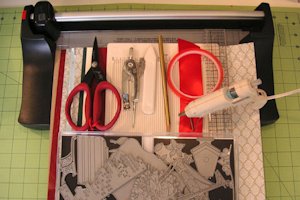
- Cardstock in several different colors
- Chipboard
- Paper trimmer
- Scoring board
- Bone folder
- Scissors
- Pencil
- Ruler
- Compass, or round shape/dish
- Double-sided tape
- Hot glue gun
- Die cutting machine
- Dies
- Ribbon
Step-by-Step
-
Step 1
Cut seven (7) each of the following cardstock panels:
Front Panel – 5 1/2” x 5 1/4” (shown in green below)
Inside Panel #1 – 5 1/2” x 7 1/2” (shown in red below)
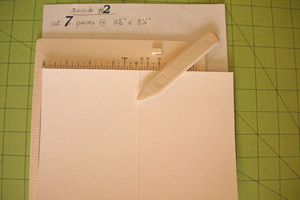
Inside Panel #2 – 5 1/2” x 8 1/4” (shown in silver mirror cardstock below)
Wall – 8” x 8 1/2” (shown in green below)
Roof - 5 1/2” x 8 1/2” (shown in glittery cardstock below)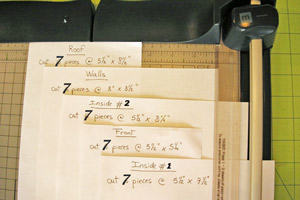
-
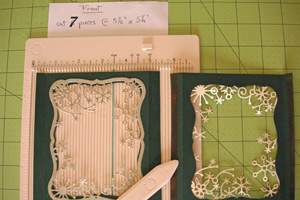
Step 2
Score the first front panel on the short side at 1/2” and 4 3/4”. Turn the panel over and place double-sided tape along the ends, outside the scored lines. Die cut a window opening in the center of each panel. Decorate the window opening as desired. Each one can be customized to create a scene or tell a story.
-
Fold the completed front panel in half, with scored ends folded to the outside. Secure the center fold with a bone folder.
Repeat the same steps for the remaining panels of this size.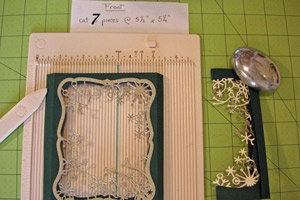
-
Step 3
Score the first inside panel #1 on the long side at 1/2”, 3 3/4” and 7”. Place double-sided tape along the ends, outside the scored lines. Fold the panel in half, and center a die to cut a window opening through both layers of cardstock at once. Decorate the window openings as desired.
Repeat the same steps for the remaining panels of this size.
-
Step 4
Score and fold each inside panel #2 on the long side at 4 1/8”.
-
Step 5
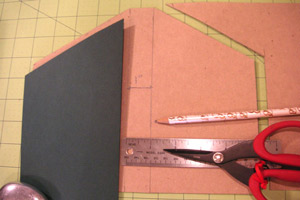
Score and fold the first wall panel on the long side at 4 1/4”.
Measure down 2 1/2” from the outer corner, and make a pencil mark. Cut a diagonal line from the top of the fold to the pencil mark. This creates the slope of the roof.
Repeat the same steps for the remaining wall panels.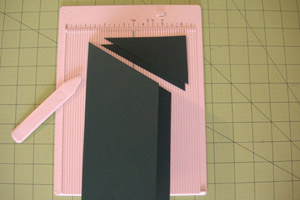
-
Step 6
To create a template for the roof shape, unfold one of the folded wall panels. Trace the pointed top edge onto a piece of scrap paper, and connect the ends with a rounded line using a pencil and compass. Cut out the template, then trace it onto the roof panel and cut the shape out.
Hint:
If you don’t have a compass, line up the edge of a plate, and trace the curve from point to point.
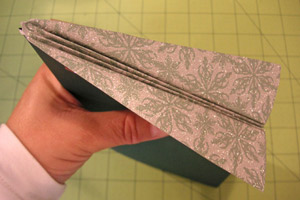
Fold the cut roof panel in half. Open it up, then fold each section in half again. Open again and fold to create another crease in each section, for a total of 7 fold lines. Open the panel and fold it accordion-style, with 3 valley folds and 4 mountain folds.
Repeat the same steps for the remaining roof panels.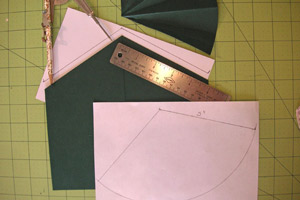
-
Step 7
Assemble one section of the carousel at a time. Each of the seven sections will have five pieces: one front panel (shown in green), one inside #1 panel (shown in red), one inside #2 panel (shown with silver mirror cardstock), one wall panel (shown in green) and one folded roof panel (glittery cardstock).
-
Using the double-sided tape attached earlier, adhere inside panel #1 to inside panel #2.
Add a front panel to these 2 pieces using the double-sided tape attached earlier (the tabs will wrap around the back).
Repeat the same steps for the remaining six sections.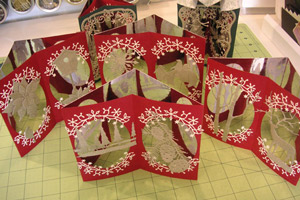
-
Step 8
Tape the assembled section to one half of a wall panel, aligning the bottom and outside edge. Line up the opposite edge, and tape down the other side.
Repeat the same steps for the remaining six sections.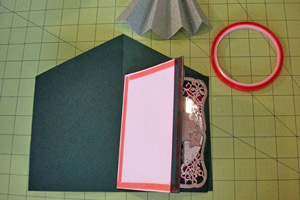
-
Step 9
Insert the folded roof piece into each section as shown, folded in an accordion fold, with the two end flaps out like a paper airplane. Fold down and tape these wings flush with the edges of the wall on the outside of this panel.
-
Step 10
For the cover, take a folded wall panel and trace it onto chipboard on the left side. Leave a 1” space in the middle for the spine, then flip the folded wall panel to the other side and trace again. Cut the shape with scissors, then score and fold along the spine.
-
Wrap the chipboard cover with matching cardstock. The outside piece should be larger than the cover, and the inside piece just slightly smaller. Score the lines along the spine again, and fold.
Attach ribbon to the center of each side of the cover, long enough to make a bow in the front. Attach a loop of ribbon on either side of the spine for a hanger.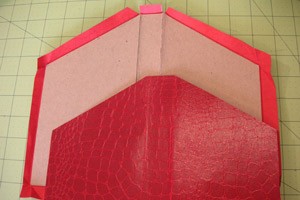
-
Step 11
Attach the assembled sections together side by side.
Glue the ends into the covers using a hot glue gun.
-
View of the carousel closed

-
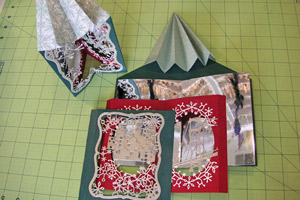
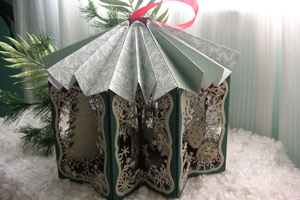
Step 12
View of the carousel opened and tied with bow on the front

-
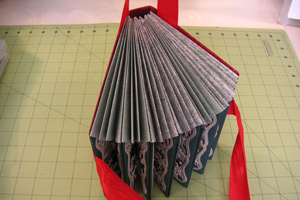
View of the carousel opened from the back
Video!
Your Turn
You've seen the tutorial, now you try it! We've got a section of the gallery set aside for Carousel Book. Try this technique, then upload your artwork to the gallery. Show us your creations!
***Please note - Internet Explorer/Edge is not a supported browser, and will not allow you to see the videos. Please use Chrome, Firefox or Safari to view our tutorial videos.

Questions and Comments
We'd love to get your feedback or questions. Leave your comment below.
http://memoryboxco.com/
If you plan on making one, give yourself plenty of time because this is a 15 hour card. At least that is how long it took me, it takes a while to decorate each mirror panel. But the end result is nothing short of stunning. Bibiana, you did an outstanding job not only in creating this beauty but also with the tutorial. The measurements are accurate and everything goes together beautifully.
I have the large backing to the Frostyville frame which cuts edge to edge, so I glued clear acetate over the opening to give the border something to glue against. Works fine, but I had to make a 2"spine to accomodate the thickness.
Thank you so much for this gorgeous piece and your kind comments on my blog!
Hugs, Ronnie Kay
Page 2 of 2 pages < 1 2