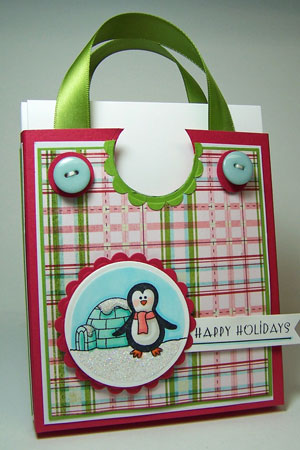
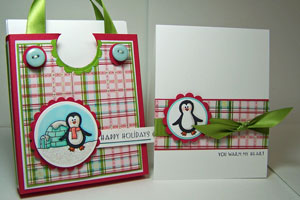
Card Purse
by Jodi Collins
Slip a few cards and envelopes into this purse for a quick and personal gift.
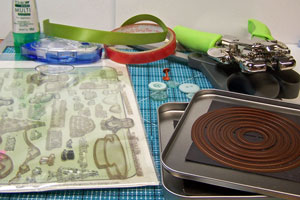
Supplies
- One piece of cardstock 5 3/4" X 11"
- Two pieces of cardstock 4 1/8" X 4 3/4"
- Two pieces of cardstock 1/2" X 4 3/4"
- Patterned Paper as desired
- Scor-Pal™, or other scoring tool
- Scissors
- Circle Nestabilities™ or circle punches
- Crop-A-Dile™
- Tacky Tape™, or other strong adhesive
- Two 11" strips of ribbon
- Adhesive
- Your choice of brads, buttons or eyelets (something to attach the ribbon handles)
- Stamps and Embellishments of your choice
Step-by-Step
-
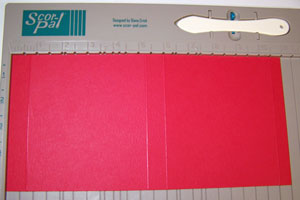
Step 1
Score your 5 3/4" X 11" piece of cardstock at 10.5", 6", 5.25" and 3/4".
-
Step 2
Turn the cardstock and score lengthwise at 5".
-
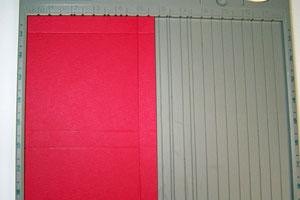
Step 3
Cut the bottom flaps as shown.
-
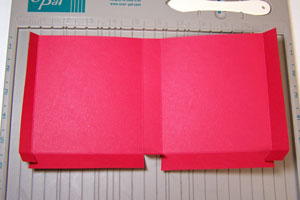
Step 4
Decorate the front, back and side panels using your patterned paper or stamped panels as you wish.
Do not adhere these to the box yet.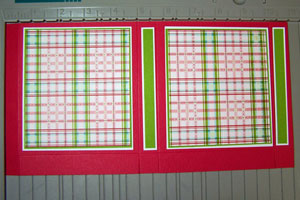
-
Step 5
Using a die cutting machine (I used a Cuttlebug™ and Circle Nestabilities™) or circle punches, cut a circle notch in the center of both the front and back of the box.
Do the same with your decorated panels.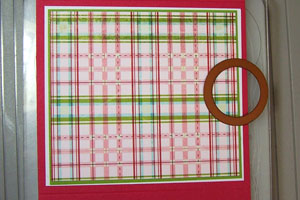
-
Step 6
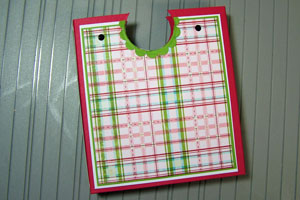
Place Tacky Tape™ as indicated. Fold and assemble the box.
Once assembled, adhere your front, back and side panels to the purse.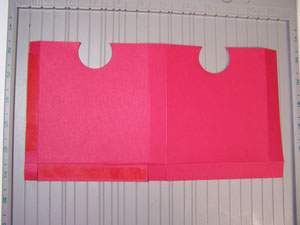
-
Step 7
Using a small circle punch or Crop-A-Dile™, punch two holes on either side of the circle notch. Do this to the front and back of the purse in the same spot.
-
Step 8
Attach your ribbon handles using brads.
Hint:
You can use any random brads from your stash if you plan to cover them up in the finished project. If not, use something that will match your final project.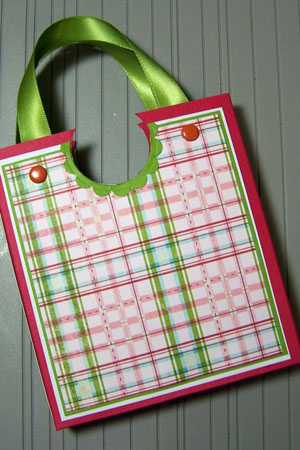
-
Step 9
Embellish your purse as desired.
-
Step 10
Make a set of matching notecards and envelopes for a fast, easy, handmade gift!
Video!
Your Turn
You've seen the tutorial, now you try it! We've got a section of the gallery set aside for Card Purse. Try this technique, then upload your artwork to the gallery. Show us your creations!
***Please note - Internet Explorer/Edge is not a supported browser, and will not allow you to see the videos. Please use Chrome, Firefox or Safari to view our tutorial videos.

 *
*
Questions and Comments
We'd love to get your feedback or questions. Leave your comment below.
You can find all our tutorials listed in our resource section. Click HERE and it will take you directly to the photo tutorial for the meander book.
Hugs and smiles
TFS, I too like the videos along with the written directions.
Keep 'em coming ladies.
Jennifer
Check Step one, the score measurements are listed there. 5.25 = 5 1/4". I used 5 1/4" and it worked. Maybe double check if you scored the other lines as listed above.
I love the penguin and igloo you used. Could you tell me which stamp set that came from?
TIA.....Happy Holidays
The stamps are from the Penguin Love set from There She Goes!!
Thanks for the tutorial - love this project.
https://www.thereshegoesclearstamps.com/store/
And the set is called Penguin Love...here:
https://www.thereshegoesclearstamps.com/store/penguin-love.html
that look like days gone by. and will try to make this Thank you very much.
Elisa
Page 2 of 3 pages < 1 2 3 >