Black Magic

by Wendy Weixler

Create a dramatic look by stamping on dark cardstock with light ink and coloring it.

Supplies

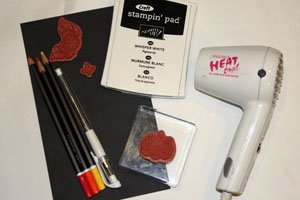
  • Black cardstock, or another dark colored cardstock
  • White pigment ink
  • Colored pencils
  • White gel pen
  • Heat embossing tool

Step-by-Step

  1. Step 1

    Stamp solid image in white craft ink onto black cardstock.

    Hint:
    Other dark cardstock will work as well.
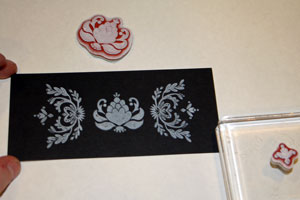
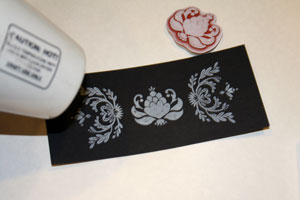
  2. Step 2

    Heat-set image with heat embossing tool.

  3. Step 3

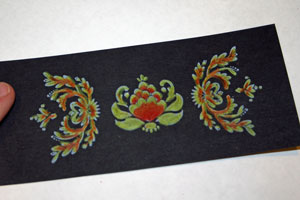
    Color image with colored pencils.

    Keep the lighter colors toward the edges of the image for a more dramatic effect. Start with the darker colors at the base or center of the image and work your way to the outside edge and lighter colors.

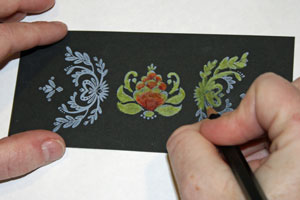
  4. Your finished image should look something like this. Don't be afraid to press too hard when coloring with the pencils. The richer the color, the greater the contrast.
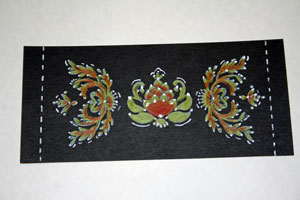
  5. Step 4

    Using a white gel pen, accent image with dots, and lines.
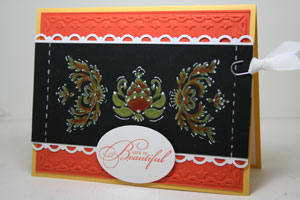
  6. Step 5

    Add image to card and embellish as desired.

Video!

Your Turn

You've seen the tutorial, now you try it! We've got a section of the gallery set aside for Black Magic. Try this technique, then upload your artwork to the gallery. Show us your creations!

***Please note - Internet Explorer/Edge is not a supported browser, and will not allow you to see the videos. Please use Chrome, Firefox or Safari to view our tutorial videos.

Questions and Comments

We'd love to get your feedback or questions. Leave your comment below.

Thank you! So impressive, can't wait to try this. I had a quick question about the stamps used in the card show in the photo for the Splitcoast sample. I found the SU! set for the side images, but not sure where to find the central image? Thanks in advance!
TxAngelDee  |  Thu Dec 30, 2010 at 8:05 AM
Sheesh!! My bad!! I totally forgot to list that in the card description in my gallery! The central image is from "Friends Never Fade" by Stampin' Up ... :S
Wendy Weixler  |  Thu Dec 30, 2010 at 8:14 AM
Going to try this tonite! Thanks
Debra  |  Thu Dec 30, 2010 at 10:57 AM
absolutely gorgeous!!!! Can't wait to try it. Thank you for sharing with us.
Laurie  |  Thu Dec 30, 2010 at 12:00 PM
for those who asked about Prisma colored pencils, for this techique. Prisma will work on any colored paper. I have used it on black, and many other colored paper. Prisma also has a water color pencil. Besure to try them too for different effects. Hope you have fun with the Prisma. I love them.
Pattie Jones  |  Thu Dec 30, 2010 at 12:53 PM
Marvelous tutorial. You really kept it interesting while you colored.
Debbie  |  Thu Dec 30, 2010 at 1:04 PM
I love my Prismas!!
Ruby Taylor  |  Thu Dec 30, 2010 at 3:31 PM
I love this technique! TFS! I cannot wait to try it out!
Melannie-Craft Haven Retreats  |  Thu Dec 30, 2010 at 9:27 PM
Hi Wendy, Thank you for a wonderful tutorial! I do not have watercolor pencils but I had to try this technique so I tried it with my Watercolor Crayons and it works great.. yahoo..I have not used them a lot so now I can use them. Thanks again!
Dahlene Spencer  |  Thu Dec 30, 2010 at 11:05 PM
Its beautiful. Vibrant. And I can't wait to try this out, its sophisticated, I think I'll probably make quite a few of these in the near future, thanks!
Louella Turvey  |  Thu Dec 30, 2010 at 11:56 PM
Love this technique. Anxious to try it. Thanks.
Bonnie  |  Fri Dec 31, 2010 at 12:15 PM
This is truly stunning! I'm always amazed at the beautiful work that appears on Splitcoasters. I love being able to be fed ideas that will enhance what I do. Thank you for being so generous and giving!
Meledie Knopf  |  Fri Dec 31, 2010 at 1:54 PM
just bought the white ink...going to try this 2nite....
Bonnie  |  Fri Dec 31, 2010 at 4:06 PM
WOW! This is a beautiful card. I can't wait to try it. This will be the first card I make...once my craft room it clean. I am halfway done, so tomorrow I will see if I can make a card as beautiful as yours. Thank you for sharing.
Ddddddiana  |  Fri Dec 31, 2010 at 8:36 PM
WENDY! That card is so fantastic! I must try this out this weekend...excellent tutorial!!!!
Kelly Schirmer  |  Fri Dec 31, 2010 at 9:08 PM
do you stamp & color on the 'flat' or the 'textured' side of the black card stock???
thnks
Lynn  |  Sat Jan 1, 2011 at 6:41 PM
I didn't use textured cardstock, so both sides of mine were "flat" ... smile
Wendy Weixler  |  Sun Jan 2, 2011 at 5:31 PM
I love the tutorial and Thank you for sharing. This will be great for Valentines Cards. I am going to try this technique as soon as I close...
TamraAnn  |  Sun Jan 2, 2011 at 7:33 PM
Is there any way to save the video on our computers that you know of?
Ruby Taylor  |  Sun Jan 2, 2011 at 7:42 PM
Wendy

In the written tutorial, one of the supplies is colored pencils. But in your video, you mention water color pencils. Is either one okay to use?

It's a spectular card.
Roberta Worley  |  Sun Jan 2, 2011 at 7:44 PM

Page 3 of 5 pages  <  1 2 3 4 5 >

You need to be logged in to comment

GET OUR NEWSLETTER


Splitcoaststampers's privacy policy