Bendi Fold
by Bibiana Martinez-Ziegler
Create this unique shaped card using 3 pieces of cardstock. Technique courtesy of Emma Fewkes
Supplies
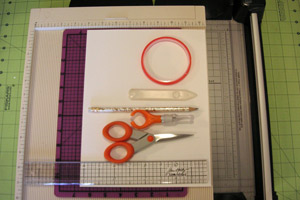
- One 5 1/2" x 8 1/2" piece of cardstock
- Paper trimmer
- Scoring board
- Self-healing mat
- Ruler
- Scissors
- Hobby blade
- Pencil with eraser
- Bone folder
- Strong Adhesive Tape
Step-by-Step
-
Step 1
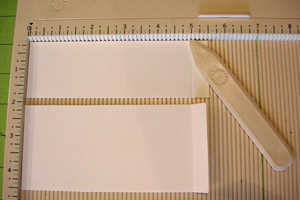
Cut your 5 1 /2" x 8 1/2"piece of cardstock at 4 1/4".
You will have 2 panels measuring 4 1/4" x 5 1/2".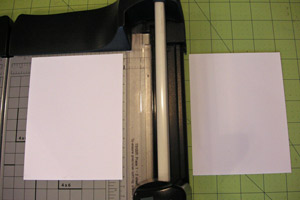
-
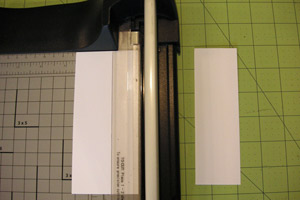
Step 2
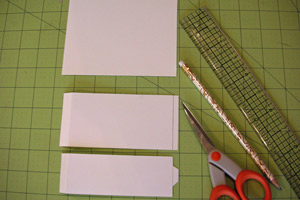
Cut one of the panels (4 1/4" x 5 1/2") at 2 1/2".
-
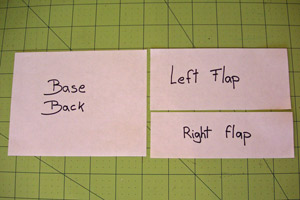
Step 3
You will have 1 piece of cardstock for the base and you will have 2 pieces of cardstock for the swinging flaps.
-
Step 4
Score 1/2" on each end of the swinging flaps.
-
Step 5
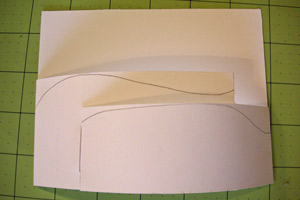
Trace a line with pencil at 1/4" on the opposite side of the scored line of each flap on those lines hand free cut 2 notches .
-
Step 6
Trace a line with pencil on the base piece of cardstock at 4" from the edge.
Trace a second line on the left swinging flap at 2" from the edge.
Mark with pencil on top of those lines where you will make the slits for the notches to be inserted.
Cut the slits with Hobby Blade.

-
Step 7
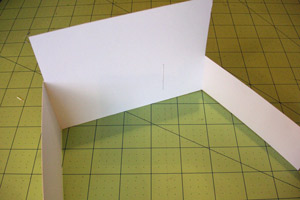
Erase all your pencil marks and lines.
Add double sided tape to the end of the flaps, on the scored side.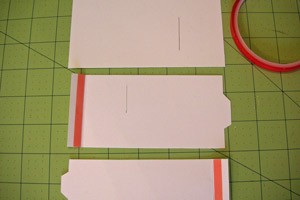
-
Step 8
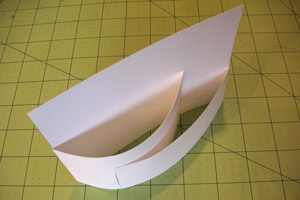
Tape the flaps to the base.
-
Step 9
Insert notches on slits. Make any adjustments.
.
-
Top view
-
Step 10 (Optional)
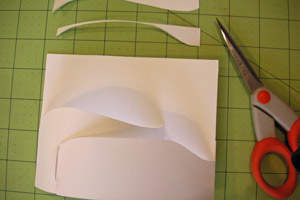
Trace with pencil valleys on the flaps.
-
Step 11
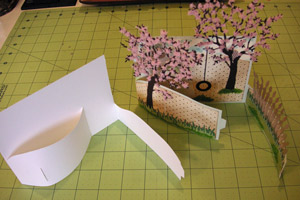
Trim with scissors. Decorate…as desired.
-
-
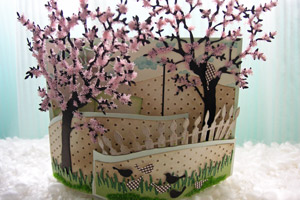
Step 12
Finished card closed.
-
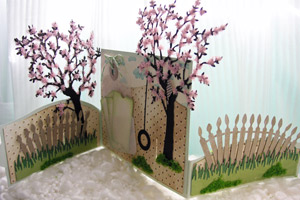
Finished card open.
Video!
Your Turn
You've seen the tutorial, now you try it! We've got a section of the gallery set aside for Bendi Fold. Try this technique, then upload your artwork to the gallery. Show us your creations!
***Please note - Internet Explorer/Edge is not a supported browser, and will not allow you to see the videos. Please use Chrome, Firefox or Safari to view our tutorial videos.

Questions and Comments
We'd love to get your feedback or questions. Leave your comment below.
Stunning card! TFS
http://ladynthestamp.blogspot.com/2010/12/very-first-creative-crew-gallery_31.html
Also, the card lays flat for mailing (Just uninsert the tabs).
Thanks for all the wonderful comments...
to Elizabeth:I only used one color cardstock, I distress and emboss, and add Flower soft to the branches...
To Diana: thanks for the tip on that book. I will check it out as I have never seeing it...more inspiration for all of us
For the mailing: YES a nice box will be very pretty and worth while to make (or bought) since the card is already so pretty. I think the outside deserves to be pretty too, this is, if you want to send it "standing"...
OR, you can mailed it flat too. Place it in a 12' x 9 ' big "yellow/office" envelope. Only fold one flap and it will fit, just add a little note explaining that the flaps need to be inserted on the slits to make it "stand".
if you need supplies, The supplies can be found at my blog. I have linked them to some Online Stores (affiliate program).
I will be checking here if you have some more questions...or leave them at my blog too, either way...thanks for taking the time to watch!
keep in touch
Bibiana
to Michelle: thanks for the info on Emma F. but, I am sorry to say that I do not know her...
BTW, I did NOT invent this fold, I only did a video to share with you on how to make the card and made my own designed card for SCS...
The 1st time that, I saw this fold was at a company that I discovered at a scrapbook convention called "Sparkle and Sprinkle" ...
and again, thanks for all the kind comments
I will be checking the gallery with your creations
Bibiana
Yes, all of the Bendy Fold cards that were made after Emma did this for the January 2011 Creative Crew should be moved into this new gallery.
http://www.splitcoaststampers.com/gallery/showgallery.php?si=Bendy+Fold&x=-291&y=-567
Thank you for the tutoriel.
I looked for him of everywhere in the gallery and now he( appears today.
I realized a lift of this card this morning, she(it) para�tera on my blog tomorrow: http://papierscrapetc.blogspot.fr/
Good day.
Chantal
Page 2 of 6 pages < 1 2 3 4 > Last »