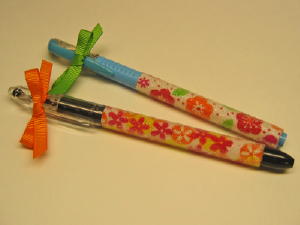
Beaded Pens
by Sarah Moore
Turn ordinary writing instruments into works of art.
Supplies
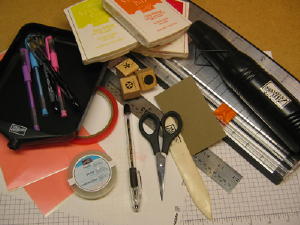
- Sticky Strip™ or Double Sided Industrial Strength Tape Sheets (Also known as “Terrifically Tacky," “O’so Sticky," “Wonder,” or “Red Liner” tape)
- Translucent microbeads
- 2” X 4” shipping labels
- Pentel R.S.V.P™ or pen of similar style
- Scissors and/or paper trimmer
- Bead tray or suitable container
- Ruler
- Bone folder or other burnishing tool
- Embossing heat tool
- Small image stamps
- Vivid colored water-based ink
- Scrap cardstock
Step-by-Step
-
Step 1
Stamp an entire shipping label with selected images and inks.
Tip: remove the label and place it on an empty label sheet or square of waxed paper before stamping.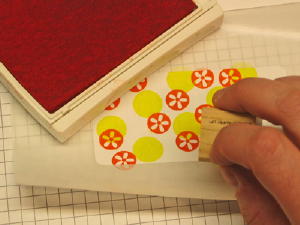
-
Step 2
Using the scrap cardstock and a ruler, measure pen length. To measure around the pen, use a strip of scrap paper. Create a template for the pen for later use and store it with the microbeads.
Use the template to cut the adhesive sheets to size.
Tip: If using Sticky Strip™ instead of sheets; apply strips of tape to waxed paper before trimming to template size.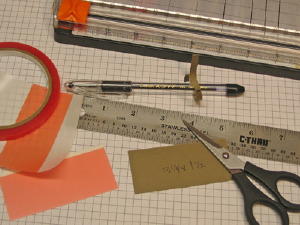
-

-
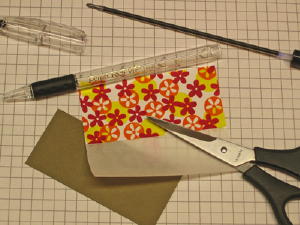
Step 3
Trim the stamped shipping label to size using the template as a guide. Disassemble the pen.
-
Step 4
Apply the stamped shipping label to the pen. Use a bone folder to firmy rub the label onto the pen.
-
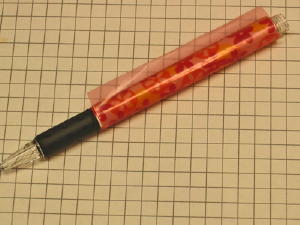
Step 5
Apply the Sticky Strip™ over the label and press down firmly. Do not allow the ends to overlap until the tape backing is removed.
-
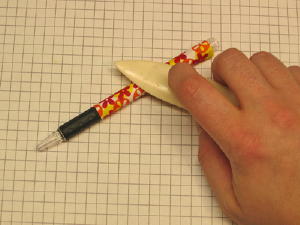
Step 6
Use embossing heat tool to heat the adhesive/pen for a few seconds. Do not overheat and melt the adhesive.
-
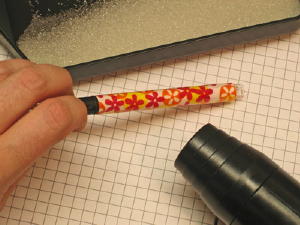
Step 7
Roll the pen with the warmed adhesive in a tray of microbeads until well coated.
When fully covered, roll the pen on a flat surface and press beads into place. Set aside briefly to cool.
Tip: However tempting it may be, don’t play with the beads! The oils in your fingers will coat the beads and prevent them from adhering to the adhesive.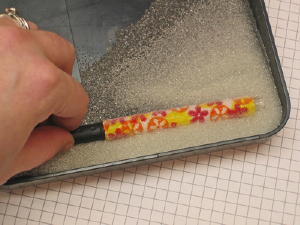
-
Step 8
Reassemble the pen and enjoy! Add a little bow for a cute finishing touch.
Variations
Quick Tip
For a really quick and easy version of Beaded Pens, use trim patterned paper to size and run through a Xyron™ machine to apply adhesive to the reverse. Use in place of stamped shipping labels.
Your Turn
You've seen the tutorial, now you try it! We've got a section of the gallery set aside for Beaded Pens. Try this technique, then upload your artwork to the gallery. Show us your creations!
***Please note - Internet Explorer/Edge is not a supported browser, and will not allow you to see the videos. Please use Chrome, Firefox or Safari to view our tutorial videos.

Questions and Comments
We'd love to get your feedback or questions. Leave your comment below.
Thanks Sarah for the cute idea. I've got my supply list and I'm off to Hobby Lobby now!!
I just LUV Splitcoast Stampers!!!!
Stampin Up used to sell the microbeads and they always have the best quality of everything! I've also bought them at Michaels.
After reading the comments I want to make sure I have the right adhesive. Where should I purchase the adhesive?
I appreciate your patience w/all of my questions. Can't wait to create my own pens! You're so creative!!
Pam
To "burnish" means rub firmly. You would burnish rub-ons to transfer them, or in this case, rub the label firmly to get it evenly applied to the pen.
Page 1 of 2 pages 1 2 >