3D Paper Piecing

by Mariska van der Veer

Layer several stamped images to create a 3d look.

Supplies
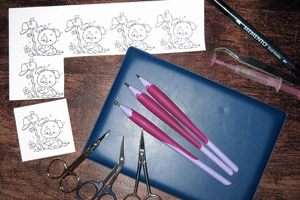
  • Five stamped impressions or printed digital images close to each other on the paper you usually color on, used here is one of the Naughty Puppies by Wee Stamps
  • One stamped impression or printed digital image cut into the shape you want to use as a base
  • Coloring Medium (markers, pencils, inks, etc.)
  • Precision scissors or a craft knife
  • Memento Dual Tip marker Tuxedo Black, or other black marker
  • Pergamano embossing tools and mat
  • Olba Glue kit with syringe, or other liquid glue
  • Pair of Tweezers

Step-by-Step

  1. Step 1

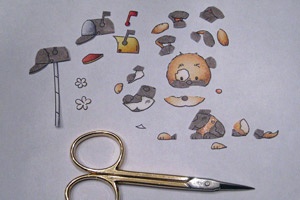
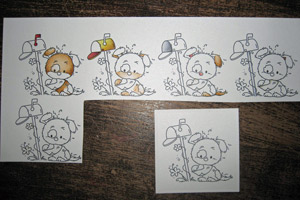
    Color every part of the image apart from each other.

    Hint:
    You can use several parts of one images but make sure that the different colored parts of the image don’t touch each other and have enough space between them to cut out later. In this picture for instance the body of the puppy is colored in one image and the back leg, that will go onto op the body as a layer, is colored in a second image.
  2. Step 2

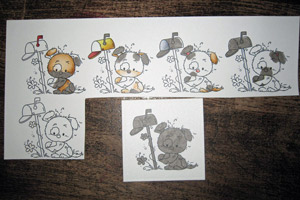
    Decide from every little piece that you have colored what adjoining piece is going to be the base for another piece.

    For instance, in the matter of the body the back leg, the feet, the envelope and the head are going to be a higher layer then the body, so those parts are going to serve as a base to adhere these parts to. Color those base parts with a shadow color, used here is a W5 Copic Marker. Also color the part of the base image that is going to be paper pieced on.
  3. Step 3

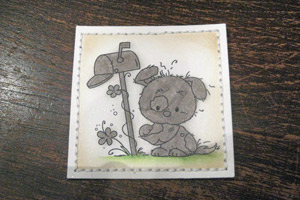
    Add shadow and background coloring to the base image when desired. Distressing or sewing on the base image should also be done at this point. You will not need the base part now until step 7.
  4. Step 4

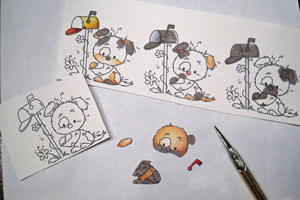
    Cut out all the pieces WITH the adjoining base parts that you have colored in a shadow color. You don’t need the base parts, just a good rim to add glue to will often do.
  5. Step 5

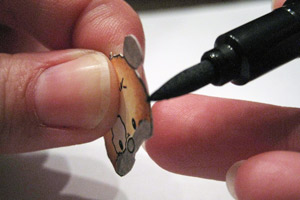
    Color the sides of the little pieces with the large tip of the Memento marker. Where there aren’t black lines (in this sample the back leg has party been cut without using black lines as a guide) don’t color the sides with the black marker.
  6. Step 6

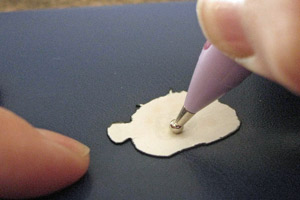
    Place the little pieces colored side facing down on the embossing mat, take an embossing tool that matches the size of the piece you are embossing, with the ball of that tool push down a little and go round in circles.

    The little pieces should be slightly rounded on the colored side when you are ready. Be sure to not add to much pressure and be careful with very small pieces as they may jump away.
  7. Step 7

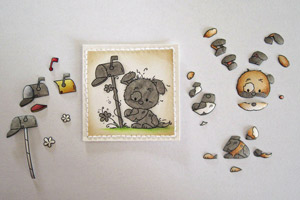
    Take a sheet of paper, place the base piece in the middle and all the little pieces in the order they are going to be placed on top of each other around it.
  8. Step 8

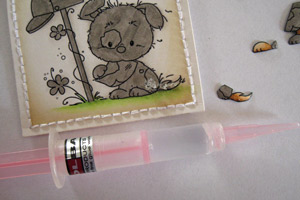
    Fill the syringe with glue and carefully decide which part of the image is going to be the most in the back of the image. Decide where the glue should go and carefully apply the glue.
  9. Step 9

    Using tweezers put the colored piece on top of the glue. Make sure the glue supports the piece of paper but don’t press down on it, this will push the glue to the sides and will flatten the image. The glue is very strong and once set will hold the pieces of paper perfectly in place.
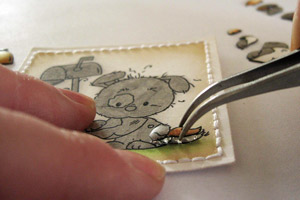
  10. Step 10

    Continue this process, each time carefully deciding which piece should be adding next and where the glue should go. If you by accident make a mistake the glue will stay flexible for a few minutes and the pieces can easily be removed.
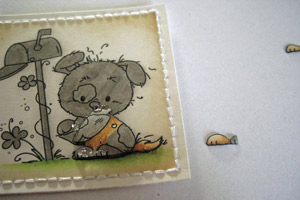
  11. Step 11

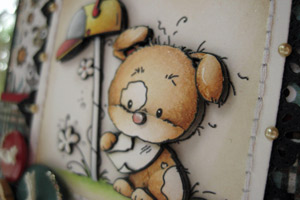
    The image is completely paper pieced. Looking from the side the image also looks good because of the shadow you have added to the base parts and the white sides of the pieces of paper that you have colored.
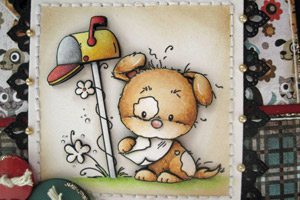
  12. Step 12

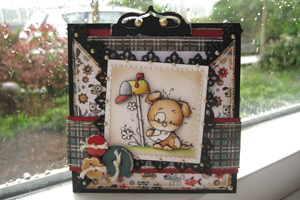
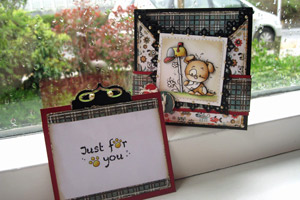
    Finish your project.

  13. Used here is the Criss-Cross Card Tutorial altered measurements.
Video!

Your Turn

You've seen the tutorial, now you try it! We've got a section of the gallery set aside for 3D Paper Piecing. Try this technique, then upload your artwork to the gallery. Show us your creations!

***Please note - Internet Explorer/Edge is not a supported browser, and will not allow you to see the videos. Please use Chrome, Firefox or Safari to view our tutorial videos.

Questions and Comments

We'd love to get your feedback or questions. Leave your comment below.

This is wonderful, Mariska! Love how much dimension you get. Thanks so much for sharing all of your tricks.
Mel McCarthy  |  Wed Jun 5, 2013 at 3:08 AM
I have seen such beautiful 3D work and always been afraid to try it. ≈ If I can keep my hands from shaking I will be trying this! Thank you for breaking this down into perfect instruction! <3

Karen
Karen Shirey  |  Wed Jun 5, 2013 at 4:15 AM
Wonderful instructions. Thank you for taking the time to break this process down step by step.
Crystal Ramos  |  Wed Jun 5, 2013 at 4:31 AM
That is the CUTEST idea ever! What is the name of that glue? It seems like it would wet the paper a lot but it doesn't appear to. I'd like to buy some and try this but I want to make sure I buy the right kind! Thanks for a wonderful tutorial??
Heather Herrmann  |  Wed Jun 5, 2013 at 5:44 AM
Thank you for the amazing tutorial. Your finished piece is beautiful and you made it look easy. I will be trying this real soon. I'm wondering what other types of glue I could use or if you could repeat where you get your glue from. Thank you!
Michele Cederqusit  |  Wed Jun 5, 2013 at 6:10 AM
Thank you so much for your lovely comments ladies, it was just such an honour to be able to do this tutorial. The glue I'm using and the syringes are both from a Dutch company named Olba. It's sold in the USA through Whimsy Stamps. On my blog I have added a link. Hope that helps. Hugs!
Mariska van der Veer  |  Wed Jun 5, 2013 at 6:20 AM
WOW wow wow! This is a fantastic tutorial, Mariska! Thank you for your time and patience in putting it together and for sharing your great talent with us! :D
Bev Rousch  |  Wed Jun 5, 2013 at 6:35 AM
Beautiful is all I can say!
Maxine in canada
maxine goldsmith  |  Wed Jun 5, 2013 at 7:09 AM
Wauw this is fantastic Mariska. You�ve made such an awesome video here, and it�s so easy to follow and understand your explanations. You�ve done an amazing job creating this and I really apreciate the great amout of work, you�ve put into making this for us here. The finished card is sooo gorgeous, but then your work always are, so that doesn�t surprise me at all. You�re such a talented girl, and I love your creations.
Maryann Laursen  |  Wed Jun 5, 2013 at 7:52 AM
Let's see, what can I skip from today's schedule? Looks like a lot of fun and I can't wait to try it.
Kelley  |  Wed Jun 5, 2013 at 7:57 AM
This is stunning and amazing! I love doing this technique but I have always know it as paper tole or sometimes as decoupage. I always use foam tape and it is a pain. I REALLY like that glue. I will have to give that a try! TFS!
Valerie Martin  |  Wed Jun 5, 2013 at 10:49 AM
I have been admiring your cards and art for some time now. I am amazed at the depth and dimension this technique gives each project. Thanks so much for the clear and concise tutorial. It looks like a lot of work, but I just may have to try this out. Thanks for sharing your secrets!
creepy glowbugg  |  Wed Jun 5, 2013 at 2:25 PM
Thanks... I love your card and the tutorial is clear to understand. Again, thanks to share your creative art. Hugs from Panama
Maritza A. De Quiroz  |  Wed Jun 5, 2013 at 4:31 PM
Mariska you are amazing! Just your tip about coloring the colored parts grey was so incredible! Thank you for such a wonderful tutorial and video for us! xxoo
lydia  |  Wed Jun 5, 2013 at 4:38 PM
This is great, however very time consuming by doing the coloring yourself.
I did layering like this many years ago with preprinted objects, which was not nearly as time consuming.
Bonnie Deibel  |  Thu Jun 6, 2013 at 2:58 AM
I love this card. I plan on doing one as soon as possible.
Debbie Jarvis  |  Thu Jun 6, 2013 at 8:29 AM
Wow! I did paper tole years ago, but nothing this detailed. I love the idea of coloring the edges. One thing I have used instead of foam tape is clear latex sealant--the kind you buy to put between your bathtub and tile. It's hard to get tiny bits out, but you could squirt it on some waxed paper and use a toothpick--just remember to get the clear.
I have to try this, but I think I'll start with a slightly bigger image!
Karen  |  Thu Jun 6, 2013 at 8:36 AM
This is one of the best video's (instructional) that I have watched. What a beautiful way to take a simple stamp and elevated to a award winning card.
Mary Anne Perlmutter  |  Fri Jun 7, 2013 at 12:15 PM
Mariska, I was mesmerized by your wonderful tutorial! It is one of the very best tutorials I've ever seen. Thank you so much for taking the time it took to do it. I am inspired to try this technique and hope I can succeed in making something that comes close to your amazing work!
Laurel  |  Fri Jun 7, 2013 at 7:21 PM
Wonderful! Thanks for showing us!
Kathy Harrison  |  Fri Jun 7, 2013 at 10:28 PM

Page 1 of 3 pages  1 2 3 >

You need to be logged in to comment

GET OUR NEWSLETTER


Splitcoaststampers's privacy policy