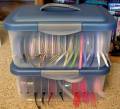
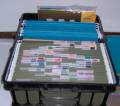
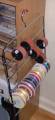
I first went to the store with the intension of getting photo boxes and putting 1/2 inch eyelets in the holes, but I could not figure out how to make the holes that big. So I was wondering around the tool row looking for some kind of punch and I spotted drill bits and my mind got to thinking that maybe I could use them. So I bought the eyelets, drill bits, and the plastic storage boxes instead of photo boxes (They were cheaper! Less than $2 each) and headed home.
Before drilling I put the ribbons in side by side and measured about how wide apart the holes needed to be. Marked it with sharpie marker. I used a 1/4 inch drill bit for the grosgrain size, and a half inch for the organdy ribbon size. Some of the edges were a little rough around the 1/2 inch size because I used a wood bit for that, so I used a small blade to cut off the rough excess around the holes. Then I tried to put in one of those eyelets because it looked so cute.... WHAT A JOKE! They were the hardest metal to hammer. And the space in which you have to hammer INSIDE of the box is too small even with our little eyelet hammer. After 10 min of trying I decided it did not need eyelets after all. It works really good. I did not bother putting a dowel rod down the middle of the spools because it is too difficult to change. Now my ribbons are so easy to use and they stay dust free, also I can keep an eye on whether they are getting low.
It is an easy project and I had fun... Plus I impressed my husband that I used his drill and he got some new drill bits! LOL!
Date: Monday, February 7, 2005 GMT Views: 9433
Favorited:262
My sis-in-law and I went to target to find one of those ribbon organizers that everyone is talking about. We couldn't find one, now I see your idea...no more target, I think I'll make one for sis-in-law too. Thanks so much. I thought of somethin...maybe a small dowell hole on the sides so the ribbon can be on the dowell. Have to ask hubby to help.
Registered: October 4, 2004 Location: Bloomington, IL Posts: 690
Sat, Feb 19, 2005 @ 9:00 AM
I have been using these boxes from Wally World for ever! I love them because they have the handle on top and they latch securely closed...In fact,all my SU! ribbons are stored in them now!....but I NEVER thought to drill holes through them and make them NICE ribbon organizers!!!! THANK YOU SOOOOO MUCH for an ingenious idea!!!!! And I'm with you forget the eyelets....simple and practicle is for me!!!
------------------------------
Wishin' I could be Stampin' 'stead of workin' :-) Karol
Success is not final, failure is not fatal: it is the courage to continue that counts.
Registered: December 17, 2004 Location: Indiana Posts: 982
Fri, Mar 04, 2005 @ 7:23 AM
You are so clever! This is a great idea! I have a ink pad holder with little dowels to put my ribbon spools on. I have a lot of trouble with the spools falling off, and I can't put too many on them on. It's very frustrating. I'm definitely going to have to make some of these! Thanks for sharing with us!
Registered: December 2, 2003 Location: Upstate NY Posts: 13089
Sat, Mar 05, 2005 @ 5:30 AM
I ended up getting these boxes as well! 4 of them. One for gingham and grossgrain...one for organza, one for satin, and one for misc wires and fibers. DH shook his head after I showed him my organized ribbons. I said "What?" and he replied, "It is just sad that you need 4 containers...no one should have that much ribbon"...
I have these exact same bins with the blue lids!
Does anyone know... is it possible to paint the lids a different color? I am planning on painting my room sage green and having rust red accents, so I want the lids to color-coordinate. (I have mine stacked on a book shelf, so you can see the lids.)