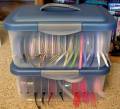
I first went to the store with the intension of getting photo boxes and putting 1/2 inch eyelets in the holes, but I could not figure out how to make the holes that big. So I was wondering around the tool row looking for some kind of punch and I spotted drill bits and my mind got to thinking that maybe I could use them. So I bought the eyelets, drill bits, and the plastic storage boxes instead of photo boxes (They were cheaper! Less than $2 each) and headed home.
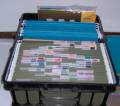
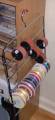
Before drilling I put the ribbons in side by side and measured about how wide apart the holes needed to be. Marked it with sharpie marker. I used a 1/4 inch drill bit for the grosgrain size, and a half inch for the organdy ribbon size. Some of the edges were a little rough around the 1/2 inch size because I used a wood bit for that, so I used a small blade to cut off the rough excess around the holes. Then I tried to put in one of those eyelets because it looked so cute.... WHAT A JOKE! They were the hardest metal to hammer. And the space in which you have to hammer INSIDE of the box is too small even with our little eyelet hammer. After 10 min of trying I decided it did not need eyelets after all. It works really good. I did not bother putting a dowel rod down the middle of the spools because it is too difficult to change. Now my ribbons are so easy to use and they stay dust free, also I can keep an eye on whether they are getting low.
It is an easy project and I had fun... Plus I impressed my husband that I used his drill and he got some new drill bits! LOL!
Date: Monday, February 7, 2005 GMT Views: 9431
Favorited:262
Registered: January 9, 2005 Location: In the express lane to Crazyville Posts: 73335
Mon, Feb 07, 2005 @ 10:03 PM
How clever & crafty are you! These look absolutely great! I'm impressed, usin'
those power tools & all! Now, is that thinking inside or outside of the box?
Way to go!
Registered: December 28, 2003 Location: Posts: 112
Tue, Feb 08, 2005 @ 4:26 AM
So great! But tell me, when you pull some ribbon out, do all of the spools roll with the one you are pulling on and get all messed up?
Thanks for the great idea!
------------------------------ --Kim in Maryland
Tell SU: We need an East Coast Distribution Center!
Registered: June 18, 2003 Location: Lino Lakes, Minnesota Posts: 13768
Tue, Feb 08, 2005 @ 5:09 AM
I can't believe it, I had one of these exact boxes sitting in my storage room with nothing, I repeat, nothing in it!! Well, there is something in it now!!!! Thanks for sharing such an awesome idea! I don't think I even need the holes in it as I can remove the cover so easily and just grab the roll I need. Thanks for sharing this great idea with us!
Registered: August 4, 2004 Location: Aurora, Colorado Posts: 3
Tue, Feb 08, 2005 @ 8:10 AM
I am so doing this. I saw these storage boxes for my ribbon and thought about them, but didn't want to have to "open" them to get to my ribbon. Drilling holes, how cool and easy. Now those boxes will work for me!!!
Registered: October 27, 2004 Location: Beyond the rainbow! Posts: 557
Tue, Feb 08, 2005 @ 8:11 AM
How do you keep the rolls pushed to the front?
------------------------------ The meaning of earthly exisitence lies, not as we have grown use to thinking, in prospering, but in the development of the soul. -A. Solzhenitsyn
Registered: March 9, 2004 Location: Utah Posts: 155
Tue, Feb 08, 2005 @ 9:05 AM
If you are thinking of trying this:
A tip for you now that I have done them, I would put the holes a little higher than I drilled them, about the height of the top of a organdy size roll. It is a little difficult to reach down to put the ribbon through when the box is filled with ribbons both front and back side where I drilled the holes.
Also, the ribbons stay pretty good, but they are a little loose inside the box. But it is way better than the drawer I was keeping them in and also makes it way easier to USE them. I know I am more likely to use somethng if it is easy to access.
Hope this helps everyone! And thanks for all the kind words!
Shelene