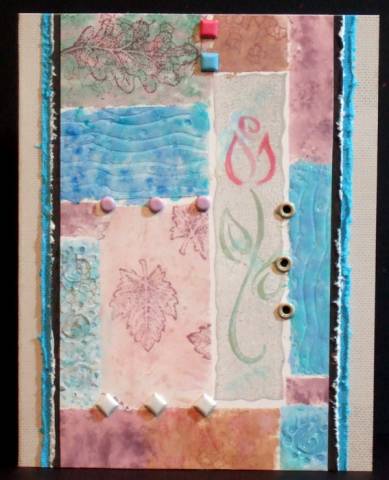
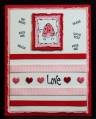
My main panel is ½” from each side before the matting so that makes it 3 ¼” wide.
I started the panel by stamping the grey shadow; pressing it into the stamp pad then adding color using an old H2o brush/aqua painter that I trimmed up after it frayed beyond regular use and used a stipple motion to add the color directly to the rubber. The flower was inked up with the stamp pad and also darker marker color was added before stamping.
Then I just masked off with post it notes and started adding color using the polished stone technique. On the blue I rubber the VersaMark pad over it and heat embossed with clear ultra thick powder then stamped with an image while still hot. I added the hardware to finish it off, layered, tool distressed, attached to card base after stamping Linen on the grey and turquoise and I think that covers the directions. It really was fun to make and didnÂ’t take that long.
Date: Tuesday, February 13, 2007 GMT Views: 2102
Favorited:8
Stamps: Hero Arts – flower, shadow, Stampin Up – Linen, Fantastic Foliage, swirl, Magenta – wavy dotted lines in the embossing, Posh Impressions – crackle
Paper: Light grey, grey black, turquoise (SU), semi glossy white
Ink: Stampin Up classic – Cool Caribbean, Bliss Blue, Mauve Mist, Perfect Plum, Creamy Caramel, Close to Cocoa, Mellow Moss, Sage Shadow, Going Gray, Pretty in Pink, VersaMark
Accessories: Clear embossing powder, brads, eyelets, tonic perforator for distressing (round wheel with v shapes cut out), 1/16”, 1/8” punch, post it notes, markers
Techniques: Heat embossing, tool distressing, collage, polished stone