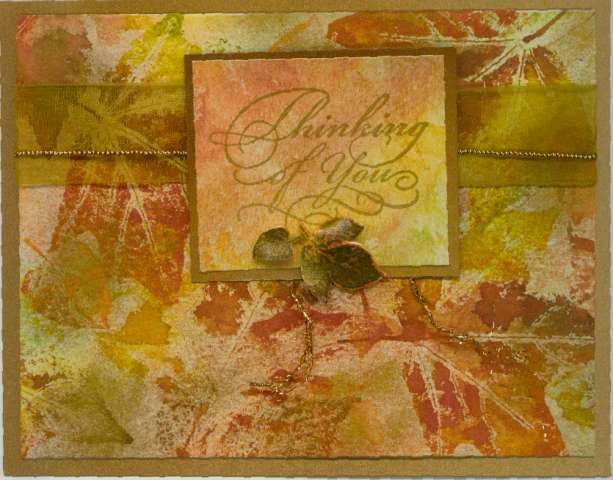
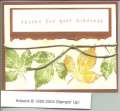
I love the look of water color and with the help of a misting bottle and one stamp pad I was able to achieve the look of the beautiful fall colors outside my window. And what goes better with fall colors than Copper . . . awesome combination!!
Date: Monday, October 11, 2004 GMT Views: 1746
Favorited:34
Registered: April 8, 2004 Location: Austin, TX Posts: 4857
Tue, Oct 12, 2004 @ 1:32 AM
stunning, stunning background! yes, please did you mist the CS then stamp, then brayer, or mist the inked up stamps then brayer after stamping?
------------------------------ Melanie
Illustrator and Designer for Gina K Designs/StampTV
Author of "Fabulous Stamped frames" and A Year of Flowers", published by Annie's
Please visit my blog "Hands, Head, and Heart" at: http://melaniemuenchinger.blogspot.com/
Check out my Youtube channel for stamping and cardmaking videos: https://www.youtube.com/user/MelanieMuenchinger/videos
Registered: March 18, 2004 Location: New Hampshire Posts: 7021
Tue, Oct 12, 2004 @ 3:20 AM
Beautiful background! Looks almost like fossilized leaves.
------------------------------ "Life is much too important to be taken seriously." Oscar Wilde Proud to be a member of Mo's Digital Pencil Challenge DT! My BlogMy Gallery
Registered: May 6, 2004 Location: Greensboro, NC Posts: 160
Tue, Oct 12, 2004 @ 5:16 AM
Really nice - want to CASE!!! Please tell us step by step directions!! Thanks.
------------------------------ "A child of God should be a visible beatitude for joy and happiness, and a living doxology for gratitude and adoration." ~Charles Spurgeon
Leaf Layer: After inking the stamp with the Spectrum pad I misted it and stamped onto the paper. Then immediately I stamped again in another area for a second generation stamping look. I continued until I felt I had enough leaves (allowing for a bit of negative space so I could add color another way). Next I misted the card stock again (this will cause a bit of bleeding and blending to begin to occur) and then I inked my brayer using the same spectrum pad. Next I rolled the brayer off on a piece of scrap paper to get rid of some of the ink and then I rolled first one way and then another (criss-cross fashion) across the misted paper. The ink will move and blend and do all kinds of wonderful things. Each sample will be a bit different. I had my stamp club gals do this one and there was not a bad card in the whole batch. Not sure if you can tell it in the scan but we also applied the Encore copper ink using a sponge to the top of the leaves after the paper had dried. Adds a bit more pizzaz.
Greeting Layer: Stamp Greeting using Encore Copper and emboss (either with clear EP or Copper EP). Then mist paper. Ink brayer using spectrum pad and roll off as described above. Then roll on top of the misted card stock first one way and then the other to blend and mix colors.
Polyshrink Charm: Brayer Spectrum pad onto white polyshrink (don't sand first). Then use the Copper Encore to stamp leaves on top of this. You MUST DO THIS NEXT STEP in order to have success . . . spray to seal with Krylon Workable Fixative. This will seal not only the brayered on color but will also get the Copper metallic ink from "mis-behaving". Then just cut and shrink leaves as desired. (I prefer to use a toaster oven.) Right after you remove leaves from the oven shape them as desired. (I don't like flat leaves but that is just me.)
I think that's it. The rest is just assembly work.
Have fun!! :smile: