This is for Robin's fun Free for All challenge - Sheltering Friends. Click here
for all the challenge details.
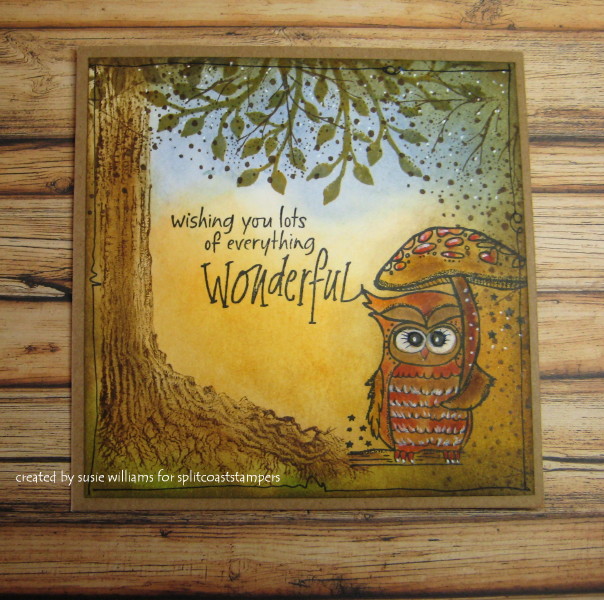
My MISTI stamping tool arrived a couple of weeks ago - I can honestly say I don't know how I lived without it. Because this stamping tool is so good I lashed out and purchased some more Lavinia stamps from England. The tree trunk on the left is a Lavinia stamp, the trunk is only 3" tall, but you can flip it upside down and stamp another couple of inches.
The weeping branches at the top are actually the left side of a large tree stamp that is terrible to stamp with and the sentiment is an even bigger pain in the rear end to get a crisp image. Thanks to the wonders of MISTI and my microwave oven, no stamp is a challenge anymore.
To remove the rubber from a wooden block, microwave on high for 10 seconds. While it is still warm, gently separate the red rubber from the foam. The rubber will be smooth with no traces of sticky stuff. Use the red rubber in MISTI as you would an acrylic stamp - apply kids school glue stick to the rubber - you can lift it up, move it around, stamp over and over, when you have finished wipe MISTI and the rubber with a baby wipe. No need to use Ezymount!!!
To get the words straight, I roughly placed the stamp where I wanted it to be, swished it with the glue stick, then I closed the MISTI lid to pick up the stamp. Using the grid that is on the lid, straighten the stamp up, ink it, close the lid...job done.
This is NOT my usual smack & squirt. I stamped the tree trunk first in distress ink and I thought adding inky water might make it run so I did the background with a foam blending tool straight from the distress ink pad. I stamped the owl last and coloured him with rusty hinge distress ink and an aqua pen, this was a good colour to cover the orange background.
Note: If you look closely you can see where the roots of the tree are double stamped. After I finished the card the trunk sort of blended into the background a bit, so I put the completed card in the MISTI and tried to lay my stamp on top of the image. I then stamped with brown StazOn to give it more clarity. Even though it is not exactly in the right place it is close enough not to effect the card - I doubt I could have done this using a thick acrylic block.
Thank you for looking and have a great weekend ladies.
Date: Thursday, March 5, 2015 GMT Views: 1953
Favorited:7
Registered: April 6, 2009 Location: Weyers Cave, Virginia in the Shenandoah Valley Posts: 31102
Sat, Mar 07, 2015 @ 4:50 AM
I've watched Jennifer McGuire use the Misti tool, and if you are making multiple cards, that's definitely the way to go! Also, it would be wonderful for those times when you don't get enough ink on the stamp and end up ruining the paper cuz you have to do it over. In my case, I just turn the paper over and try a second time....Who sees the back anyhow once it's glued down! Great looking tree, Susie! I love all those dots put on it! Awesome card, but then, your cards are always awesome! You Rock~
------------------------------ ~Roberta
�Ability is what you're capable of doing. Motivation determines what you do. Attitude determines how well you do it.�
― Lou Holtz
Splitcoast Dirty Dozen Splitcoast Challenge Hostess Teapot Tuesday TEAm
Registered: January 19, 2014 Location: Central Indiana Posts: 90281
Sat, Mar 07, 2015 @ 5:52 AM
Susie, genius to turn the stamp upside down to get additional tree trunk. I just love how you think outside the box or in this case the stamp. I have not used a misti tool yet and it is on my wish list. It appears it gives fantastic results. Oh I am in awe of your beautifully done card. Hugs!
Splitcoast Dirty Dozen Splitcoast Challenge Hostess Proud Fan Club Member
Registered: January 27, 2010 Location: Southern Ontario, Canada Posts: 51736
Sat, Mar 07, 2015 @ 8:41 AM
I am so happy poor Lydia managed to get everything working again so I can see this delightful card - I just love it. That owl is amazing as is the scene around him. tfs