many peopel asked for the directions for the pouches:
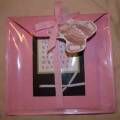
Need a 6X6 page protector, cut the ring end off but leave the sealed edges on it.Cut your cardstock to 8 inches long by 6 1/2 inches wide (some people use different measurements but I found this is what I liked best. Fold over the top 2 inches and cut a diagnol edge for the flap - I have mine go in 1 inch. Stamp the paper, I do both sides as depending on how the pouches sit in there you can see the stamped design thru. I use the sticky adhesive (forgot the name of it - its the kind with the red tape stuff - some people use staples but I didn't like the look as much). Punch a whole in the center of the flap about 1/2 inch up. Put your ribbon thru (I do staple the ribbon down at the bottom so when you open it doesnt just fall off, some people use velcro). Fill with tags...
or I am doing 3 pouches right now for baby shower gifts and they will be full of baby thank you cards (it will fit cards on the pouch too).
Date: Saturday, October 15, 2005 GMT Views: 3173
Favorited:112
Additional Info
Stamps: Terrific Tags Stamps
Paper: Gable Green for Pouch Only
Ink: Real Red, Green Galore and Basic Black
Accessories: Black Grosgrain Ribbon, 6x6 Page Protector
I would love to know how you constricted the pouch. It is lovely. I would like to see more detail or instructions on how you did this lovely piece of art.
Registered: June 10, 2004 Location: Duvall, WA Posts: 531
Fri, Oct 21, 2005 @ 8:53 PM
i'd love to know how you made your pouch...is the paper inside the protecter? i'm doing this for a camp in november.....please share!! how many tags did you put in?
thanks!!
jen
------------------------------ want to see what i've been up to? My Stampin' Spot