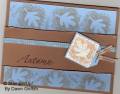
Ok girls I just learned this FABULOUS pop up from Sandy Scott :-) I love this pop up.. sooo cute .. all you want to do it keep pop'in it up and down But I must warn you this card is very hard to explain ( especially the pop up part) .. Even a little challenage for those in person .. BUT I will upload the directions as well as I can and as soon as I can HUMMM this is gonna be tricky .. please be patient with me :-) Maybe with Sandys permisson I can upload her direction will ask her 1st before I challenage myself and put it in my words ..
Thanks for looking
xoxox
Dawn
Date: Wednesday, October 12, 2005 GMT Views: 1983
Favorited:31
Registered: February 18, 2004 Location: pontiac, Michigan Posts: 1250
Thu, Oct 13, 2005 @ 5:10 PM
Supply List:
One sheet of colored cardstock 8 �" X 11"
Coordinating cardstock for layering
White or light colored card stock
Colored eyelet to match main cardstock
1/8" hole punch
Bone folder
Eyelet setting supplies
Stamps and ink of choice for background, layering piece for front of card, and stamp for white pop up piece.
Strong double stick tape
Embellishments of choice-ribbons, brads, decorative punches etc.
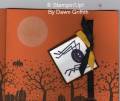
1. Cut 2 main card pieces 6 �" by 4 �". Stamp as desired.
NOTE: Stampin' Around jumbo or regular wheels work great for this part.
2. Score both main card pieces from one end only at 5 �" and again at 5".
3. Flip one piece over so the score marks are on the left (top piece) and the other should have the score marks on the right (back piece). Of course make sure that the stamping faces out. Fold on the score lines and crease well with a bone folder.
NOTE: The score mark at 5 �" is a valley fold and the 5" score mark is a mountain fold.
4. Cut a neutral/light colored piece of card stock 2 �" by 2 �"
5. Attach this piece of cardstock to the front piece (score marks to the left) with an eyelet.
NOTE: For best results use a Stampin' UP! colored or silver eyelet. The gold ones and other cheap eyelets that you can purchase elsewhere don't crimp tightly enough to securely hold this piece. This is vital to the function of your card.
--Use your 1/8" hole punch to punch a hole so that the white piece of card stock will be 1/8" down from the top of the main card piece and 1/8" back from the inner most fold line. You will be punching through the front piece and the pop-up piece.
--The white piece of card stock (pop-up piece) is in the landscape orientation and the image is initially facing the back of the card.
In sewing terms we call this "wrong sides together".
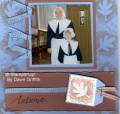
6. With the card front facing you, fold the white pop-up piece forward at an angle towards the largest part of the card front. The fold is right up against the eyelet. Stamp this piece now, making sure that the image is stamped high enough up that it won't be hidden inside of the card.
NOTE: This piece can be stamped ahead of assembly. (REMEMBER to make sure that the images are stamped high enough up so as not to be hidden inside of the card. Also remember, you must assemble the white pop up piece to the front, initially in the landscape position, "wrong sides together".
7. Using strong adhesive like double stick tape, stick front and back pieces together only along that first 1 inch on each end.
8. Stamp and assemble your layer for the card front. Apply to front of card. Embellish as desired.
9. Grab each end of the card and pull. The white piece will pop out automatically.
10. Personalize your creation with your name, whether by hand or stamp, on the back of card.
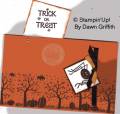
11. Stamp envelope to coordinate with card, place card inside, and send this hug out to someone! Don't keep it to yourself!! Don't forget the postage.