Measurements: without the borders – image panel – 2 x 2 3/4”, button brad panel - 1 ¾ x 2 ¼”, cross stitch/stripe panel – 1 ¾ x 3 ¼”, patchwork panel – 3 3/4 x 5” borders are black - 1/16, blue (image) -1/8”, pink (base) ¼”
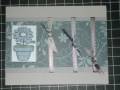
-The patchwork panel is super easy to do. I use regular white sticker paper. Cut some paper strips - any width will work and I do a variety. Remove the backing of the sticker paper and place a paper strip from about the middle of the paper to the edge. This can start at any point but I usually start mine on a diagonal from center to a corner. Place about three to four going in the opposite direction from the first and then switch directions again. Trim before you fill all the edges so itÂ’s easy to line up an edge to your cutter. Once you have the paper cut this can be done in about ten minutes.
-Paper piercing on the seams is done with the Stampin Up mat pack and I use a Making Memories piercer. Then add your stitch lines. This actually took longer than the patchwork.
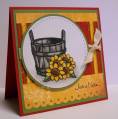
-The image is colored with Prismacolor pencils, baby oil and paper stumps using the Gamsol technique which you can find in the resources section here at SCS.
-I used all designer papers on a white cardstock base.