Registered: March 24, 2004 Location: Southern NH Posts: 8096
Fri, May 06, 2005 @ 6:05 AM
Hi everyone! Thanks so much for your sweet comments!
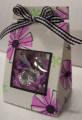
Here's how to make it:
1) Cut a sheet of 8-1/2 x 11 cardstock in half so it's 8-1/2 x 5-1/2.
2) Score at 2", 4", 6" & 8". Then turn your paper 1/4 turn & score at 2".
3) Stamp as desired.
4) Cut score lines below the 2" score line on the long side. These will be the flaps for the bottom of your box.
5) Trim off smallest section....NOT the entire 1/2" section, just the littlest one at the bottom next to the flaps.
6) Punch your window using the 1-1/4" square punch. Turn it upside down so you can see where it's going & push it in from the 1/2" flap side until it won't go any further. Hold it so it's all the way in & the edge of your punch is about 1/4" up from the bottom scored line. Then punch & VOILA...you have a window.
7) Attach a small square of window sheet to the inside of the box, so it covers the window, but doesn't overlap the scored lines. I used SNAIL adhesive. To make the tiny black frame, punch a 1-1/4" square out of black cardstock. Then put your 1-3/8" punch over the punched out section, so it lines up evenly on all sides. Then punch & you have a skinny frame. Attach with SNAIL.
9) Fold all score lines & attach box. Use Sticky Strip on the long 1/2" strip to keep the box from falling apart.
10) For the top, use the rectangle punch to make the "slits on the sides. Then wrap ribbon around & tie in a bow. You could also punch a couple of holes in the top of the box & put ribbon through them if you'd prefer.
That's it! I hope it makes sense. It's so much easier if you have someone actually showing you!
Registered: August 26, 2004 Location: Houston, Texas Posts: 13
Wed, Jul 20, 2005 @ 12:04 PM
Outstanding job... We are making "gifts" for the teens of our church for a survival kit and these would be ideal... would you consider sending me the pattern?


 To make the tiny black frame, punch a 1-1/4" square out of black cardstock. Then put your 1-3/8" punch over the punched out section, so it lines up evenly on all sides. Then punch & you have a skinny frame. Attach with SNAIL.


