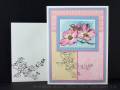
Measurements: blue and pink borders are cut ¼” smaller than the panel under it, image panel 1 ¾ x 2 ¼” plus 1/16”, ¼” and 1 /32” borders,
lower rectangles 1 ¾ x 3 3/8”, top rectangle – 1 3/8 x 3 9/16”
-The image is water colored with reinkers and artist brush.
-The out of the box feature is very easy by cutting to the image with the regular paper cutter on the front, marking the image on the back while holding to a light source then use the paper cutter again to cut to the mark. Scissor cut the image out. My paper cutter is a guillotine style. I used a Coluzzle and craft knife to cut between the flower and branch.
-The pearls are attached with Diamond Glaze (any lacquer product will work). To make the process fast and easy I squeeze a drop of lacquer onto a waxed paper (I repurpose the paper that stickers and labels are purchased on), touch the end of a large corsage pin to the lacquer then to the back of the gem which picks it up, position it on the image and press down with a finger, there is a little time to slide the gem into position if needed before it sticks tight.
-The stitching was done with the sewing machine.
-The branch on the lower rectangles was stamped off on scrap paper before stamping on the card. I actually loaded the rubber with black ink and had forgotten I wanted the image to be lighter so stamping off worked perfectly. To get the image on both pieces of paper I stamped after they were mounted on the base and placed a 1/16” strip between the two to avoid getting ink on the pink underlayer. I also stamped the inside of the card with the same technique. The envelope is full black ink.
Tools: corsage pin, sewing machine, Coluzzle and craft knife, stamp positioner, cutting scissors, artist brush
Date: Tuesday, April 6, 2010 GMT Views: 2877
Favorited:16