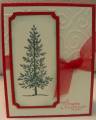
I used this paper for inspiration and also a small square greeting card for the scene and out of the box tree but I like the rolling hills effect from the paper and PSX image fit perfectly. Sorry my cardinals were just to large for the scene.
Thanks for the challenge Anne!
This set deserves a ‘here’s my story’!
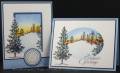
I made the portrait style first using a store bought greeting card as scenery inspiration. First off I cut it a quarter inch to short and didnÂ’t realize it until the scene was finishedÂ…I hate when that happens! I figured out a way to put it on a larger card but messed up a border line around the rectangle scene. So I got frustrated and just started over and decided the oval would show more of the PSX image and go better for the wrapping paper inspiration anyway. I already had that template cut while the rectangle was masking with numerous papers.
Well, I canÂ’t leave anything to waste so I started fixing the first one and decided I like the results of both so here they are!
Here is what I did:
-Mask off the square or oval (note: for
the rectangle - the bottom is a torn piece of paper.) I stamped the background trees and the large evergreen on the clear portion of stamp positioner guides to help me decide where I wanted to position the images on the card, once decided I stamped - the mask of course will have to be moved to stamp the large out of the box evergreen. Remember I worked with two clear guides so make sure if you lay one guide over the other that you clean off the back side to avoid getting ink on the card when it's put to use.
-I stamped the background image on scrap paper and cut the land away from the sky to use as a mask; both of these pieces will be used.
-I sponged on the sky area starting with yellow at the horizon then added the orange but staying below the yellow. Add the blue sponging darker at the top and very little on the center area.
-Now switch the mask to cover the sky area and add a little blue to the snow.
-With Prismacolor pencils I added a touch of green to the two large evergreens - the complete out of the oval/rectangle image and small portion of the image on the right.
-For the oval, I stamped the greeting right on the card and scored along each outer edge avoiding the images. As a guide for scoring I hold the panel to a light source (window) mark the image on the back before I score so I know where to stop and start up again without going over the image.
-For the rectangle - my goof up was an uneven sponged line under the navy border you now see. The fix: I masked off the image rectangle and positioned a second mask 1/8" away from the rectangle mask and sponged on the navy then added a straight line to the inside of the navy border with a black marker and ruler.
-The circle design dry embossing was created with the Cuttlebug and folder.
-The sentiment layers are a mix of Nestabilites and a punch for the black border.
Stamps: Lovely As A Tree, Linen, Circle of Friendship, PSX – background trees, Stampendous –Season’s Greetings
Paper: White, black, Stampin Up – Bashful Blue
Ink: StazOn – Jet Black, Stampin Up classic – Bashful Blue, Only Orange, Summer Sun, Night of Navy
Accessories: Scor-Pal, Stampin Up mat pack, sponge, black marker, paper for masking, Coluzzle for cutting oval, Cuttlebug, Nestabilites, EK Success 1 12/” circle punch, Prismacolor pencils
Techniques: Masking, sponging, Prismacolor, dry embossing, out of the box
Registered: June 10, 2007 Location: BC Posts: 44872
Sun, Nov 30, 2008 @ 5:19 AM
Just gorgeous Rox! Okay, I remember when I kept telling you to publish a book of sketches - and use the sketches plus our examples - and you didn't listen.
Okay, I still think that you should do that, and you would make a killing... but if you need another idea - you could design cards for Hallmark - and I mean that in a good way.. even though we all make our own cards here!
Registered: June 17, 2008 Location: Victoria, Australia Posts: 1455
Sun, Nov 30, 2008 @ 7:59 AM
WOW!!! What elegant cards. I am so jealous of their recipients. The rectangular one looks great with the CB'd button EF at the bottom too.
Thanks also for the instructions.
TFS
------------------------------
The task ahead of us is never as great as the Power behind us. - Amen! Fan Club Member
Registered: April 6, 2005 Location: Stuarts Draft, Virginia Posts: 14401
Sun, Nov 30, 2008 @ 3:51 PM
Wowee!! What stunning scenes!!
------------------------------
Wanda Cullen ~ Dirty Dozen Alumni, On design team for Papertrey Ink, Designer for Color Throwdown and Fusion Card Challenges Cullen-ary Creations[/URL]...my blogHERE'S MY GALLERY[/URL]
Registered: December 8, 2006 Location: currently stationed in Norman Oklahoma Posts: 11275
Sun, Nov 30, 2008 @ 4:49 PM
This is just GORGEOUS! WOW! STUNNING! I love everything about this. Great job!
------------------------------ Bonnie~Proud Fan Club Member~Marine Wife My Gallery~One of Kota's Kids My Blog~Bonnie's Creative Corner Every Job is a Self-Portrait of the Person Who Did It. Autograph Your Work With Excellence.~Author Unknown
Registered: March 5, 2007 Location: LaMoure, North Dakota Posts: 7723
Wed, Dec 03, 2008 @ 5:37 AM
These cards are incredible. TFS
------------------------------ KAREN Now we see but a poor reflection as in a mirror; then we shall see face to face. Now I know in part; then I shall know fully, even as I am fully known. And now these three remain: faith, hope and love. But the greatest of these is love. 1 Corinthians 13:12-13