Hi everyone, here is one of my Christmas cards for 2023. This is also my card for the following SCS Challenges: Christmas Cards December CCC23DEC with the theme "Your Beautiful Cards" - see this link for the details ---> December 2023 Christmas Card Challenge by annsforte3 at Splitcoaststampers - AND the Free for All Friday F4A710 Clean and Simple Christmas from September - see this link for the details ---> F4A710 Clean & Simple Christmas by Jeanne S at Splitcoaststampers - AND the August Fan Club Challenge by Angie - ohmypaper! - the theme of which is a secret unless you are a Fan Club Member - so why not join up & play along?!! You get loads of Challenges to play along with and you are supporting this amazing site for a very small fee to keep it going for everyone. Bonus is that your uploads upload straight away without having to wait :-)
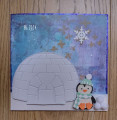
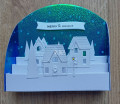
To make my card, I first masked off the top section on a piece of Lavinia Stamps multifarious card with blue painter's tape so I could ink-blend my background. I used my Tim Holtz round ink blending tool to blend Distress Oxide inks in the colours Wilted Violet, Shaded Lilac and Tumbled Glass. I removed the tape then heat-set it using my heat-gun. I stamped my Lavinia Stamps Tree Branch using Altenew Obsidian Black pigment ink. This ink is my favourite for stamping silhouette images as it gives excellent coverage. I heat-set the image so I didn't end up smearing it as I am such a clumsy person no matter how hard I try not to be!
I added some White Puffy Paint which I bought recently from KMart (Australia). I heated it and watched the magic as it puffed up to look like snow.
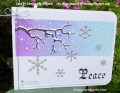
I masked off the card again around the ink-blended panel and splattered the panel using a White Posca Pen and heat-set it because I would smear it for sure!
I stamped the sentiment then added various silver glitter cardstock diecut/punched snowflakes of various brands. I have a container full of punched/diecut snowflakes ready for my cards as I do multiples when I make them. I added tiny Silver Couture Creations rhinestones to the snowflake centres. I rounded the RH corners with a We R Memory Keepers 1/2" Corner Chomper then added the panel to a card base and tied on some silver twine.
Thanks for having a peek at my card! You are welcome to visit my blog Instead of Ironing Blogspot - this link will take you to my Blog Post ---> https://instead-of-ironing.blogspot....as-card-1
Date: Saturday, December 30, 2023 GMT Views: 390
Favorited:0