This is the 2nd version of the same watercolor stamp! I am posting both today. Pretty much the same write up for both except for the way I finished them off.
I recently was able to attend our recent Stampbooking Convention (because I also worked at one of the booths) and I was able to get a few new toys. This Rubbernecker stamp was on sale and it was being demo'd at the booth. It looked so easy (probably because she had done it at least a 100 times) and she got such beautiful results that I decided to try my hand at it. SO it came home with me. One trash can FULL of rejects later... I had two cards that I felt turned out the way I wanted them to.
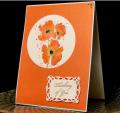
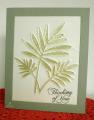
I first embossed the lined image in Gold (Ranger Fine detail, it is a two step image) and then began to work with getting results with the solid "watercolor" stamp. I cheated and used my stamp-a ma- jig to get it in the vicinity of where it should go. (The person who demo'd it DID NOT use one). The splatters you see are on the stamp and I cannot take credit for them. I cut out a circle to encompass the image, in my polka dot dp with the Spellbinders circle die. (IRL the embossed border showed up really well) I glued the image to the back of the dp and then mounted to a white card. I then got out those pesky little micro beads, remembering my last disaster of spilling them and I was SOOO careful, but still managed to knock over the bottle on my desk. I was able to get most of them back into the bottle. The idea to add them to the centers of the poppies was my husbands. Good idea...poor execution!
I used the method of smearing your distress pads on the craft sheet and spritzing it to get my watercolor effect. (Smooshed the solid stamp into it) I think perhaps my water color is a little TOO precise and should have more bleeding... I need to work on that!
I then cut out my Spellbinder sentiment holder and embossed the thinking of you in gold and popped it for a little dimension. Last I added three gold enamel pearls to finish it off. For some reason in this photo the card appears warped...not so IRL!
Thank you for stopping in today! It is always appreciated.
Date: Monday, November 3, 2014 GMT Views: 1868
Favorited:12
Registered: September 21, 2006 Location: In the beautiful Sequatchie Valley, Home of the Paper Clip Project - The National Cornbread Festival Posts: 26563
Registered: December 15, 2011 Location: Abilene TX Posts: 11275
Sun, Nov 09, 2014 @ 1:31 PM
Peggy, these are both so beautiful! I have this stamp set and have never been happy with my results when using it. Thanks so much for inspiring me to try it again! And thanks always for your sweet comments, they are truly appreciated!
------------------------------ JodyLynn - "Love me - love my cats!" DTGD12, DTGD14, HYCCT12, HYCCT13, HYCCT14, HYCCT15, Love Fest 2013, Love Fest 2014 CAS and CC guest designer QFTD 258
Registered: September 21, 2006 Location: In the beautiful Sequatchie Valley, Home of the Paper Clip Project - The National Cornbread Festival Posts: 26563
Registered: July 9, 2008 Location: Stars Fell on Alabama Posts: 75006
Sun, Nov 09, 2014 @ 1:59 PM
Beautifully water colored poppies, Peggy, and the colors are just awesome. I know what you mean about those pesky micro beads. I've had one or two accidents with those things, too. Not a good thing!
Sure, you may case my Christmas Bow card and I'm sure yours will be gorgeous with any additions you make.
------------------------------ My Blog---My Gallery---My PinterestI'm a Punchkateer! (Prez) FOREVERDirty Dozen Alumni2014 CAS Spring DT--- Inspiration Challenge Co- Hostess 12/02/17-12/28/19 Watercolor Wednesday Design Team Hebrews 13:2Brenda
Registered: January 20, 2010 Location: Brampton, Ontario Posts: 26180
Sun, Nov 16, 2014 @ 12:59 PM
A beautiful colour to showcase this stunning image! I can well imagine a field of bright orange poppies waving in the breeze. I have never tried a multi step stamp before. This is very inspirational not withstanding your trials and tribulations! I love the contrast of the light circle on the dark background. So very beautiful Peggy!


 You've really done a fabulous job