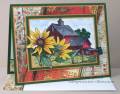
Measurements: image panel - 3 5/8” x 2 ½” plus 1/16 and 1/8” borders, diagonal red is 3 5/8” from corners to the opposite side on both top and bottom, the mustard border was cut ¼” smaller than the base and the designer paper was cut 1/8” smaller than the mustard border panel
I love old barns and churches and I donÂ’t think I could ever have too many rubber images of either one. This Sunflower Barn comes from Impression Obsession.
Ink: Memento – Tuxedo Black, Stampin Up – Bashful Blue
Accessories: nailheads, thread, Aleene’s tacky glue and Paper Glaze, Copic markers: flowers – Y15,17,19,38, E21,25,29 YG61,63,67, barn – R35,46,59,89, C2,3,5,7, fence post – W3,5,7,, trees – G09,28,29, Y17, grass right of fence – G85,94,99, left of fence – YG93,95,97, YR23
The out of the box feature is very easy by cutting to the image with the regular paper cutter on the front, marking the image on the back while holding to a light source then use the paper cutter again to cut to that mark. Scissor cut the image out. My paper cutter is a guillotine style. If needed, I used a Coluzzle and craft knife to cut between the images. I do have a pictorial on my blog if you need photos, click here. ItÂ’s a direct link to the tutorial.
The nailheads are attached with AleeneÂ’s Paper Glaze (any lacquer product will work). To make the process fast and easy I squeeze a drop of lacquer onto a waxed paper (I repurpose the paper that stickers and labels are purchased on), touch the end of a large corsage pin to the lacquer then to the back of the embellishment which picks it up, position it on the card and press down with a finger, there is a little time to slide the embellishment into position if needed before it sticks tight.
The stitching was done with the sewing machine however it doesn’t show up very well. The 1/16” strip of cardstock between the stitch lines was attached with Aleene’s tacky glue and I also did the same on the insert and envelope next to the designer paper strip.