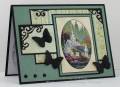
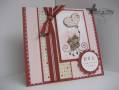
Measurements: image panel including borders – 2 5/16 x 3 11/16”, small left panel - 1 7/8 x 1 9/16, large bottom panel 4 ¼ x 3”, all my panels are placed 1/8” for the solid green panel’s edges.
-Prismacolor pencils, baby oil and paper stumps were used for the image. The panel is cut on the edge of the black border which is on the stamp image.
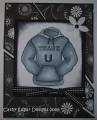
-I used a VersaMark pen to ink up the image for the inside stamping. It did pick up some the VersaMark that didnÂ’t thoroughly clean off the rubber but is still light enough to write over without a problem.
-A Cuttlebug die cut from the Vintage Corners set was used for the filigree and attached with tacky glue. Both the corner pieces are the same die but the right one is cut smaller making it more versatile.
-Martha Stewart butterflies are paper sculpted using a metal ball stylus and paper towel for cushion. I score the front, flip it over and emboss the back.
-I needed to match my stamped backgrounder to the color of the designer paper so I first inked up the rubber with Going Gray, stamped it off, inked the rubber with Cool Caribbean without cleaning and stamped on white. Once stamped, I sponged Old Paper distress ink over the panel. It was also sponged on the outside of the oval and I added a little to the designer paper so all three coordinate.
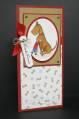
A tip for coloring Thomas Kinkade images: Do an online search for the painting of the image youÂ’re working with. I set my tools up right there in front of the computer screen and use the painting for reference through the coloring process.
Also make sure the paper stumps youÂ’re using are very firm and thin tipped.
Paper: White, Archiver’s – black, My Mind Eye – Floral Stripe 2007
Ink: StazOn – Jet Black, Ranger – Old Paper distress ink, Stampin Up – Cool Caribbean, Going Gray
Accessories: Brads, Stampin Up mat pack, Making Memories paper piercer, Martha Stewart butterfly punch, Cuttlebug – Vintage Corners die cut, sponge, tacky glue, metal ball stylus (two sizes), paper towel
Techniques: paper piercing, paper sculpting, sponging
Registered: May 15, 2005 Location: Arlington, Washington Posts: 30400
Tue, Dec 30, 2008 @ 10:09 PM
Roxie!! what a stunning creation.. thanks for the great details on how you made this wonderful card..I love how you cut apart the corner dies and made three different ones.. what a super idea... your card is Fantastic, your coloring is perfect! tfs!!
------------------------------
Judy
DT for Sassy Cheryl's Fan Club Member
" If you have a talent, use it in every which way possible. Don't hoard it. Don't dole it out like a miser. Spread it lavishly like a millionaire intent on going broke. ~Brendan Frances~
Registered: September 15, 2007 Location: Wauconda, IL Posts: 11470
Tue, Dec 30, 2008 @ 10:09 PM
Absolutely STUNNING! Love your corner placements and the butterflies. I see a peek of something inside, too ... hmm ... love that you used negative punch piece for the 'bow' on top. Beautiful card!
------------------------------ Collette Heaven Sent For You (my blog) DT Member for Bearly Mine Designs digi papers
Registered: March 7, 2004 Location: on location with SCS in Central California Posts: 34458
Tue, Dec 30, 2008 @ 10:10 PM
Oh my word Rox!! This is just gorgeous! I think this is the best Thomas Kincade coloring I've seen yet. Never thought to do a search for the painting to see how he painted it, will have to do that in the future. Thanks.