Registered: May 31, 2006 Location: Chatham, Ontario Canada Posts: 497
Wed, Jul 02, 2008 @ 5:44 PM
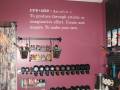
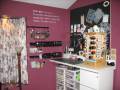
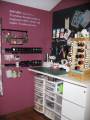
The wall decor is kind of like a giant rub-on. The only difference is that you first put it on the wall with the backing paper still on- just as a guide. Then you mark the wall where you want it to go- I was careful to measure from the top of the wall (where it meets the ceiling) to make sure it was level- they said to mark t he middle to, but I disregarded that- I figured if the top was straight the rest should be too I made three pencil markings at the top. Then you take it down again, flip it over on a flat surface and rub over the entire thing so that the letters will stick to the backing- they have a special tool for that, but I used my Pampered Chef scrubber for their stone wear- it worked great! Then you peel the backing off slowly, holding it straight up, but at a 45 degree angle (pulling the corner down toward you) Once all the letters are transferred to the sticky backing sheet, you put the whole thing on the wall carefully and then rub it on with the stone wear scraper (or the tool if you have it) Then you carefully peel off the backing sheet and the letters stick beautifully to your wall. I did spray and wipe the wall first to make sure it was clean. All the directions are also on the Stampin'Up website. he rest of the stuff on the wall is just from the kitchen department at IKEA- I got that idea from a Stampin' Success magazine a while back. It is especially great for storing and displaying punches- you nevere have to search again! The black thing is just a peg board from the hardware store. It is nice to have your tools in sight for easy access.


 I made three pencil markings at the top. Then you take it down again, flip it over on a flat surface and rub over the entire thing so that the letters will stick to the backing- they have a special tool for that, but I used my Pampered Chef scrubber for their stone wear- it worked great! Then you peel the backing off slowly, holding it straight up, but at a 45 degree angle (pulling the corner down toward you) Once all the letters are transferred to the sticky backing sheet, you put the whole thing on the wall carefully and then rub it on with the stone wear scraper (or the tool if you have it) Then you carefully peel off the backing sheet and the letters stick beautifully to your wall. I did spray and wipe the wall first to make sure it was clean. All the directions are also on the Stampin'Up website. he rest of the stuff on the wall is just from the kitchen department at IKEA- I got that idea from a Stampin' Success magazine a while back. It is especially great for storing and displaying punches- you nevere have to search again! The black thing is just a peg board from the hardware store. It is nice to have your tools in sight for easy access.