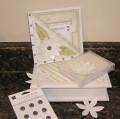
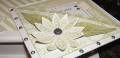
1....Stamp Doodle This flowers on Naturals White Cardstock in Versamark/White Craft ink & emboss with white e.p.
2....Paint flowers with a Mix of: River Rock ink, water, & Lumiere (You can add pearlex if you like, but Lumiere is nice on its own too--that pearly sheen is subtle but pretty)
3...Dry with heat gun & cut out flowers. (Curl them with fingers--if desired)
4...Punch holes in 2 flowers & add center embellishment. I've used a rivet from Scrapbook Interiors. It just snaps right on
5...Make leaves (see bellow)
6...Cut card (6 inches square) & cut triangle pocket (from a second 6 inch square--Use the other half to cut the triangle mat for stamping) Cut remaining pieces for layers.
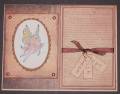
7...Add eyelets to triangle pocket (trace template for spacing OR mark placing with a pencil.)
8...Stamp on accent pieces (I've used Baroque motifs and River Rock ink.)
9) Create scallop along back of eyeleted triangle using a circle punch--(See this post for how)
10) Add the Twill tab to the slidey-out section (between layers)--& more eyelets too!
11) Stamp the layer for the back section of the card (I've used a piece of Naturals Ivory to contrast the Naturals White a little.)
12) Finally, adhere the works :0)
To make leaves super easily:
A) Draw (or stamp) a leaf shape on River Rock cardstock.
B) Fold it over & cut out two at once.
C) Moisten the leaf with water & crumple it in your hand.
D) While wet, flatten a little and pat with the River Rock stamp pad. Dry with heat gun.
E) Draw a pencil line down the center (or score a line.) Add faux stitching with a paper piercer. Marker over the line, if you like.
F) Adhere in center & fold it up a little.
Accessories: Lumiere, rivet from Scrapbook Interiors, eyelets, circle punch, hole punch, eylet setter, white e.p, Twill, pencil, paper piercer, black marker, saleabration rub-on