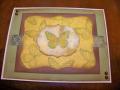
Brayer colors randomly onto glossy cardstock beginning with lightest first. I used the co-ordinating Adirondacks, and then added a splash of a contrasting color. allow colors to overlap some.
Shake Gesso well and squirt a small amount onto craft sheet. Roll brayer into Gesso, but do not cover completely.
Roll Gesso onto Glossy cardstock, leaving blothcy and uneven. Allow to dry to touch (only takes a few minutes). Be sure to wash brayer immediately after using the Gesso.
Brayer same inks on a second time, try to keep the colors in similar spots as before, allow to dry.
I randomly applied a large crackle background stamp and a script writing background stamp with the Mushroom inkpad to add a little more depth.
Be sure that the inks are dry before proceeding to the next step.
Take your medium grid sandaper (I like using the 3M sanding block as it is easier to hold and I have more control) - scrappers block will not work for this as it is too fine. Randomly sand areas of your paper to allow the brighter colors to show through, or even the white paper. Vary the pressure you use to sand for various effects.
Stamp your focal image o the cardstock and trim to desired size. Mat and embellish as you wish! I used Twinkiling H2o's to color the heart and wings.
HINTS:
This is easiest if you make full sheet backgrounds at a time and trim depending on your needs.
Experiment with colors - instead of using co-ordinating colors for the background inks, try using complementary colors for pop.
When stamping dye inks on top of gesso, the color tends to turn out lighter than you think as it is absorbed some - be sure to stamp your final image a tad darker than you intend.
This is a distressed technique - when you stamp your final image, it will bleed a tad bit over the gesso, if you want a crisp look, this technique probably isn't for you - also too detailed an image will not work well.
Experiment and have fun!
Date: Saturday, January 26, 2008 GMT Views: 262
Favorited:3