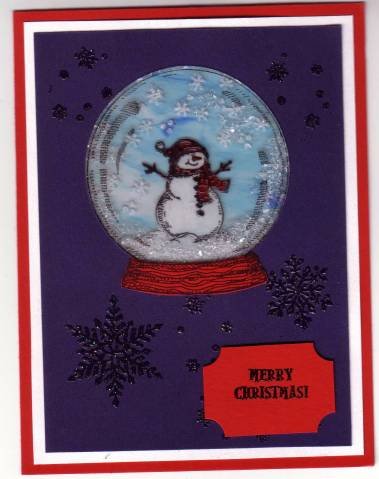
OK, this card was a little crazy. Or perhaps it was me.
I'd wanted to try the shaving cream technique, so that's what I used for the backing behind the snowman.
I had recently purchased the Snow Globe set, so it was new to me, even if it is an old set. And I saw the Snow Globe tutorial on this site and thought I'd try to modify it to suit a card.
Definitely crazy.
The snowman was stamped with black craft ink on a transparency - the sort of thing that you use in an overhead projector. I used clear embossing powder on it and heat embossed it, and then used Sharpie permanent markers for the colors on the back side and white craft ink. (Warning: at this point, I discovered that SU white craft ink resists drying on a transparency. For all I know, the ink inside this card is STILL wet.) If you try this technique, you might want to use a white gel pen instead. (I don't own one, or I would have!)
The globe itself was stamped in black craft ink on a clear transparency and heat embossed as well.
The card was assembled in layers. First, the globe against the opening in the blue cardstock (which had already been stamped with Versamark & clear embossed). I added red tacky tape around the circle, then put a small quantity of Dazzling Diamonds in the center. Next I added the white layer (with a circle larger than the one on the front) and the snowman transparency layer. I put more tacky tape around that layer with another small quantity of Dazzling Diamonds in the center. Lastly I added the shaving cream background and taped it thoroughly before applying it to the card base.
This was a fun, but very time-consuming, card to create.
Date: Tuesday, January 15, 2008 GMT Views: 1237
Favorited:9


 If you try this technique, you might want to use a white gel pen instead. (I don't own one, or I would have!)